Set up your shop on many computers and phones
Step by step, with a picture for every step: add your staff, use two or more computers and phones with the same data, work from different shops, and let the owner see everything from home.
Which setup do I need?
| Your shop | Use |
|---|---|
| Everyone works in one shop on the same Wi-Fi | Part 1 — Same Wi-Fi. One main computer keeps the data. Other computers and phones connect to it. |
| Two shops, a shop and a godown, or the owner works from home | Part 2 — Different places (cloud). Each computer keeps its own copy and they share it through the cloud. |
| You only need to add items and make bills | Part 3 — Items and billing. |
Where do I connect? The addresses to type
| Setup | Device | Box to fill | Type this |
|---|---|---|---|
| Same Wi-Fi (one main PC) | Other computer | Backend URL (setup screen, “Client Only”) | The address shown on the main PC: Devices → This Device → Network addresses, like http://192.168.1.10:3200/api/v1 |
| Phone | Backend URL on the Backend Server screen (or press Scan QR) | The same address, or scan the QR code on that page | |
| Cloud (different places) | Computer | Hub URL (Devices → Cloud Sync) | https://www.bazaarpos.in/pos-app-backend |
| Phone | Backend URL on the Backend Server screen | https://www.bazaarpos.in/pos-app-backend/api/v1 |
localhost or 127.0.0.1 on another device. They always mean “this device itself”.Part 1 — One shop, same Wi-Fi
One computer (the main PC) must stay switched on while the shop is open. Every other computer and phone connects to it, so everyone sees the same items, stock and bills at the same moment — including settings.
1 Sign in on the main computer
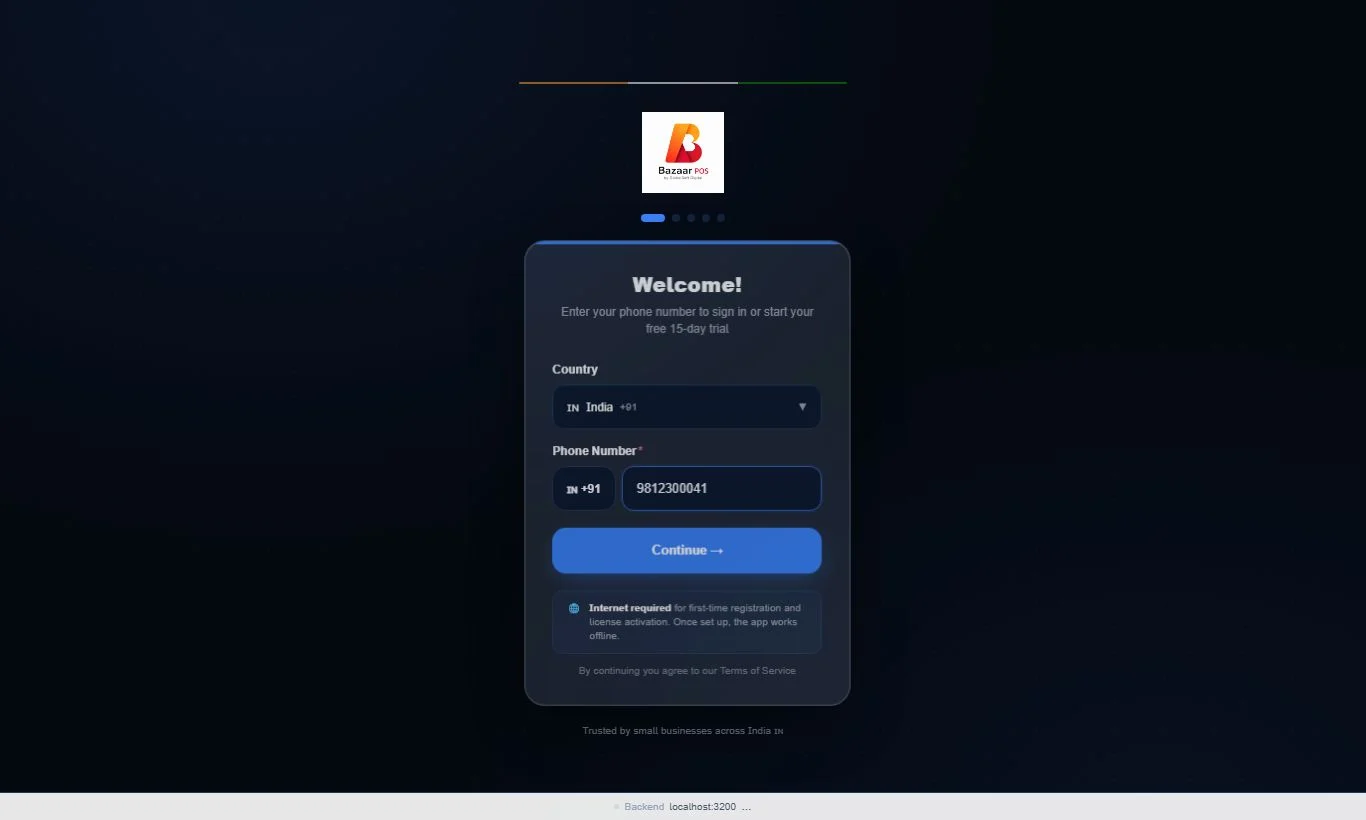
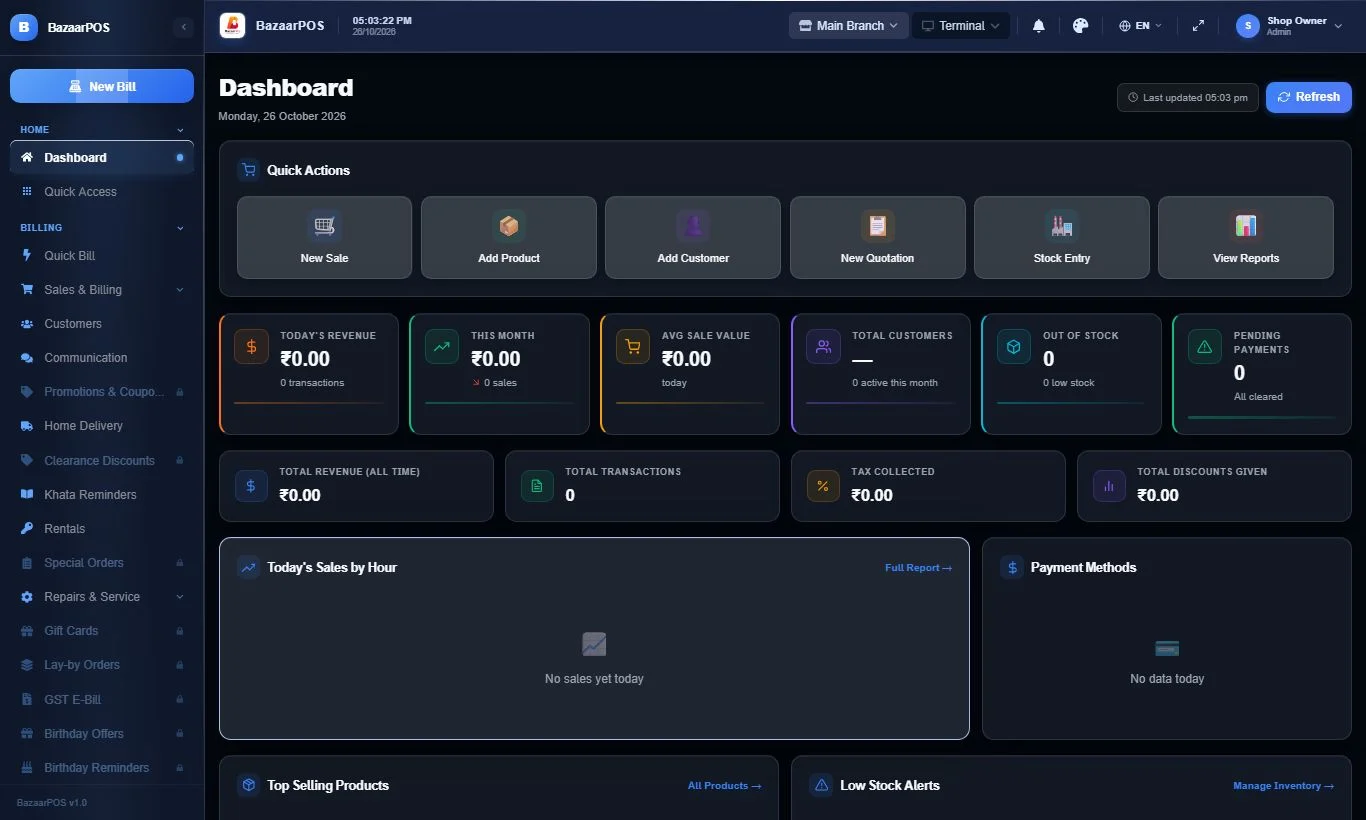
- On the computer that stays switched on in the shop (the main PC), open BazaarPOS.
- Type your mobile number and press Continue.
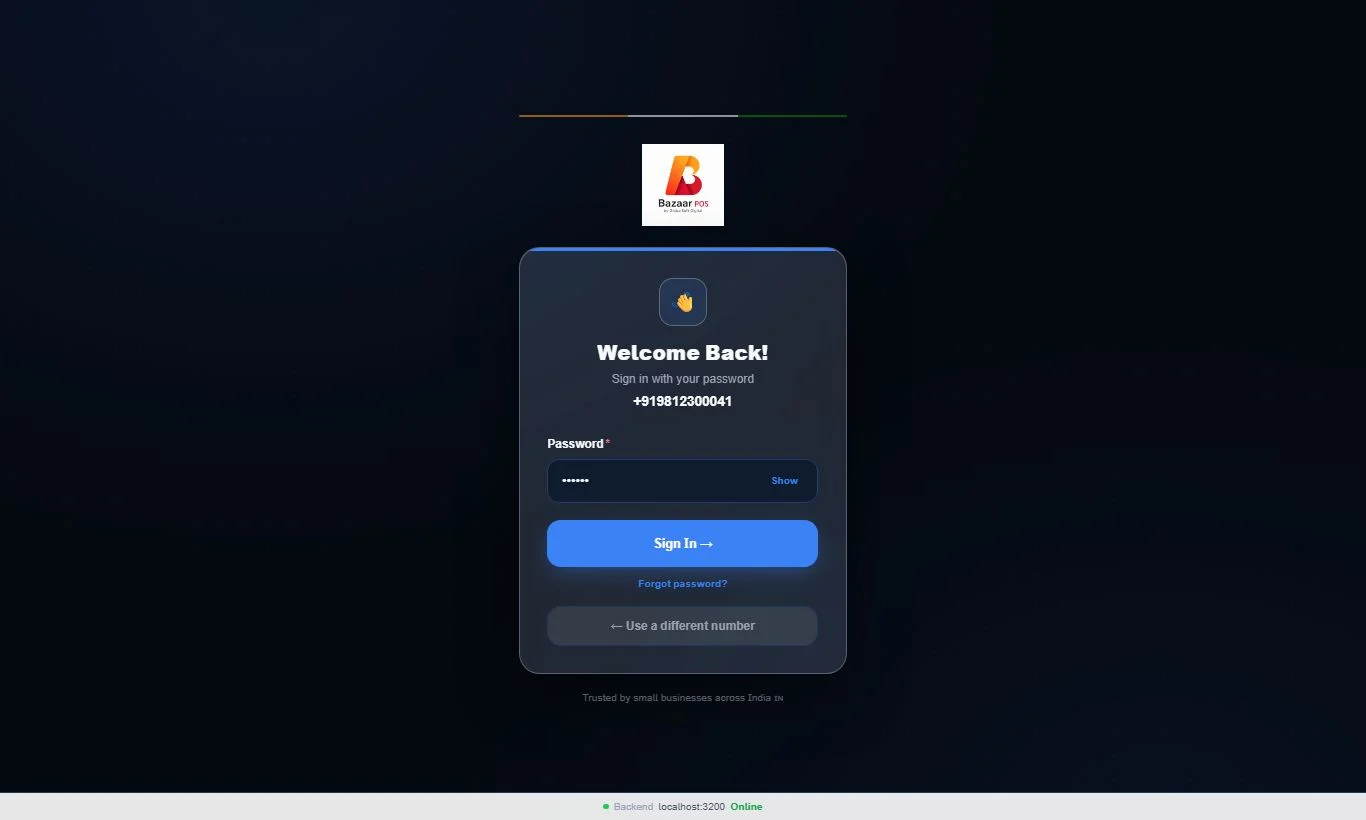
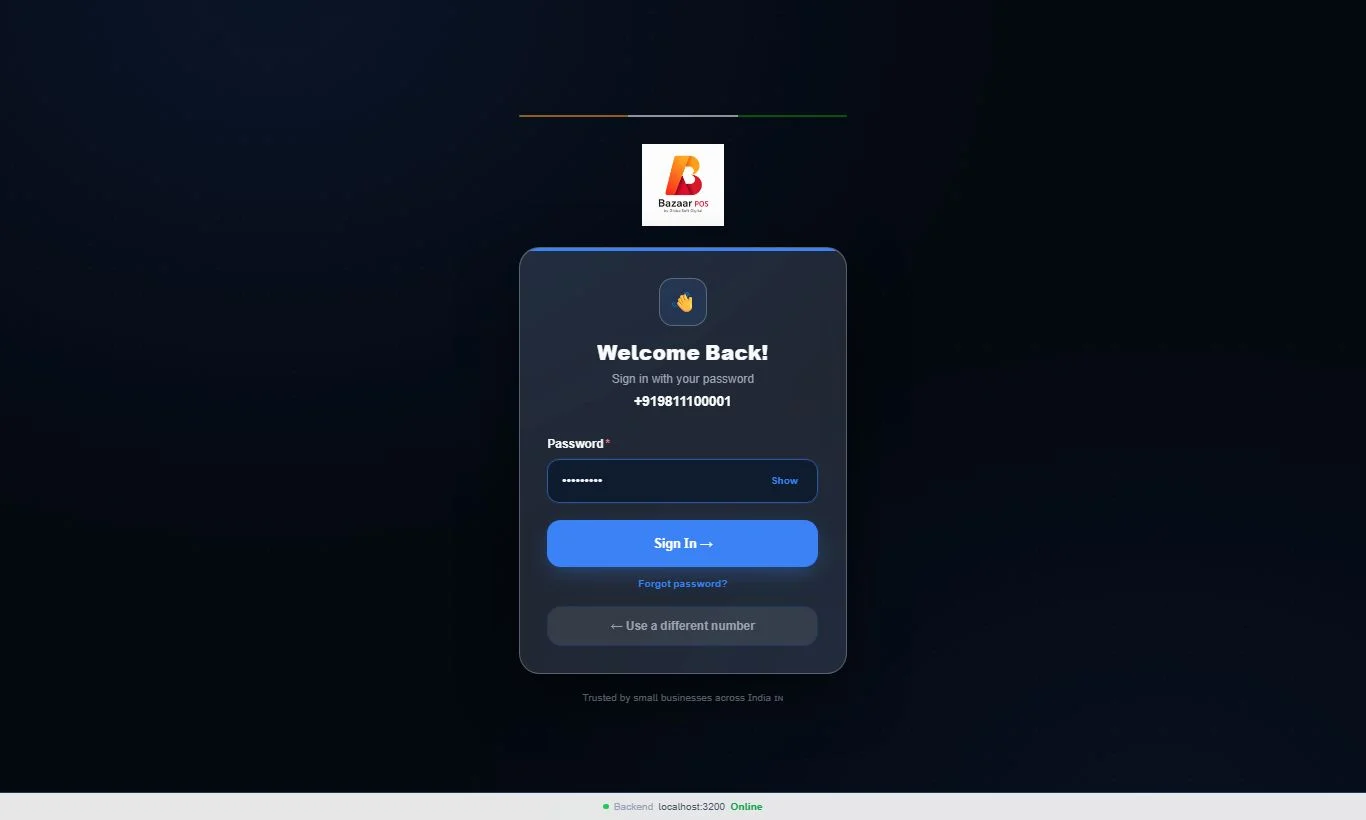
- Type your password and press Sign in.
2 Add a login for every person
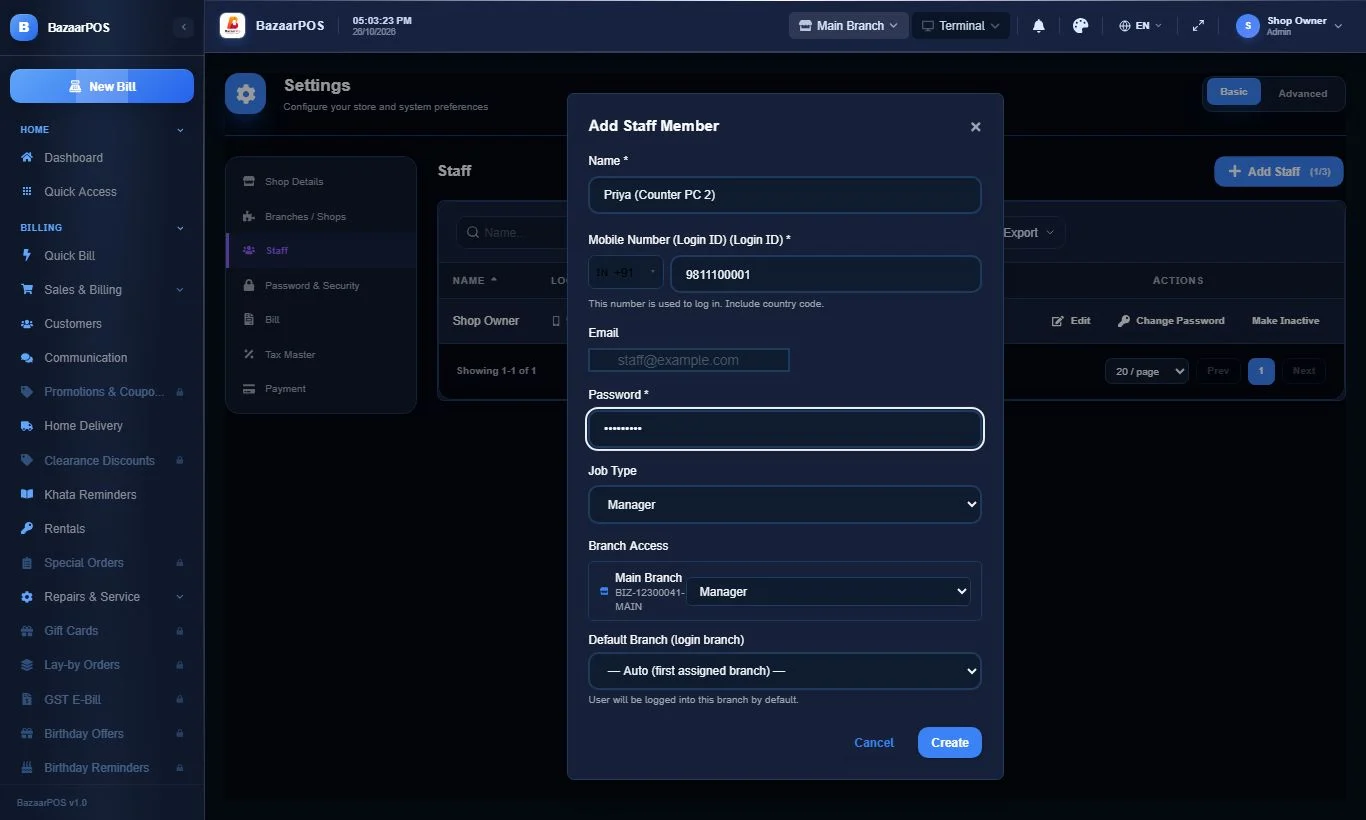
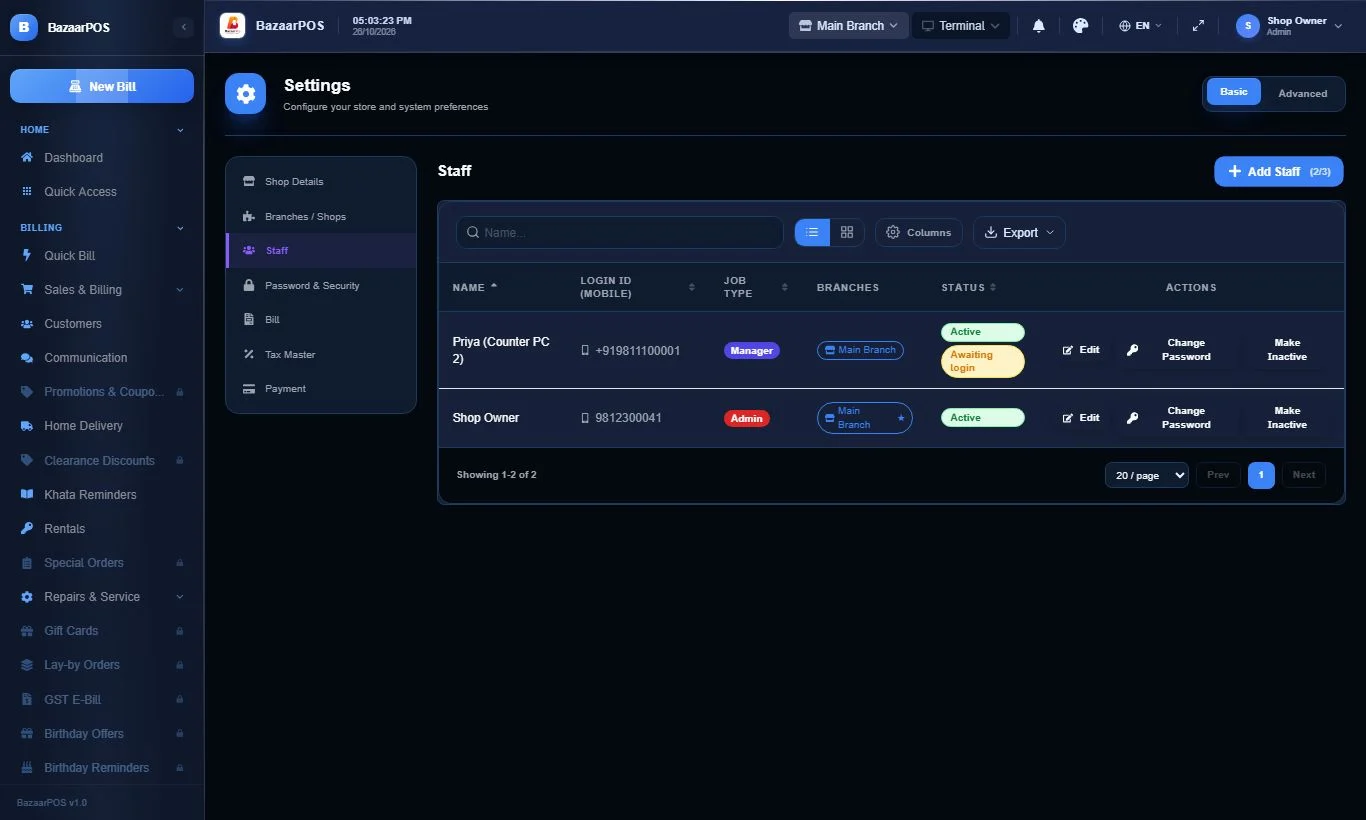
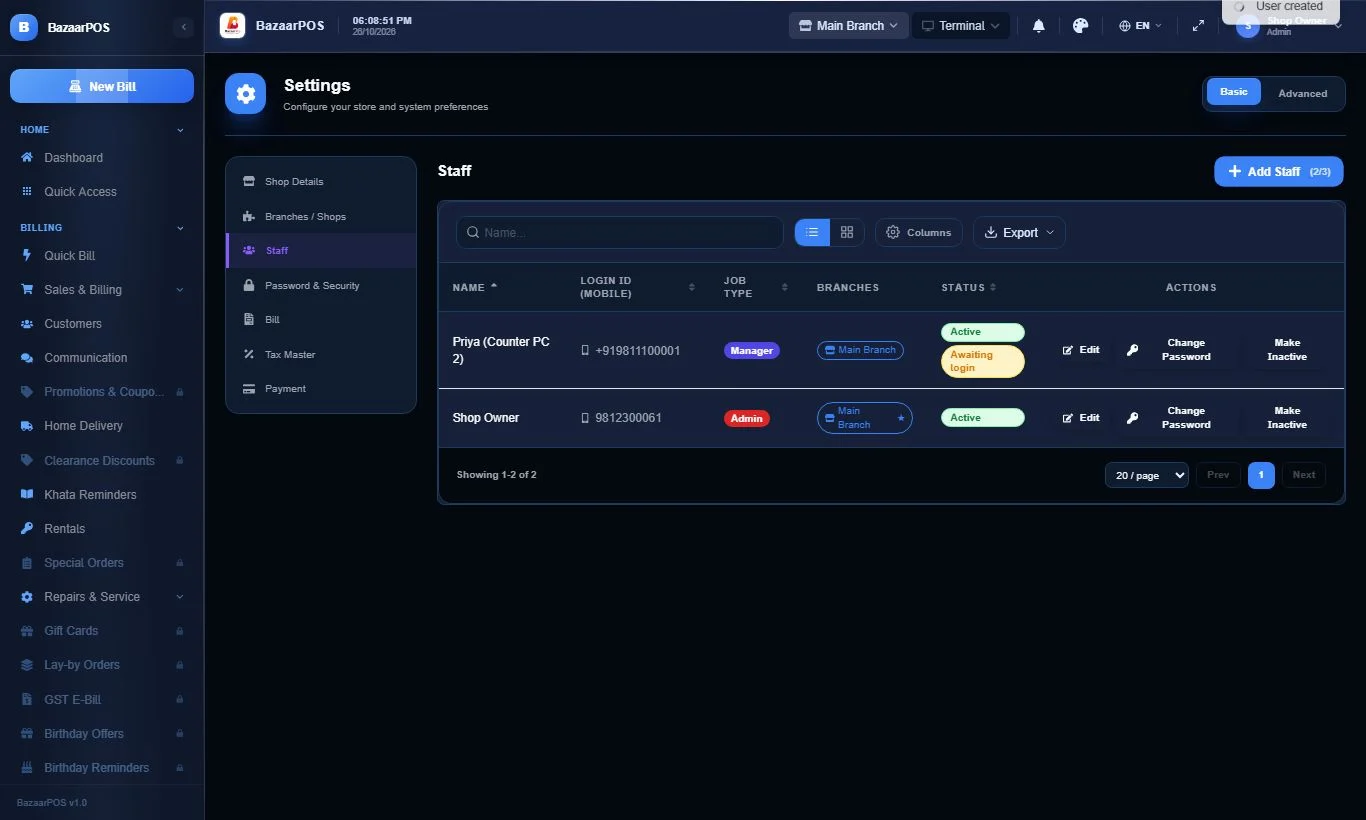
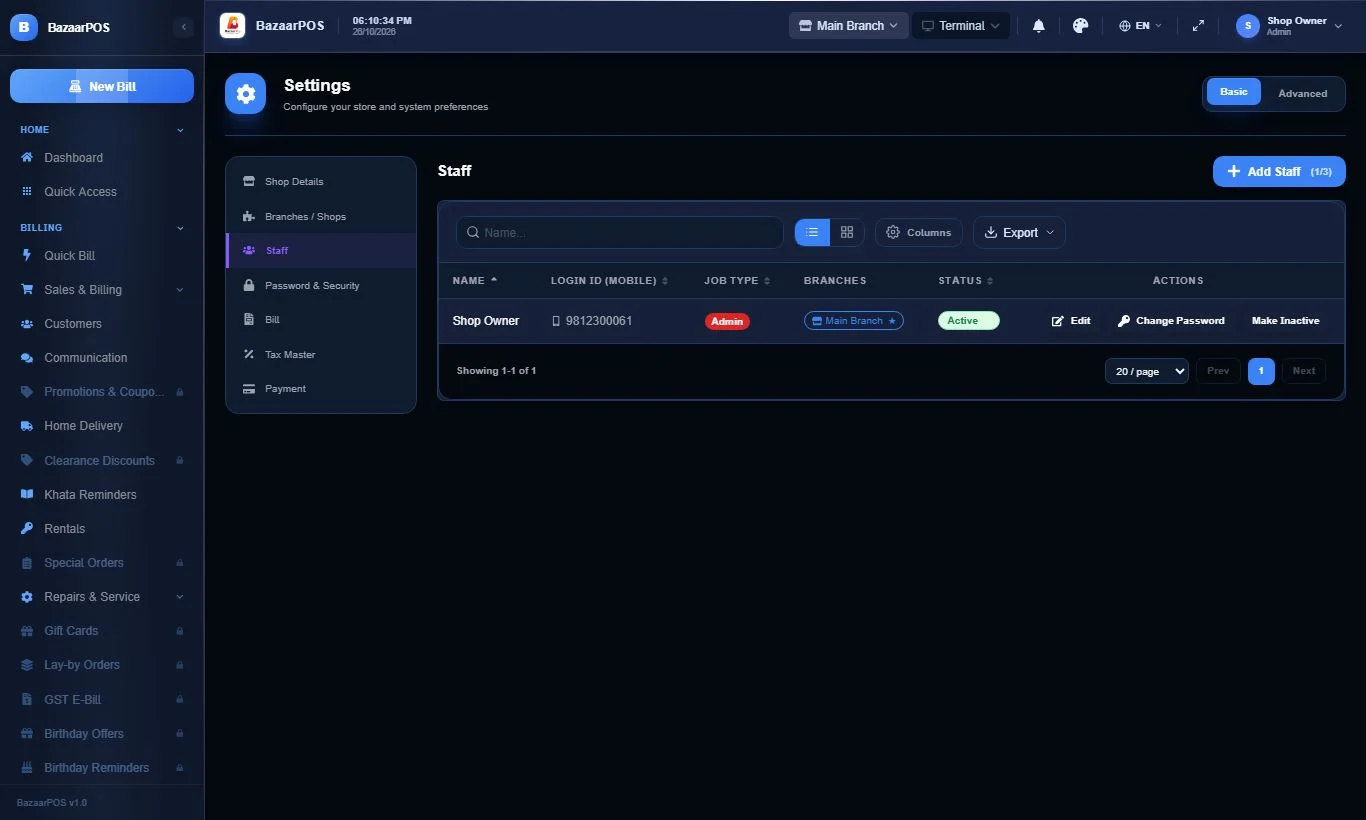
- Go to Settings → Staff. You will see only yourself.
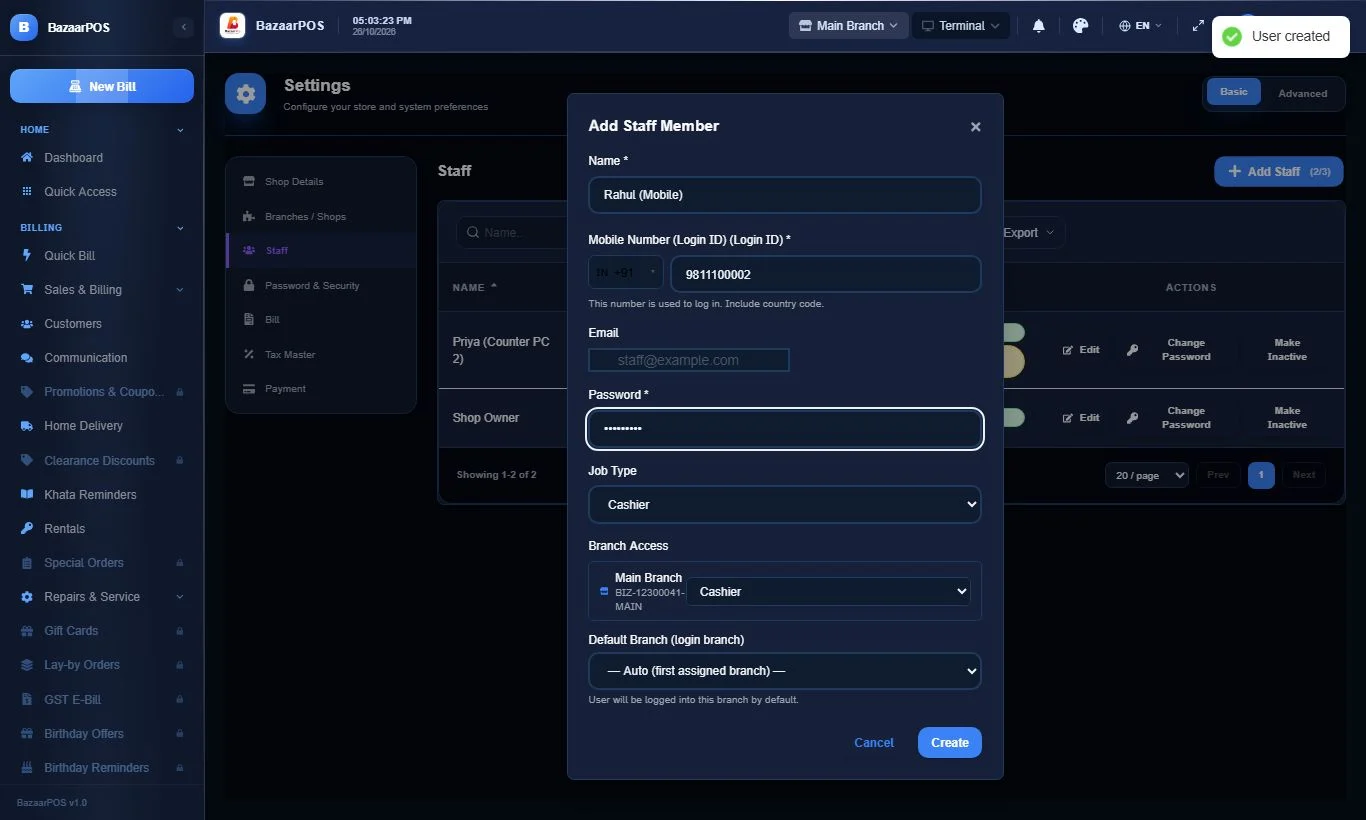
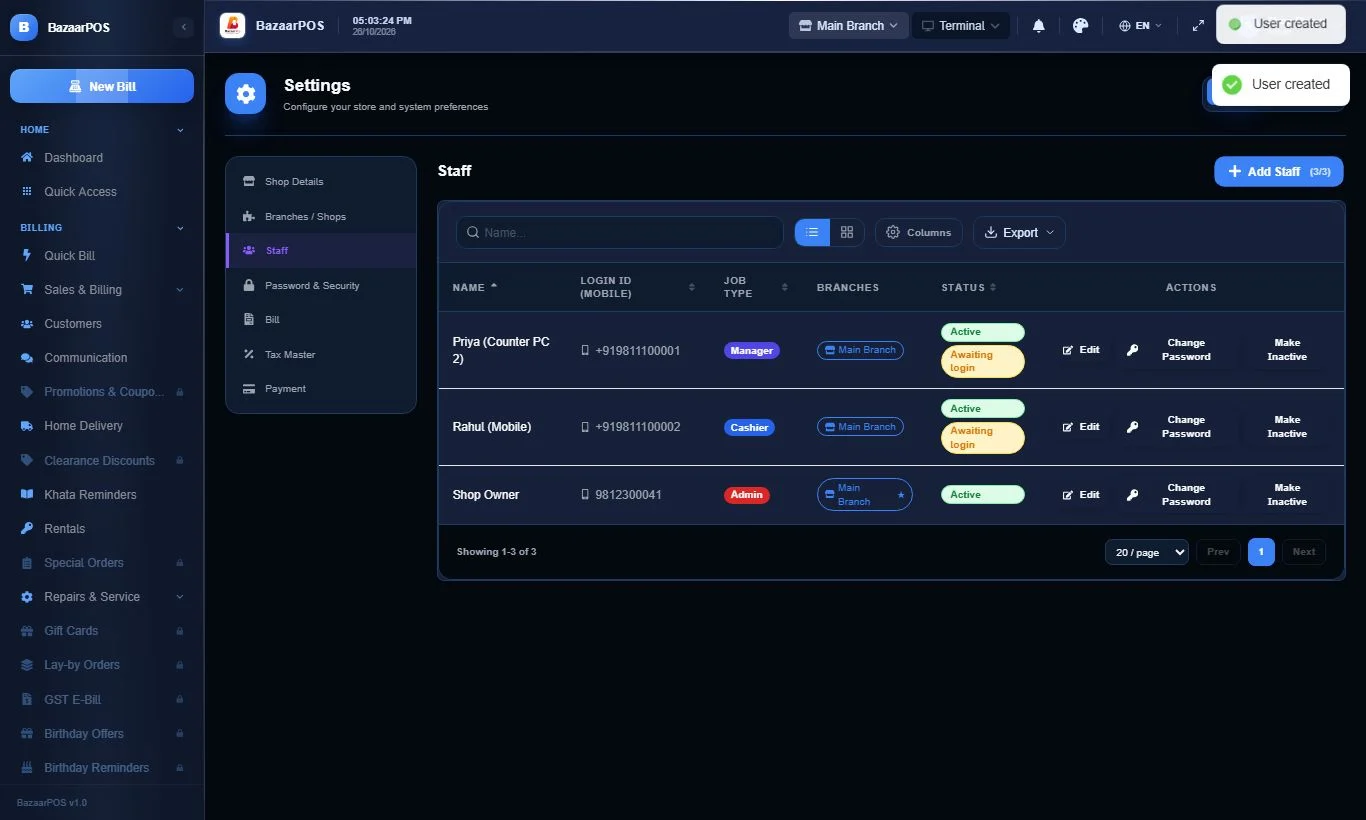
- Press Add Staff. The counter on the button (for example 2/3) shows how many logins your plan allows.
- Type the name, the mobile number (this is their login ID — keep +91 for India) and a password.
- Choose the Job Type — Manager or Cashier.
- Important: under Branch Access, pick the same job type for your shop. If you leave it on No Access, the person can sign in but cannot work.
- Press Create. Do the same for each person: one for the second computer, one for the phone.
3 Add your items once
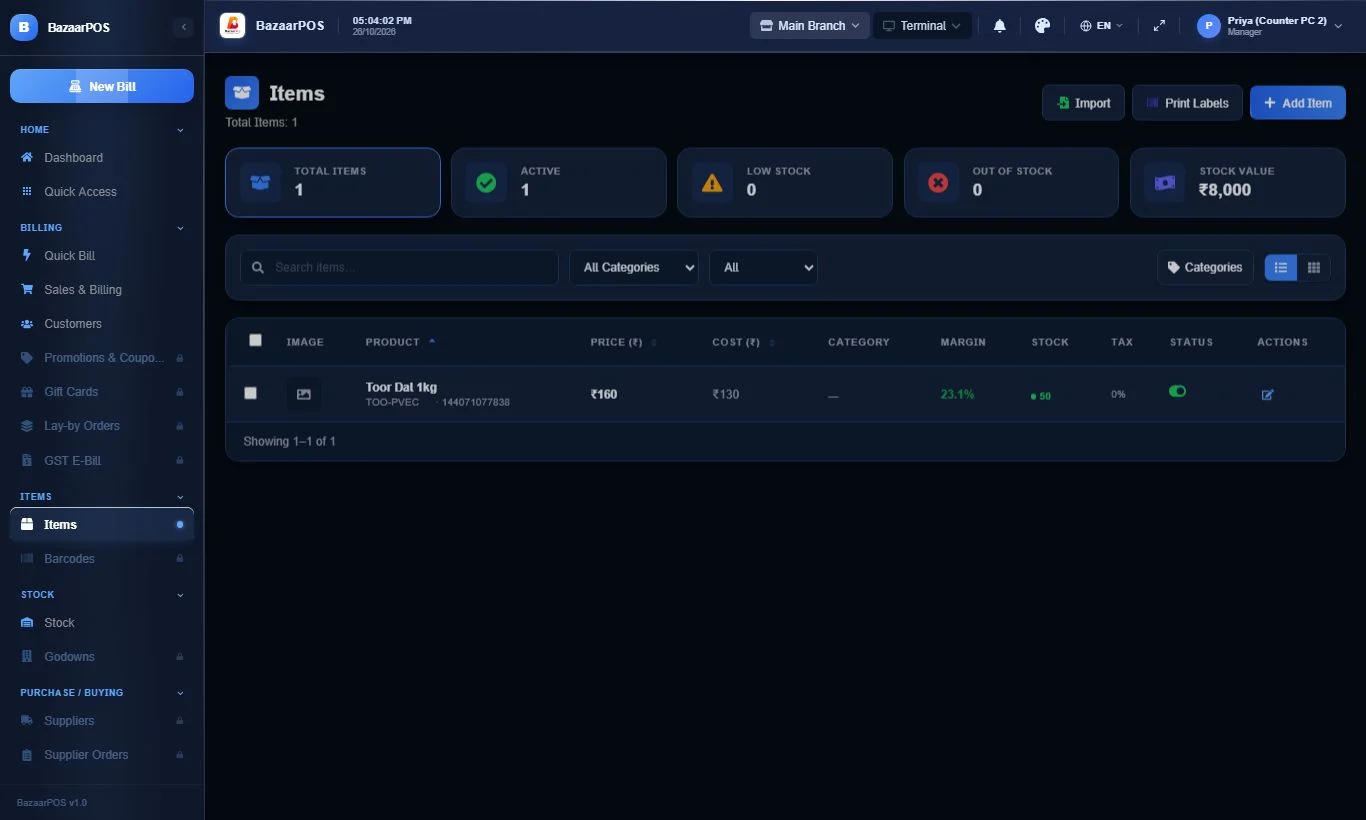
- Go to Items → Add Item. Type the name, selling price, cost price and the stock you have today.
- Keep Visibility on This branch only — this keeps the stock in your shop so it can be billed.
- Press Create Product. The item then shows in your Items list.
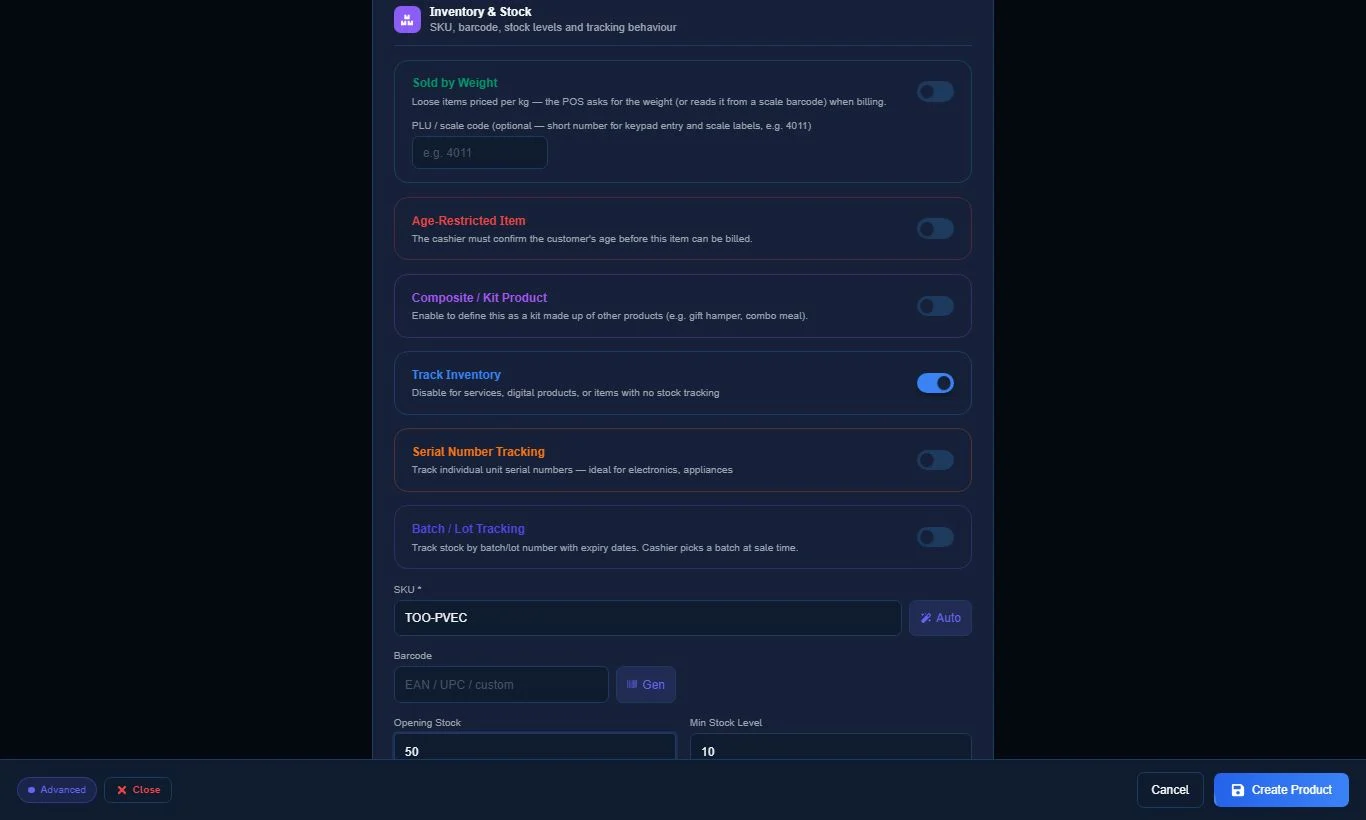
4 Find the address of the main computer
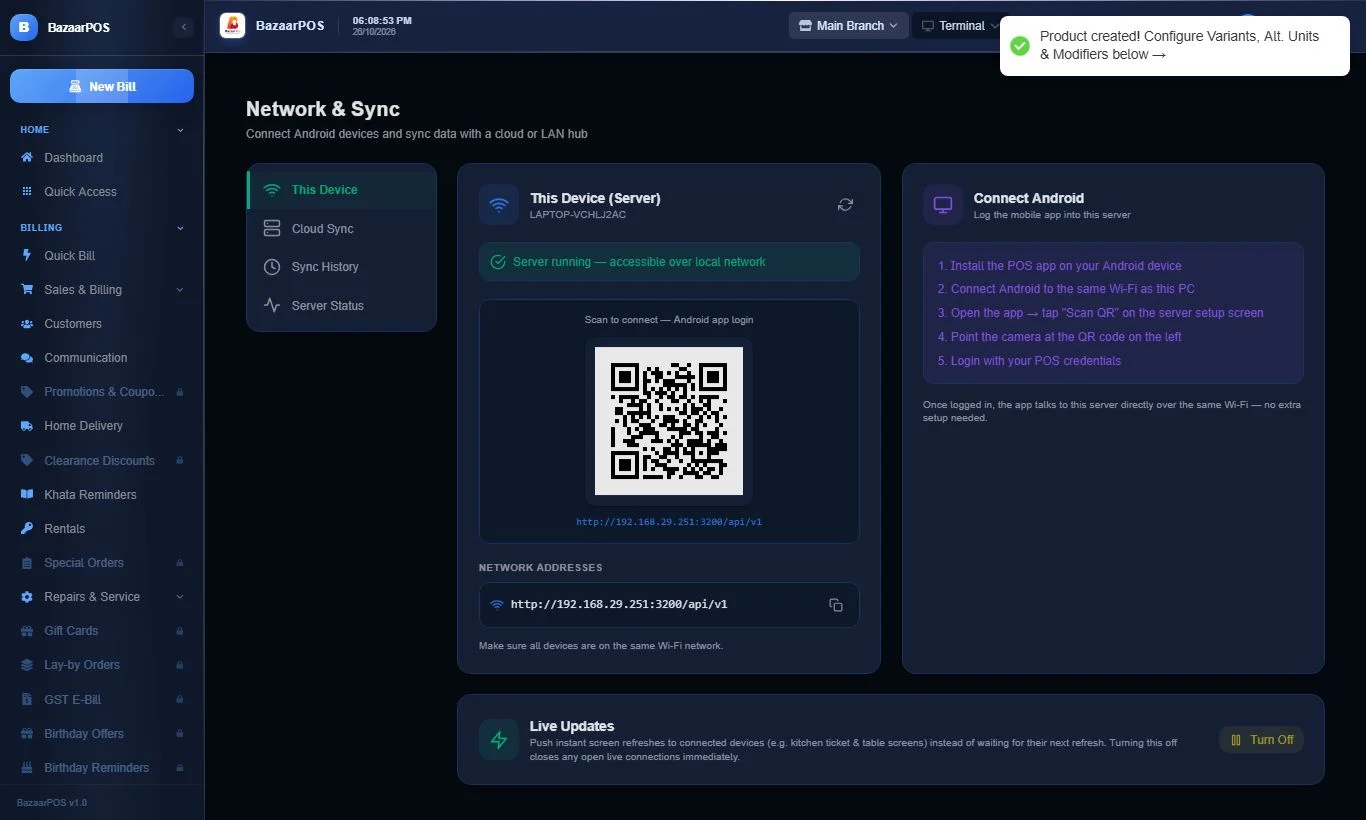
- On the main PC open Devices (Network & Sync) → This Device.
- Under Network addresses you will see the address of this computer. It looks like
http://192.168.1.10:3200/api/v1— the numbers in the middle are different for every shop. This is the address you type on your other computers and phones. Click the copy button next to it, or write it down. - The QR code on the same page holds this same address, so a phone can scan it instead of typing.
- All your computers and phones must be on the same Wi-Fi as this PC.
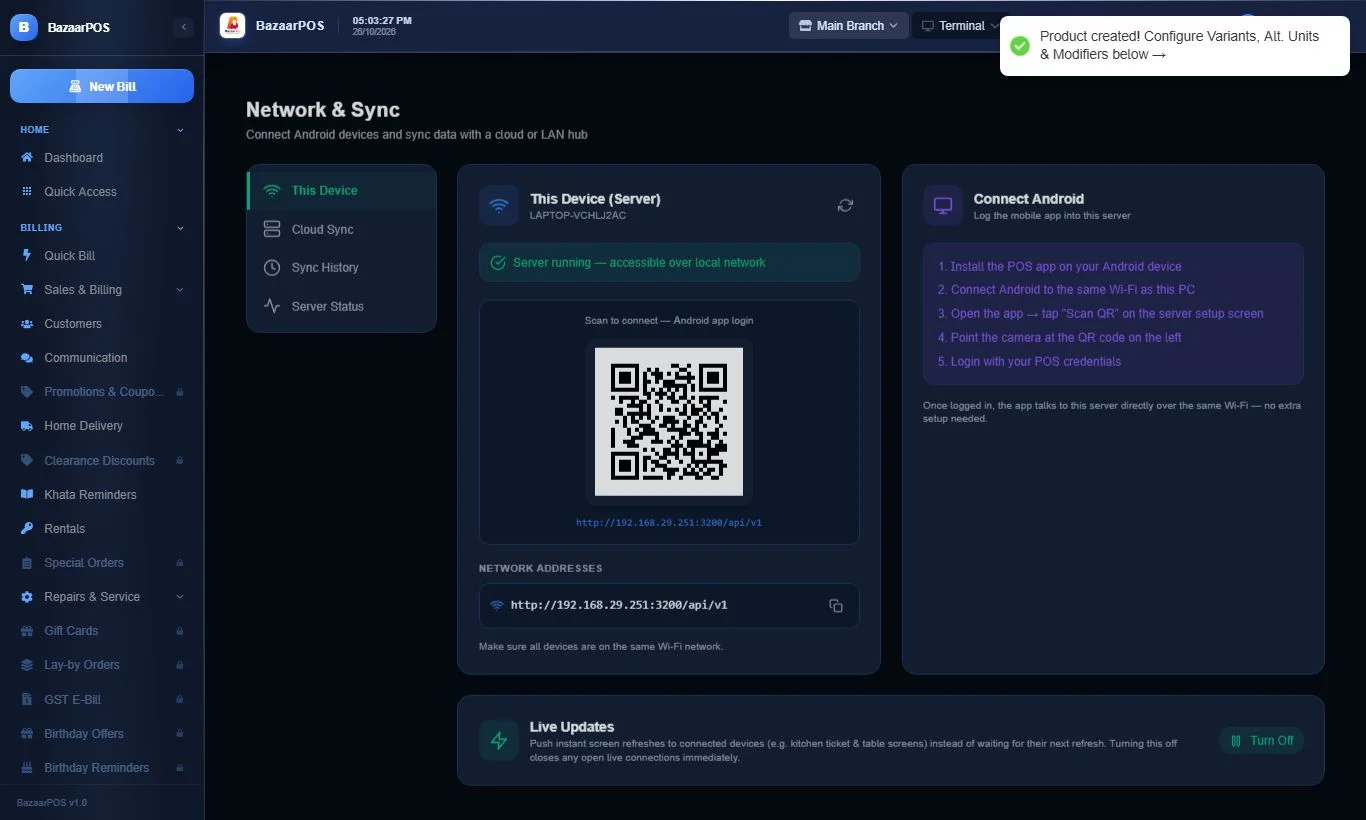
http:// and ends with :3200/api/v1. The part in the middle (like 192.168.1.10) is the Wi-Fi address of the main PC. Never type localhost on another computer or phone — it would point to that device itself, not to the main PC. If a phone cannot connect after scanning, type the address by hand.5 Connect the second computer
- Install BazaarPOS on the second computer. When the first screen asks How will this computer be used?, choose Client Only (“Run the POS app, connect to another PC's server”).
- In the Backend URL box type the address of the main PC from step 4, for example
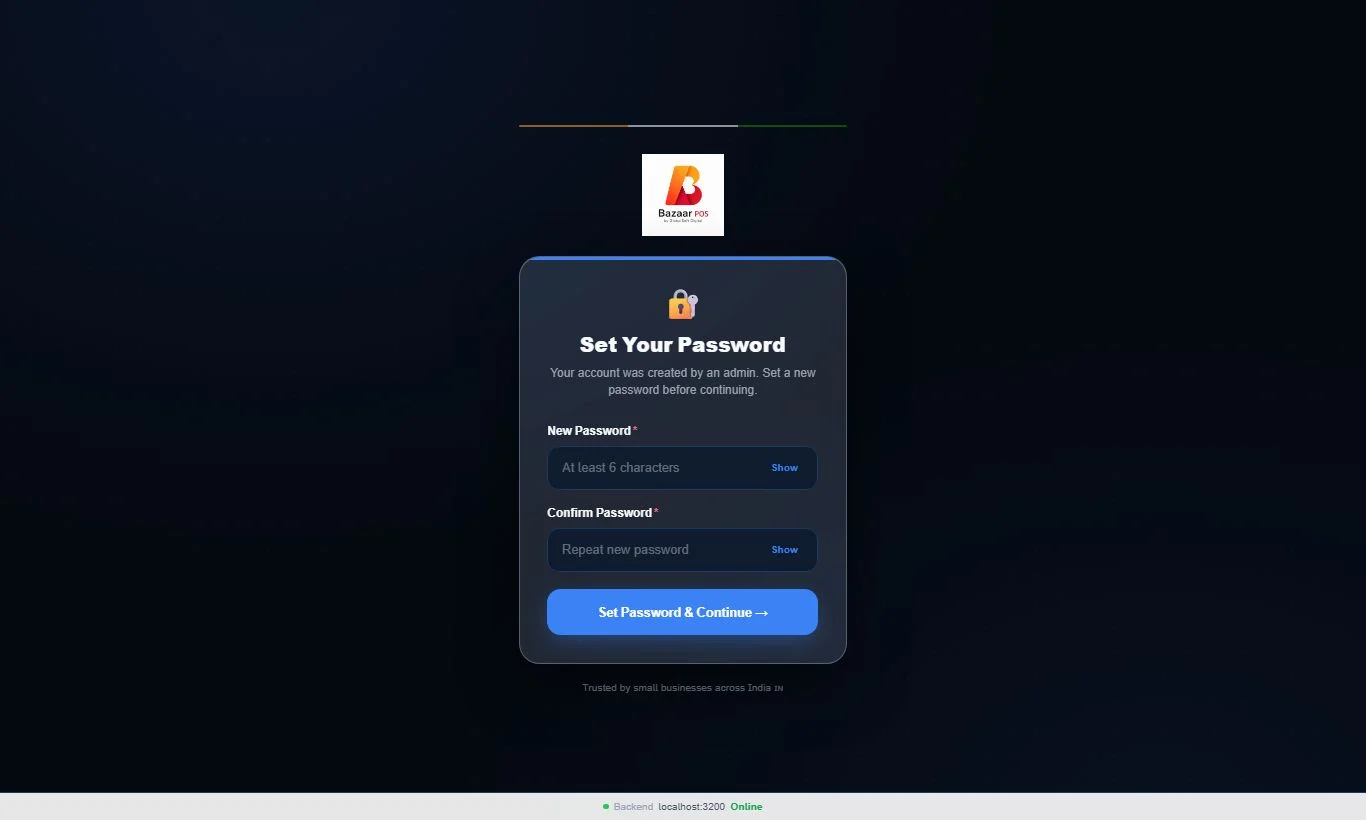
http://192.168.1.10:3200/api/v1, and finish the setup. This computer now uses the main PC's data — nothing to copy. - Open BazaarPOS and sign in with the second person's own mobile number and password (not the owner's).
6 Bill a customer on the second computer
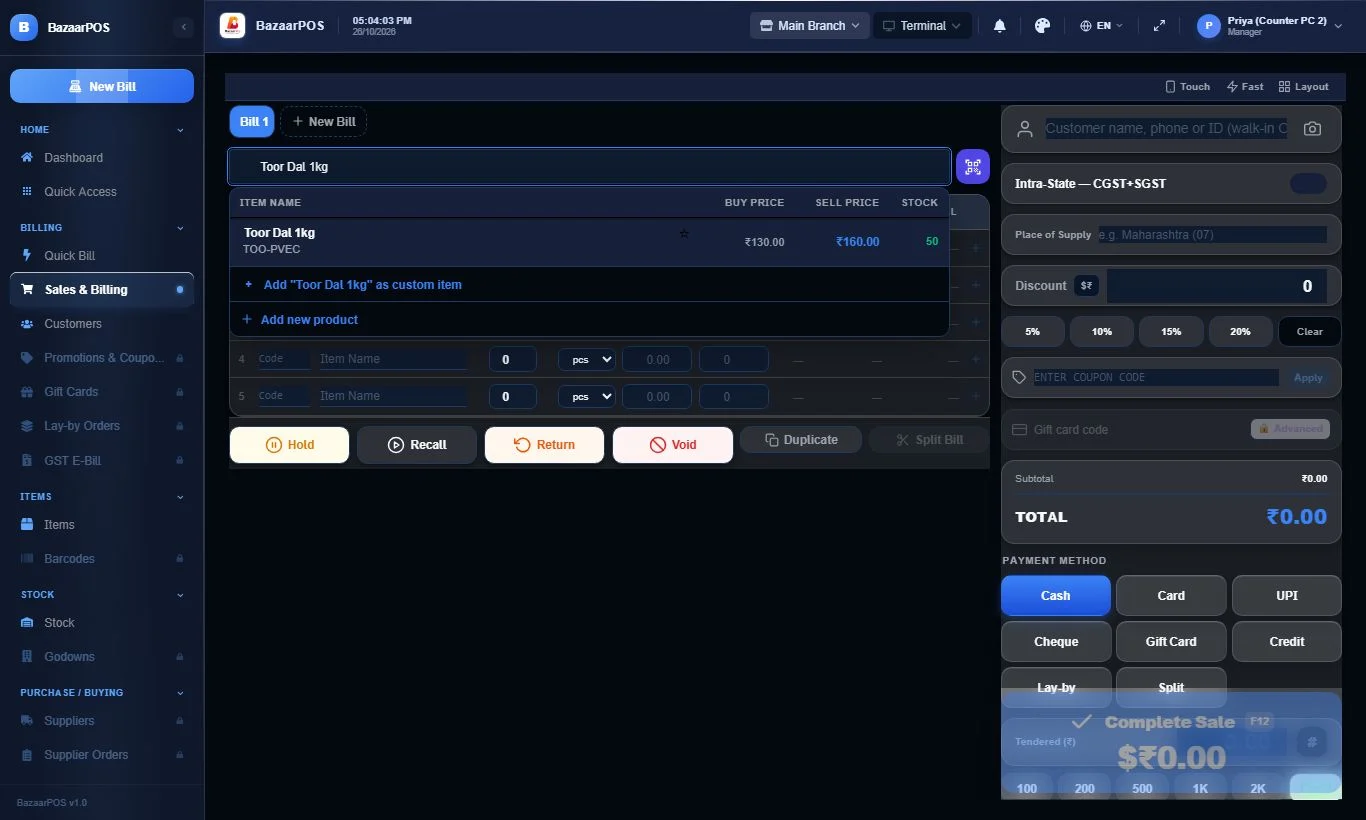
- Open Sales & Billing and type the item name in the search box.
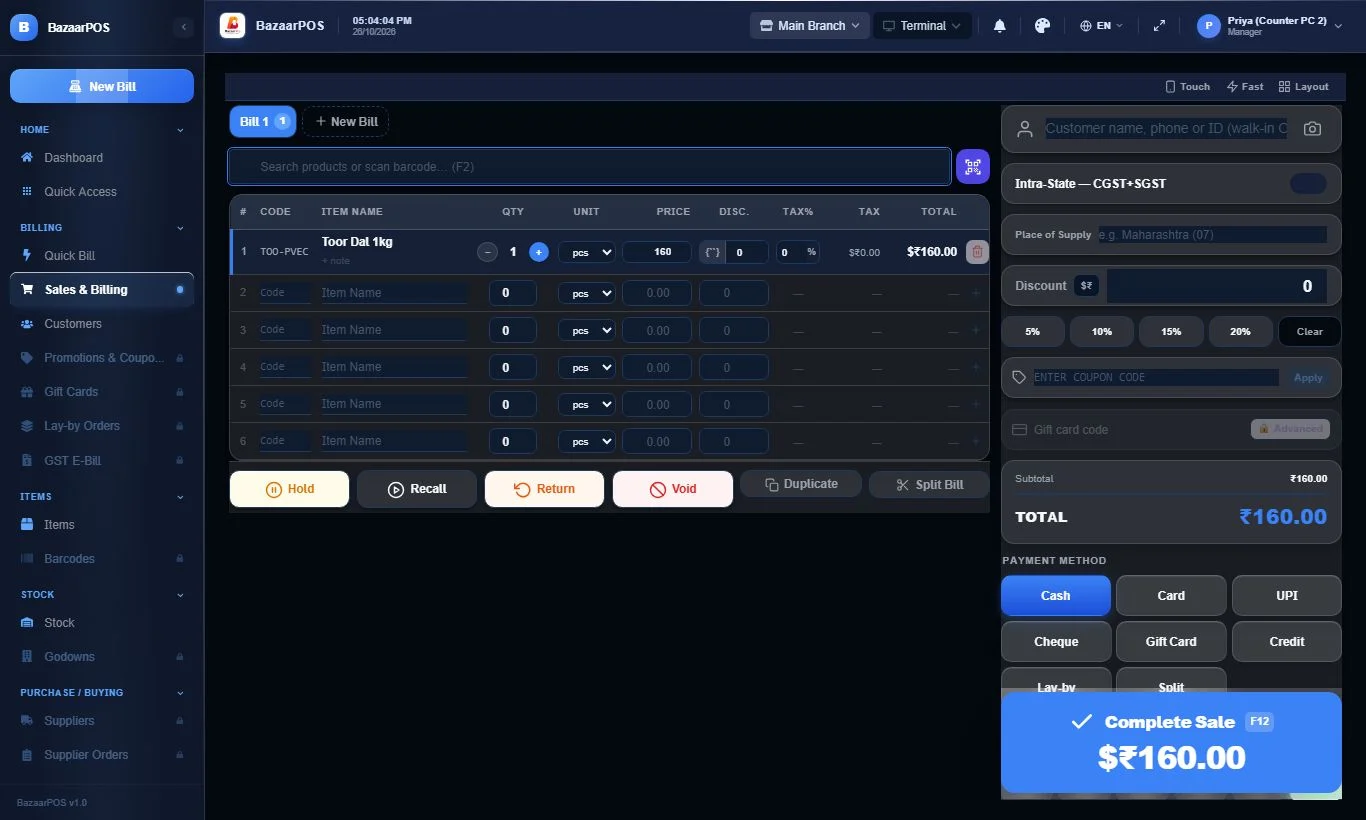
- Click the item in the list — it is added to the bill.
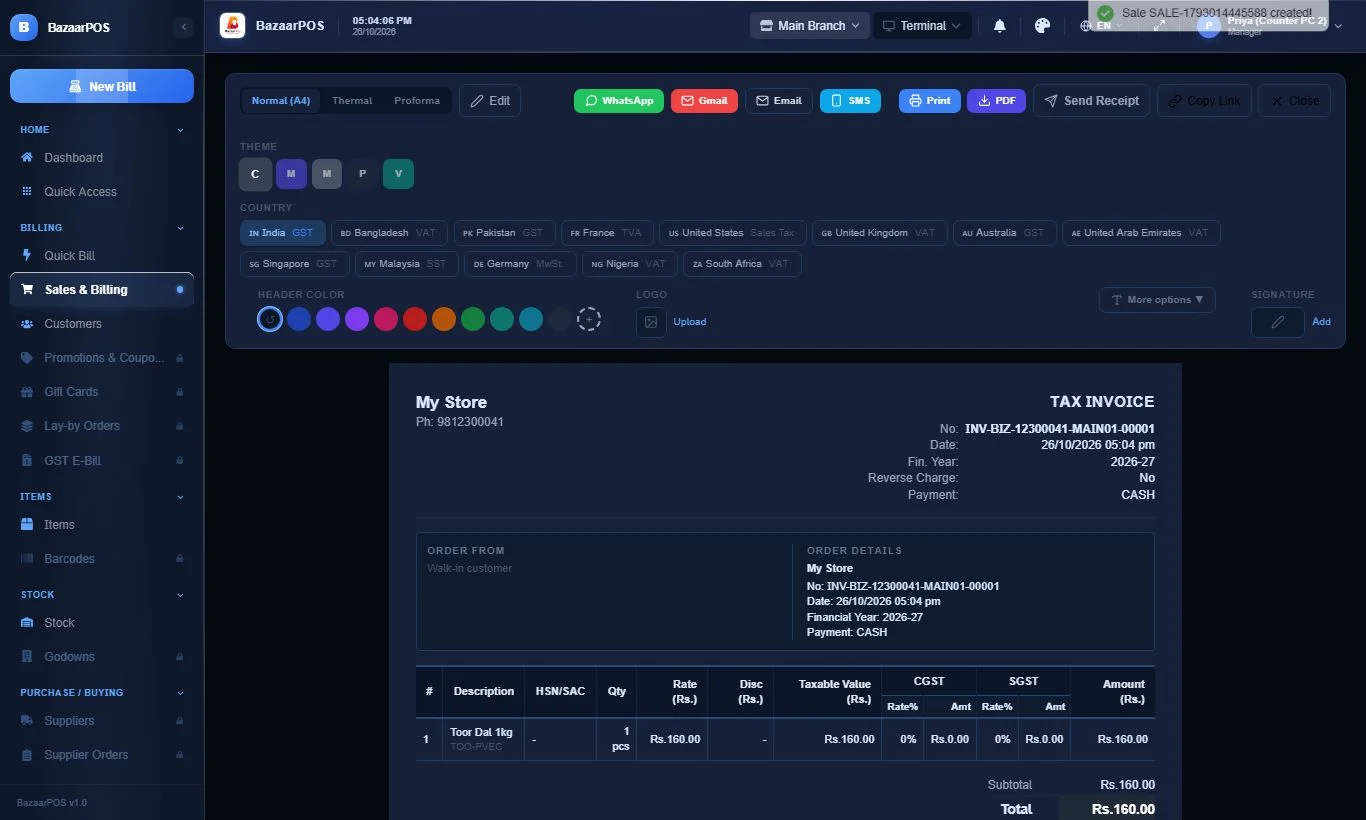
- Choose Cash (or Card / UPI) and press Complete Sale.
7 The owner sees every bill at once
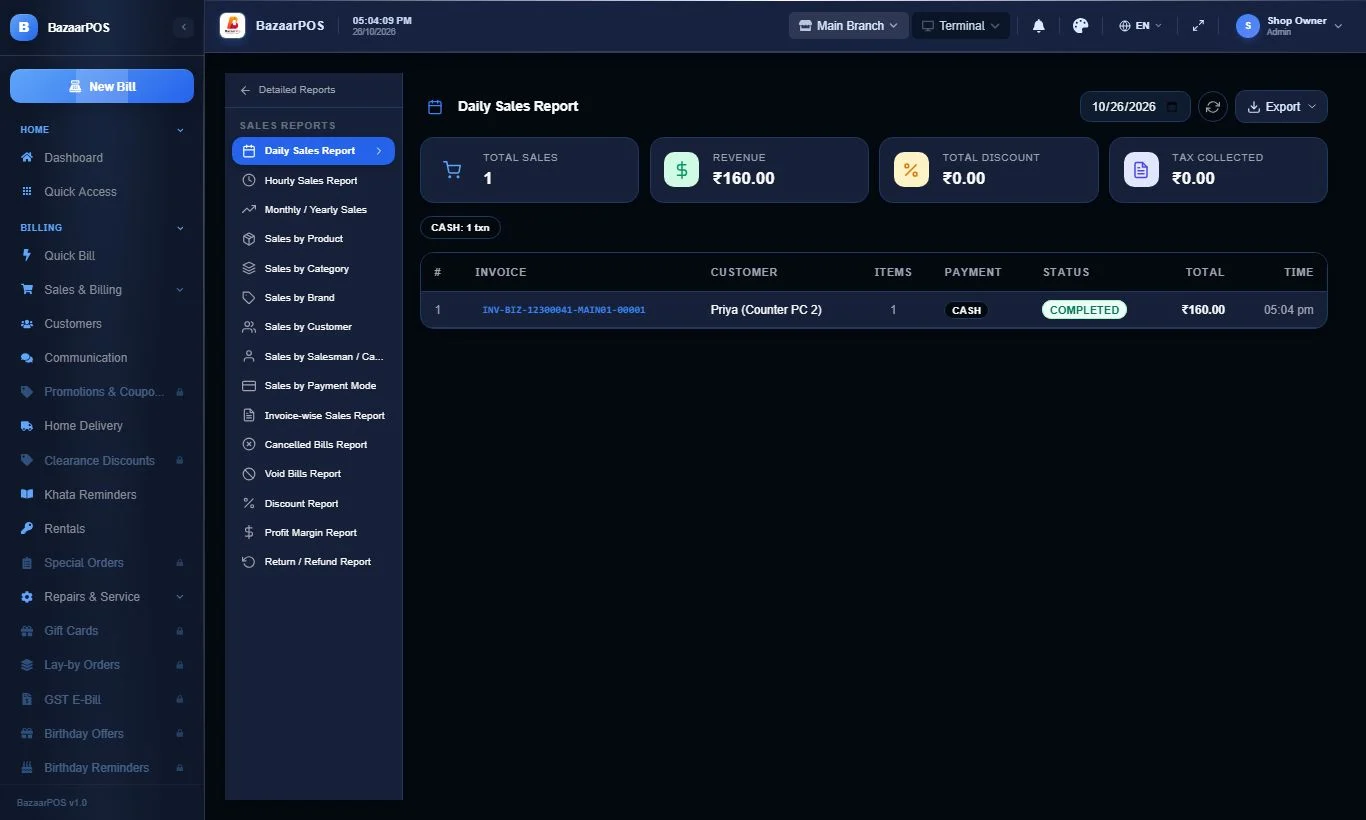
- On the main PC open Reports → Sales Reports. The bill made on the second computer is already there, with the name of the person who made it.
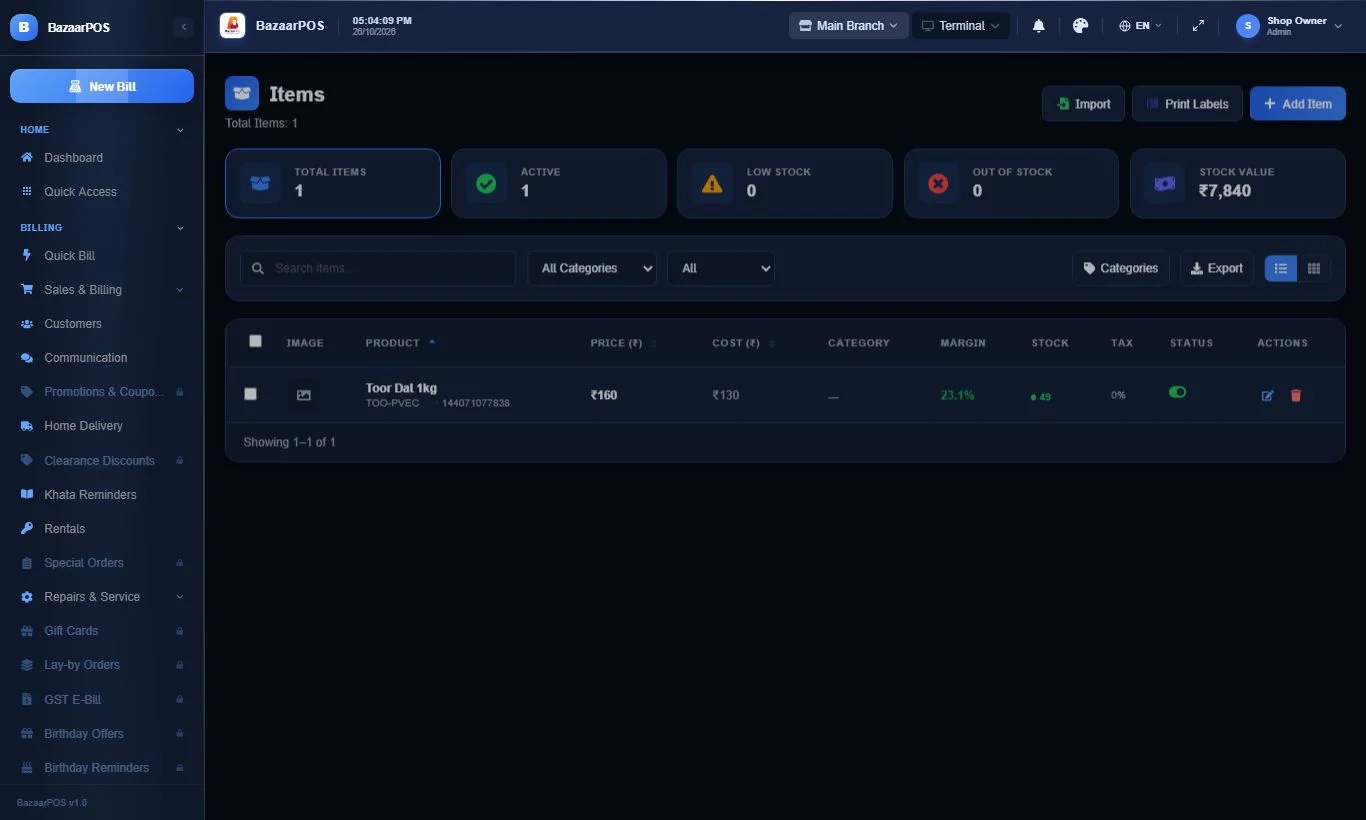
- Open Items — the stock has gone down by the quantity sold.
8 What a Cashier can and cannot do
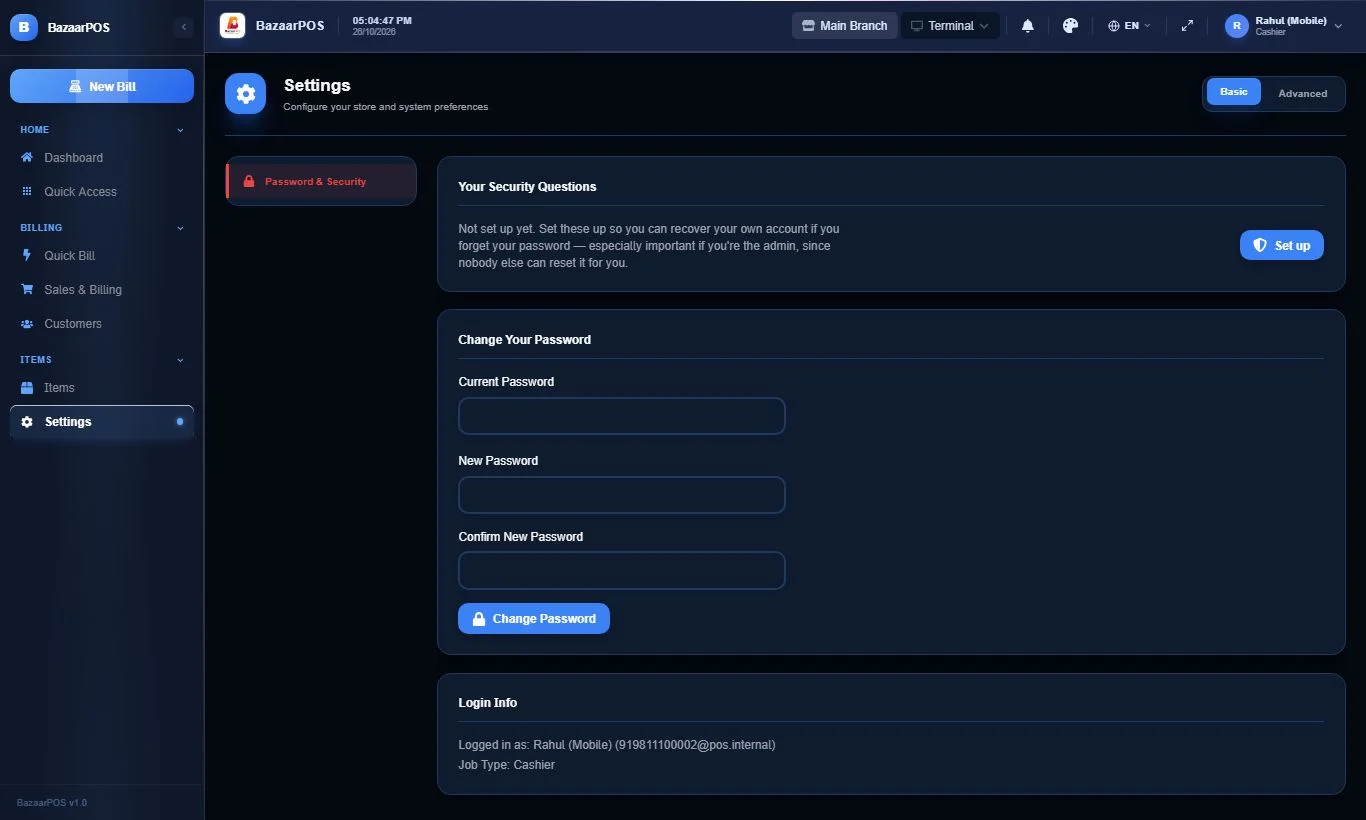
- A Cashier sees only the screens needed for billing: Quick Bill, Sales & Billing, Customers, Items and Settings.
- In Settings a Cashier can only change their own password — shop details, staff and tax stay with the owner.
9 Connect a phone on the same Wi-Fi
- Install the BazaarPOS Mobile app on the phone and connect it to the shop's Wi-Fi.
- In the app open Settings → Network & Sync.
- On the server screen (Backend Server) press Scan QR and point the camera at the QR code on the main PC's Devices → This Device page. This fills in the address for you.
- No camera or the scan fails? Type the address from step 4 in the Backend URL box, for example
http://192.168.1.10:3200/api/v1, and save. - Back in Network & Sync, type the phone user's own mobile number and password (the Cashier you made in step 2) and press Sign In & Connect.
- The phone now downloads your items and customers. After this it keeps its own copy, so it can bill even when the Wi-Fi is off, and sends everything to the main PC when it reconnects.
Part 2 — Different shops or places (cloud)
Each computer keeps its own copy, so billing continues even if the internet stops. When the internet is back, the copies match each other automatically. You need internet only to sync.
1 On the first computer: add people and items
- Add your staff and items exactly as in Part 1 (steps 2 and 3).
2 Connect the first computer to the cloud
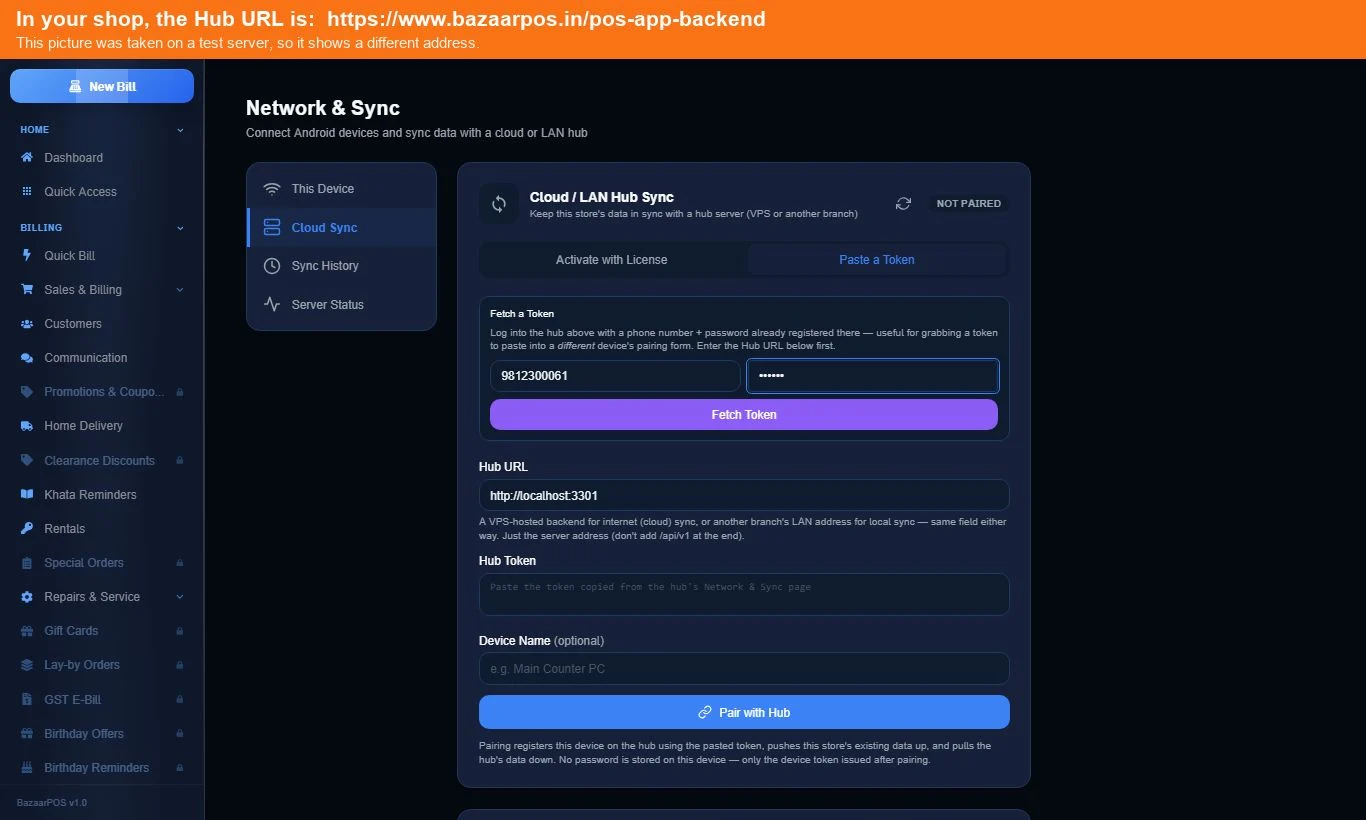
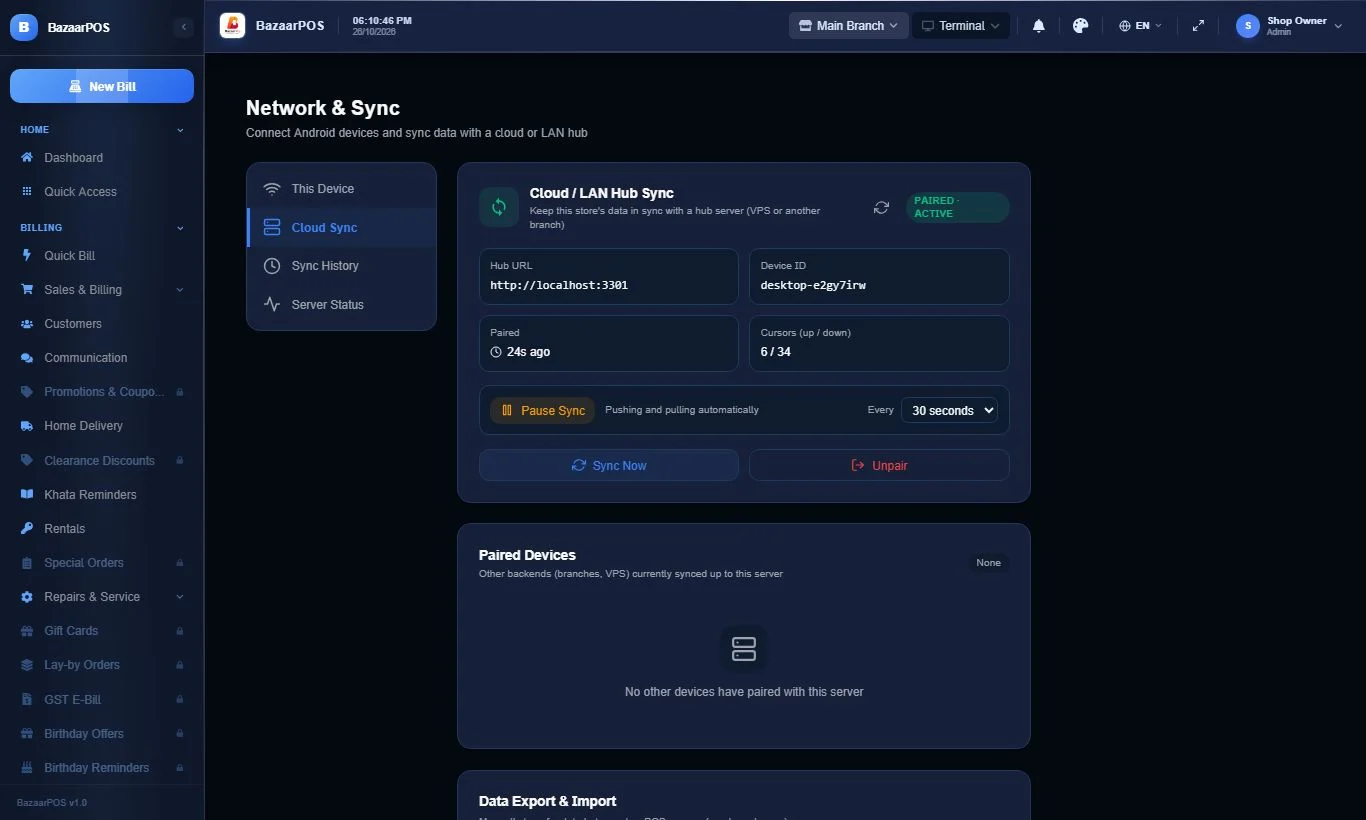
- Open Devices (Network & Sync) and click the Cloud Sync tab. It says NOT PAIRED.
- Click Paste a Token.
- In the Hub URL box type exactly:
https://www.bazaarpos.in/pos-app-backend - Then type your shop's mobile number and password above it, and press Fetch Token.
- Give this computer a name (for example Shop PC 1 (Counter)) and press Pair with Hub.
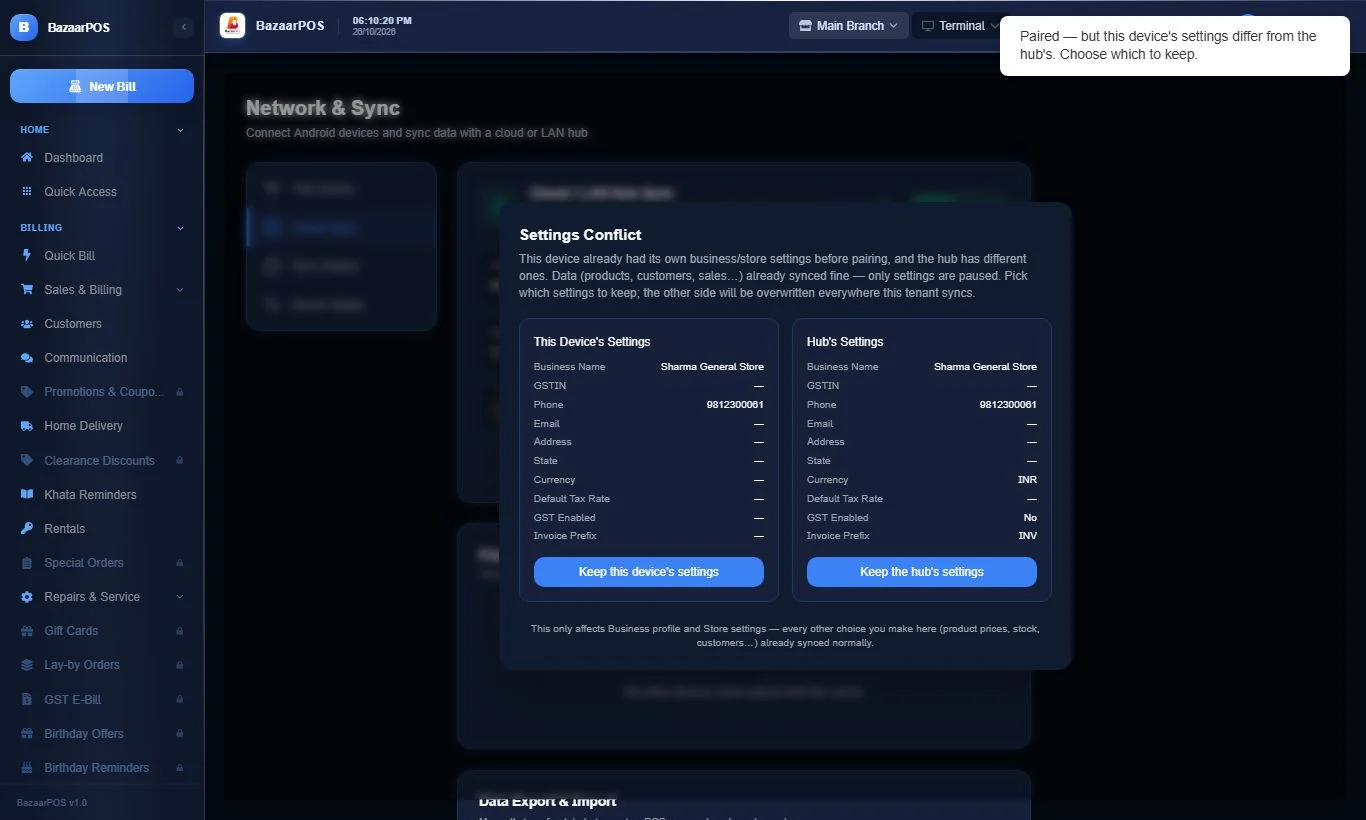
- Because this is the first computer, the app may ask which shop details to keep. Choose Keep this device's settings.
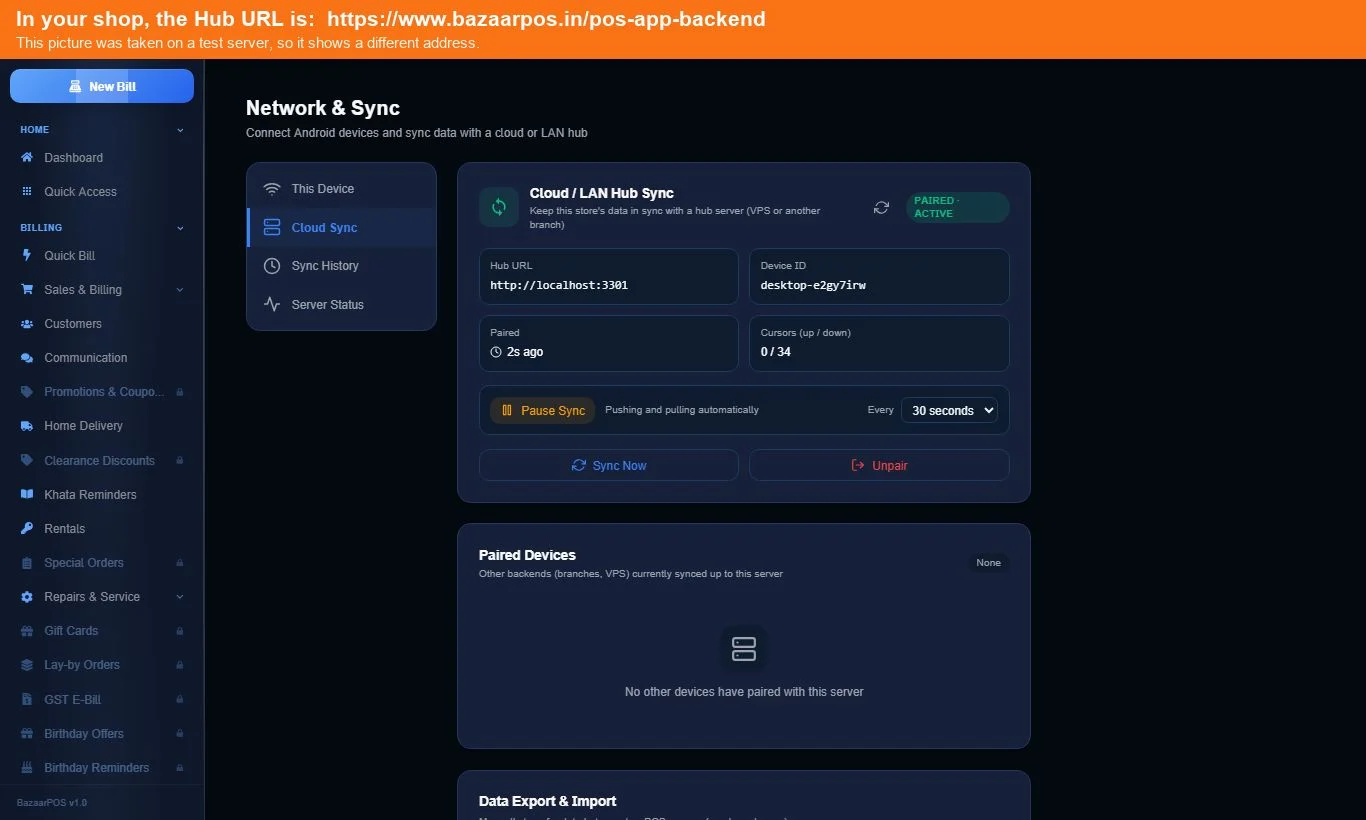
- It says Paired — initial sync complete. Press Sync Now once.
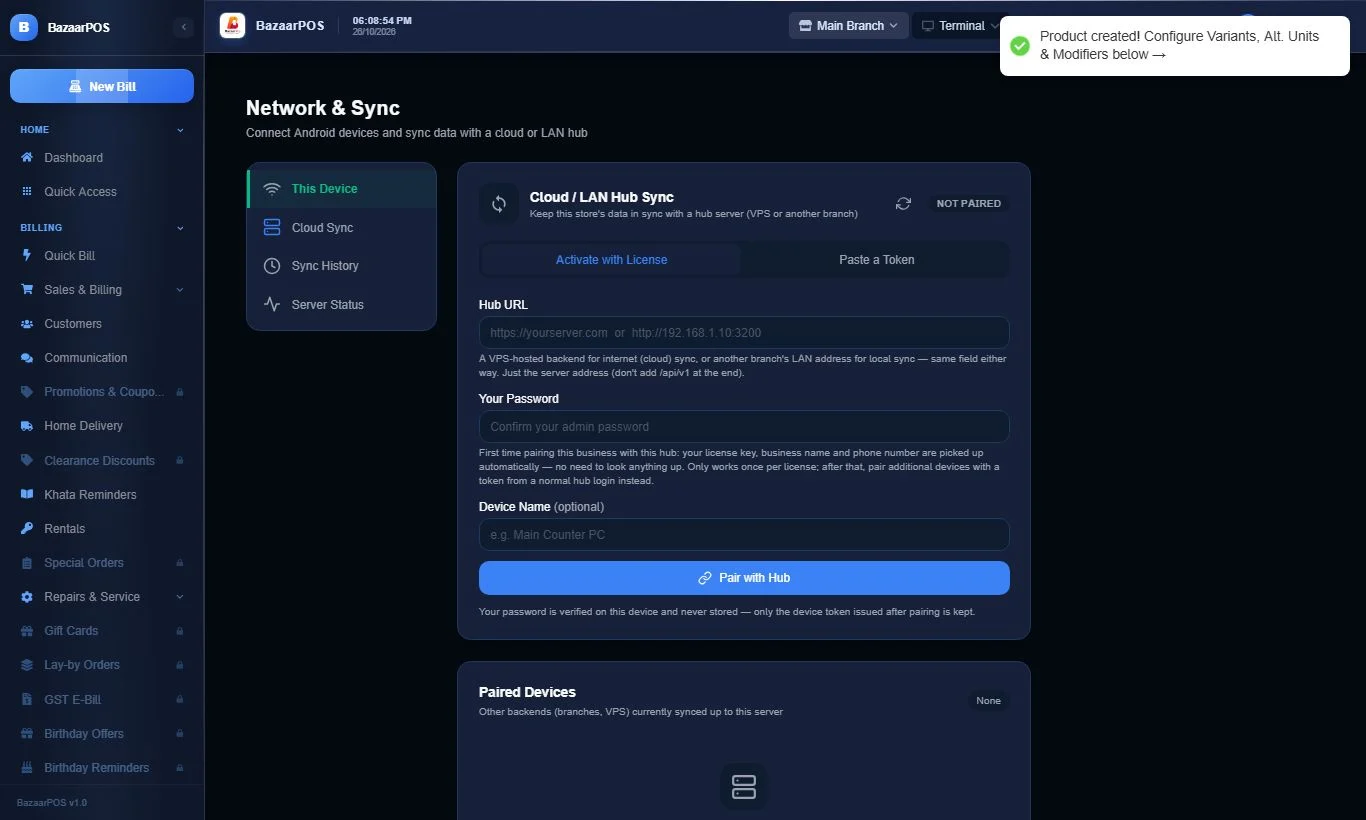
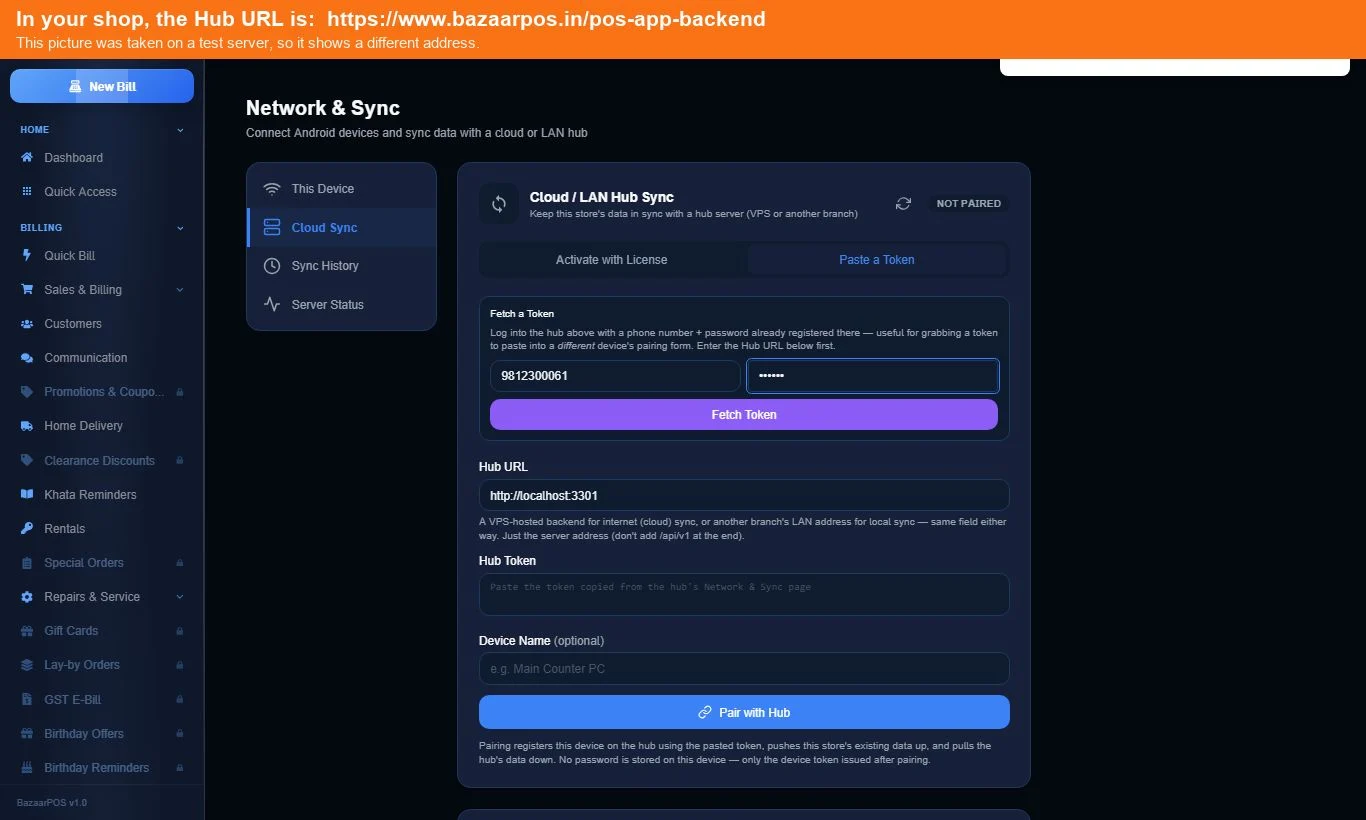
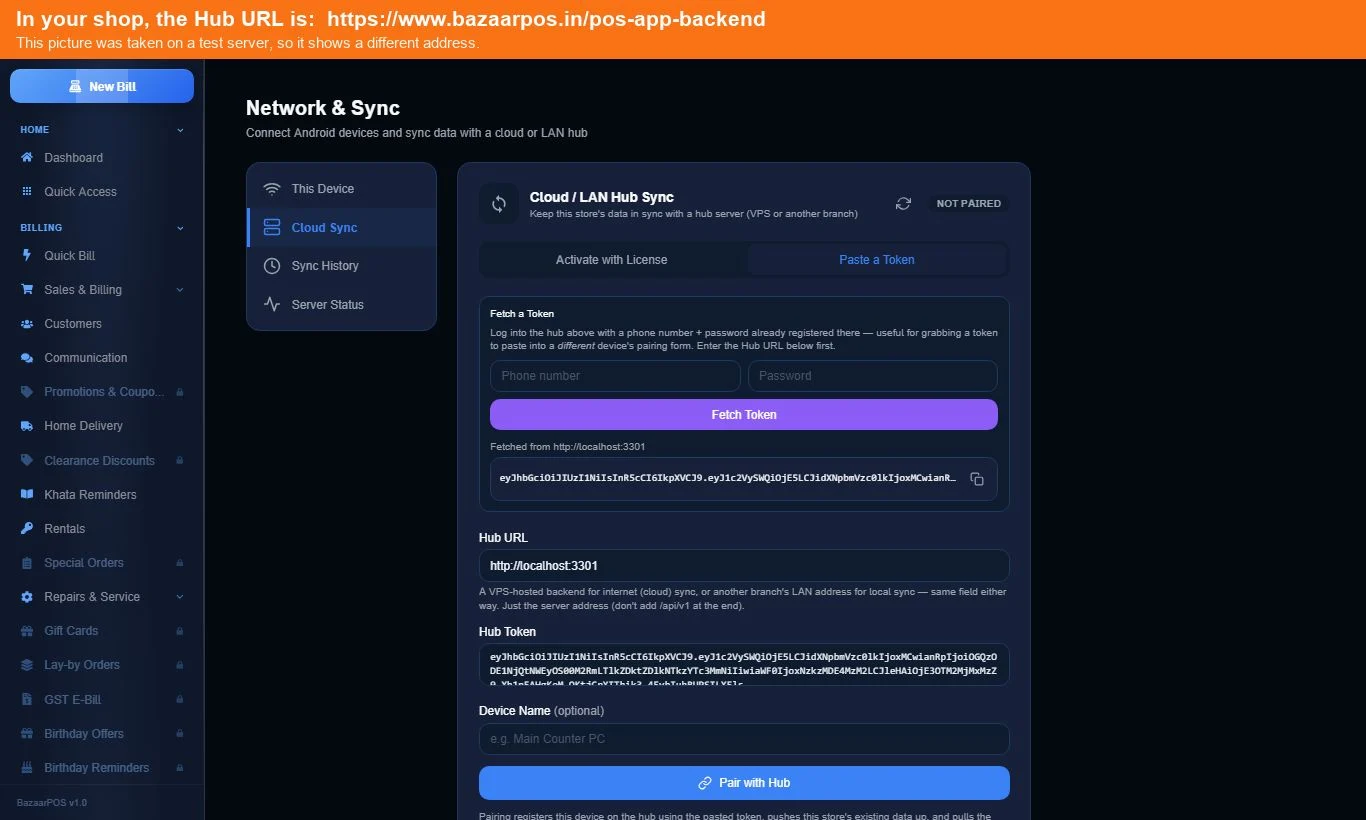
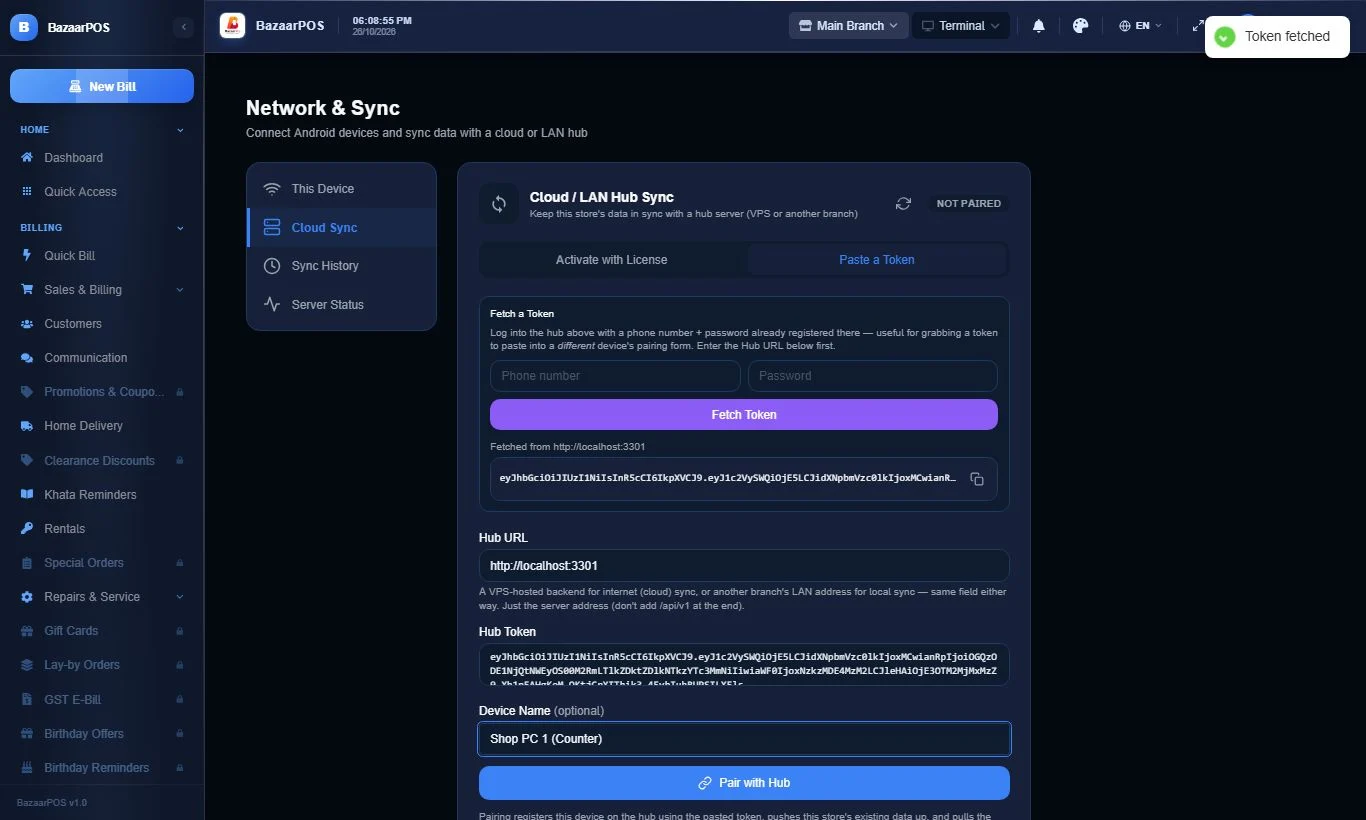
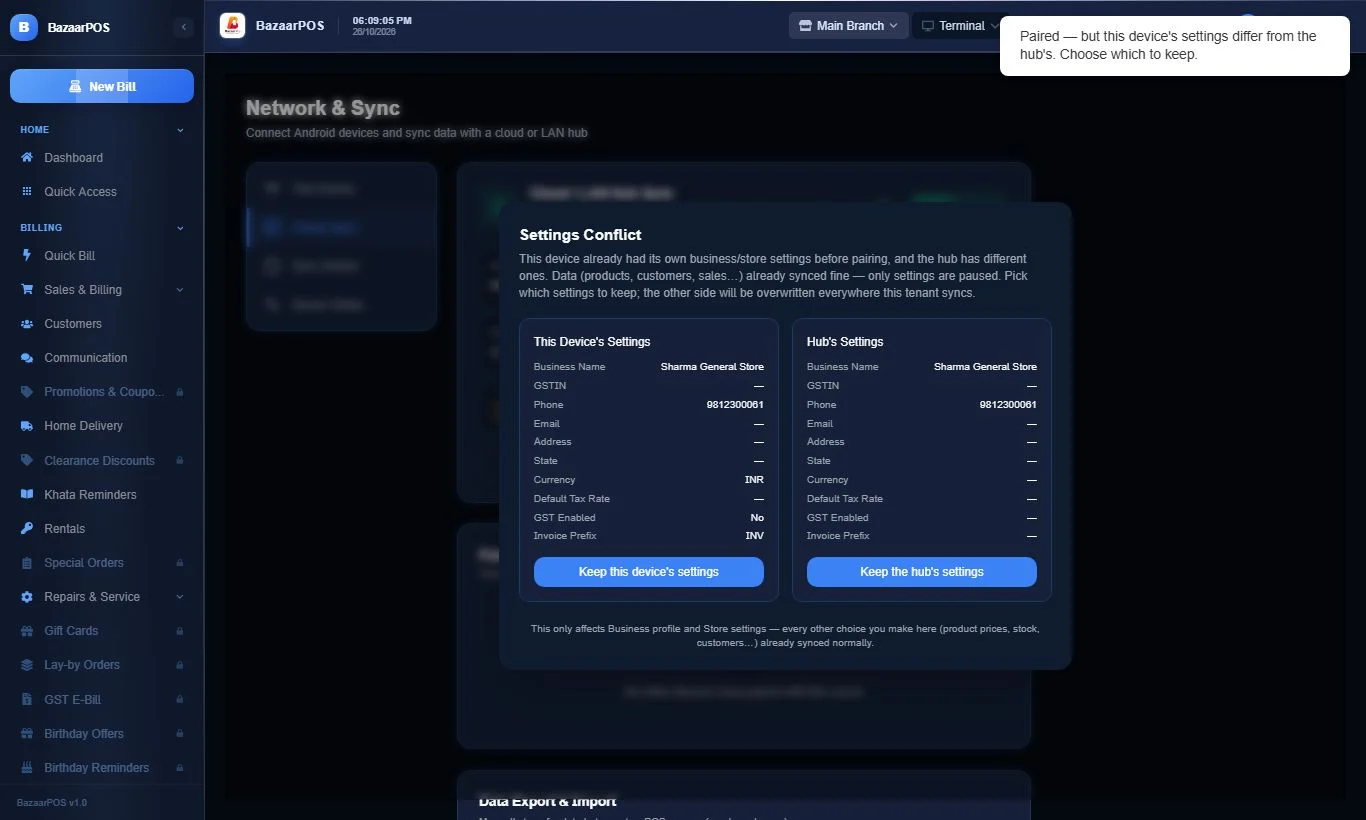
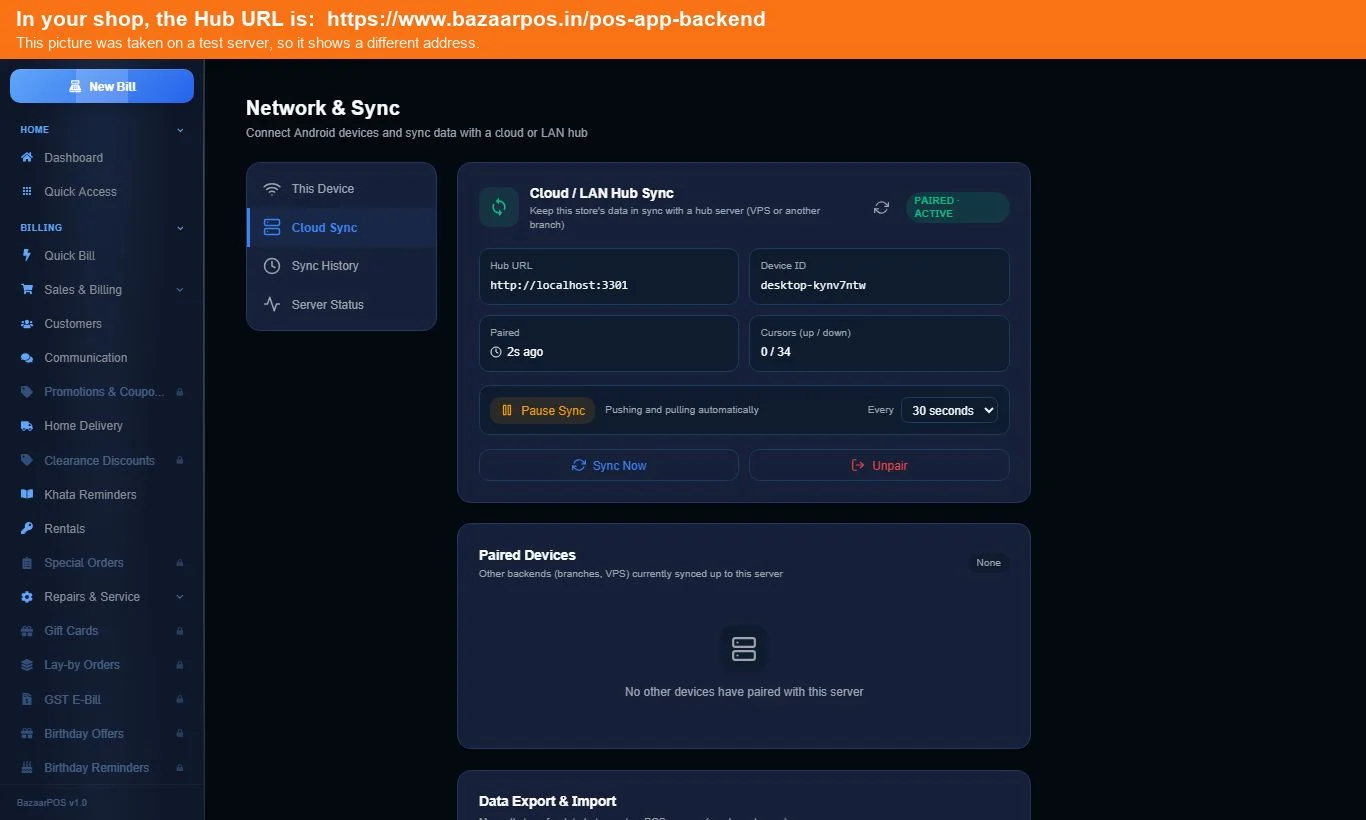
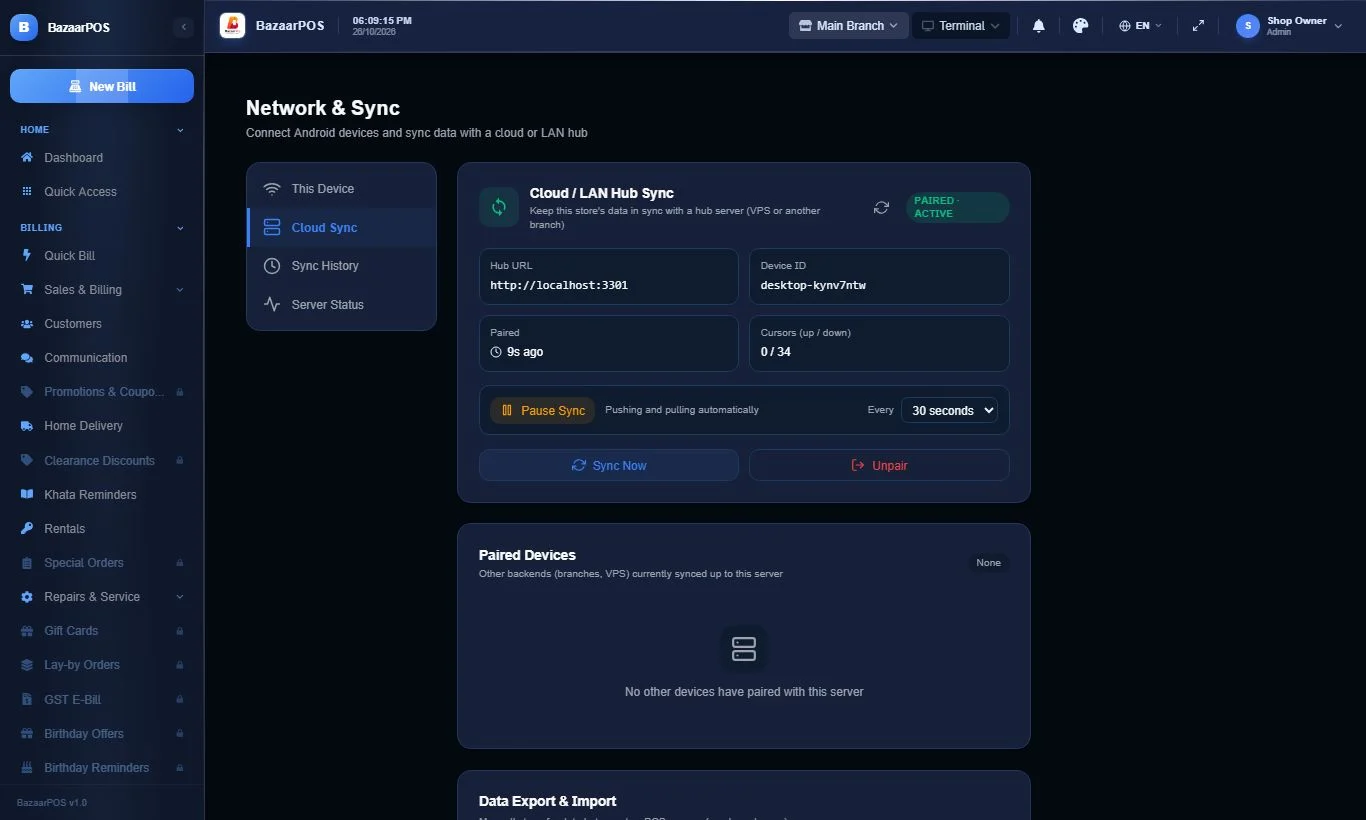
https://www.bazaarpos.in/pos-app-backend — the same on every computer. The pictures in this guide were taken on a test server, so they show a different address; the orange bar on those pictures reminds you what to type.3 On the second computer (another shop or building)
- Install BazaarPOS and sign in with the same shop mobile number and password.
- Do the same Cloud Sync steps. In Hub URL type the same address:
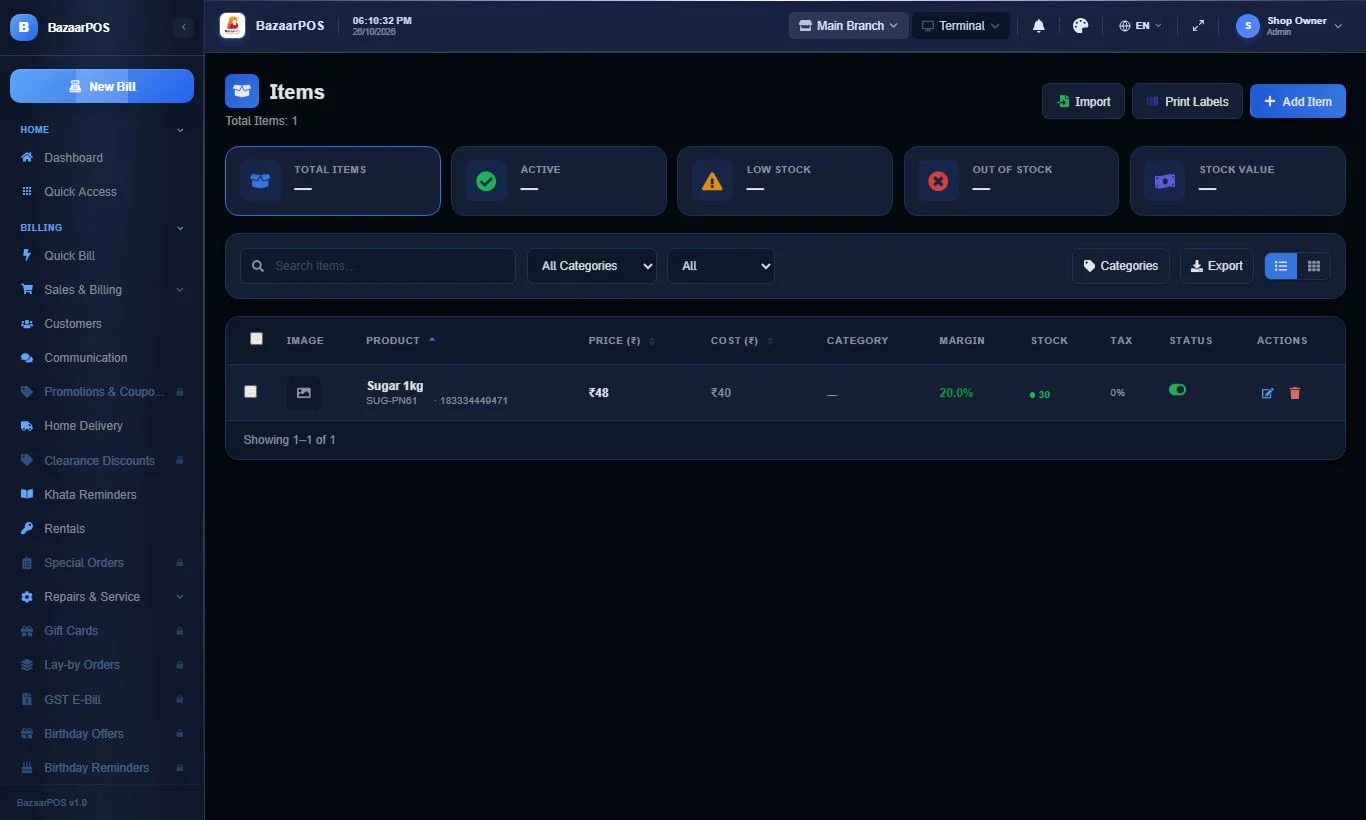
https://www.bazaarpos.in/pos-app-backend. This time, when asked about shop details, choose Keep the hub's settings so the details from the first computer are used. - Press Sync Now. Within a few seconds your items, stock, customers and staff appear on this computer.
4 Bill a customer on the second computer
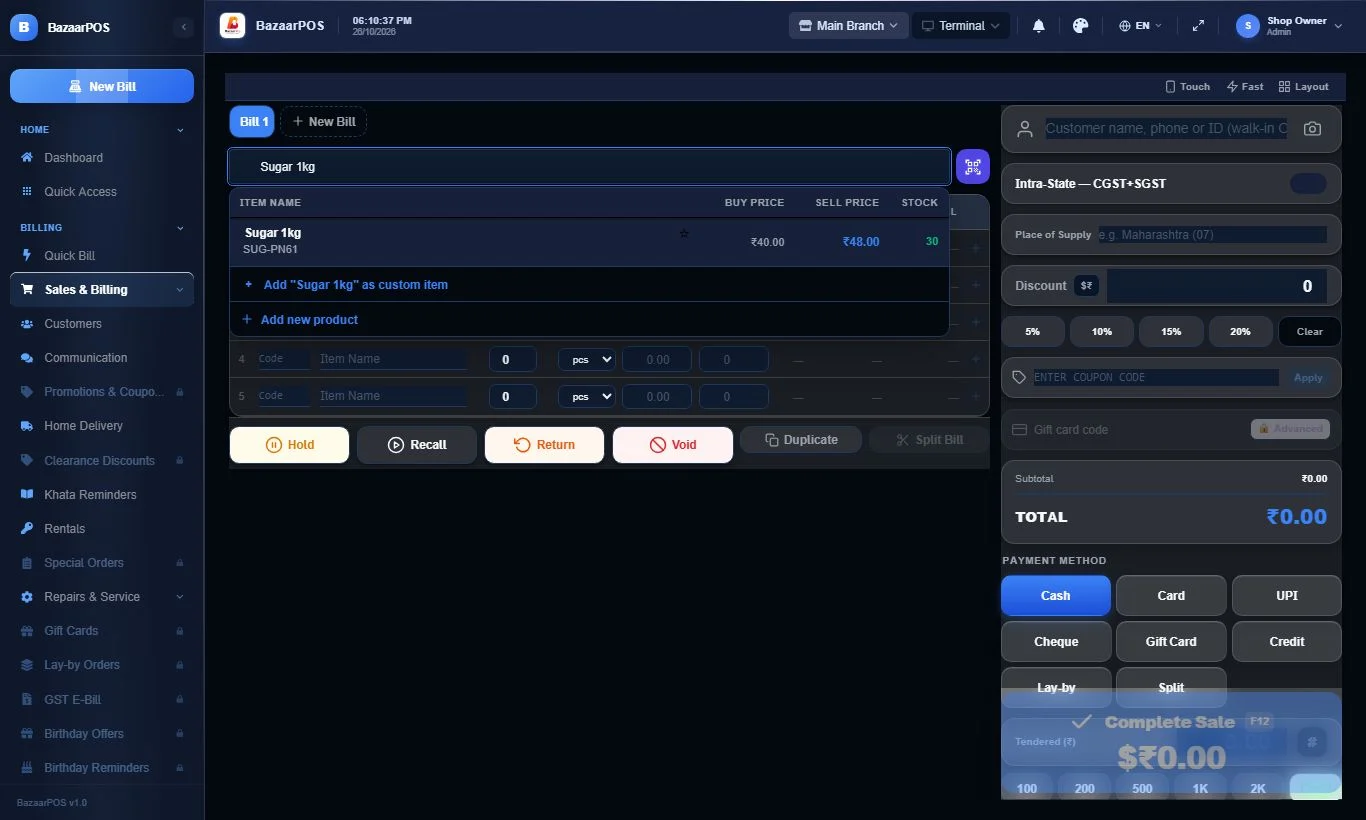
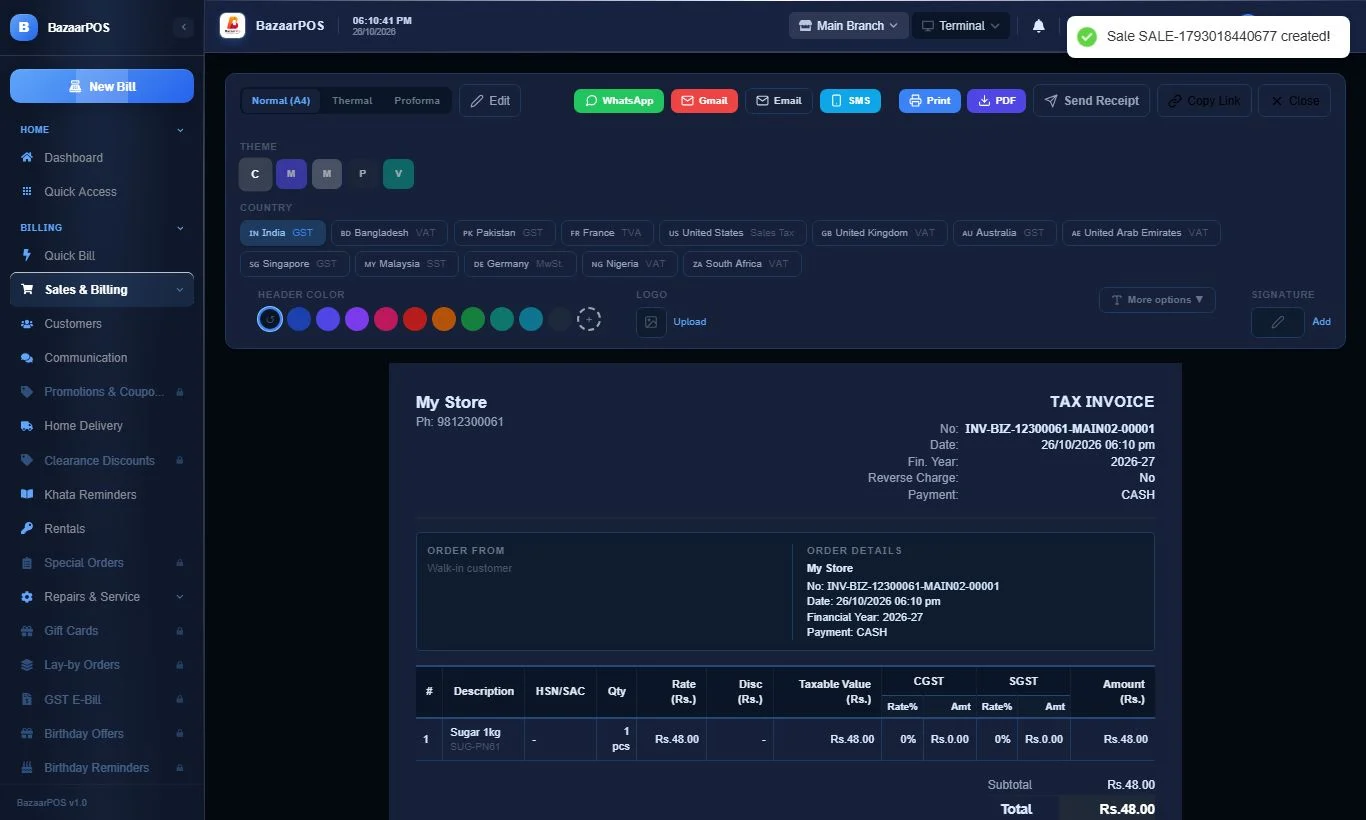
- Make a bill as usual. The bill gets this computer's own invoice code (for example
MAIN02), so two computers never use the same invoice number. - Press Sync Now (it also happens automatically every 30 seconds).
5 The owner, from anywhere
- On the owner's computer (or the owner's phone) press Sync Now.
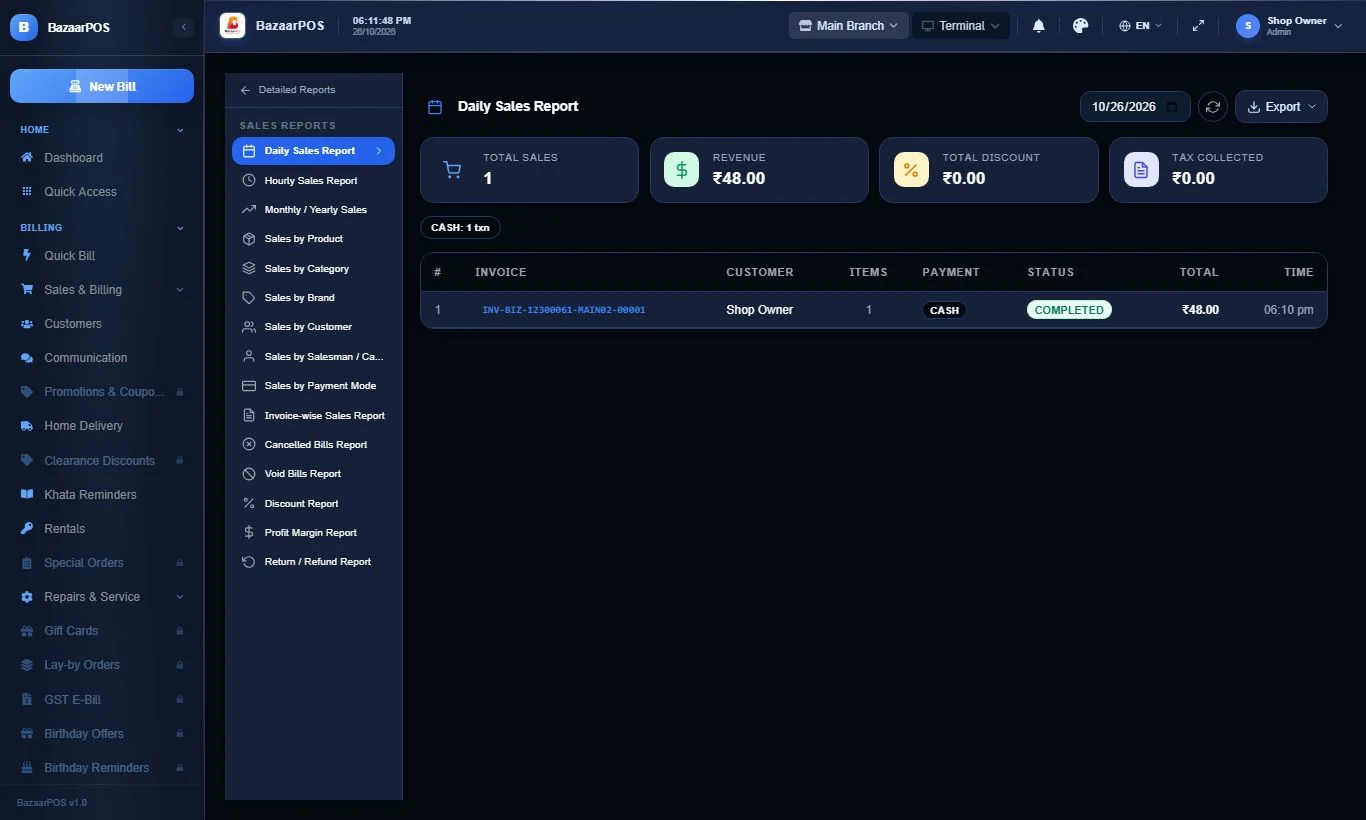
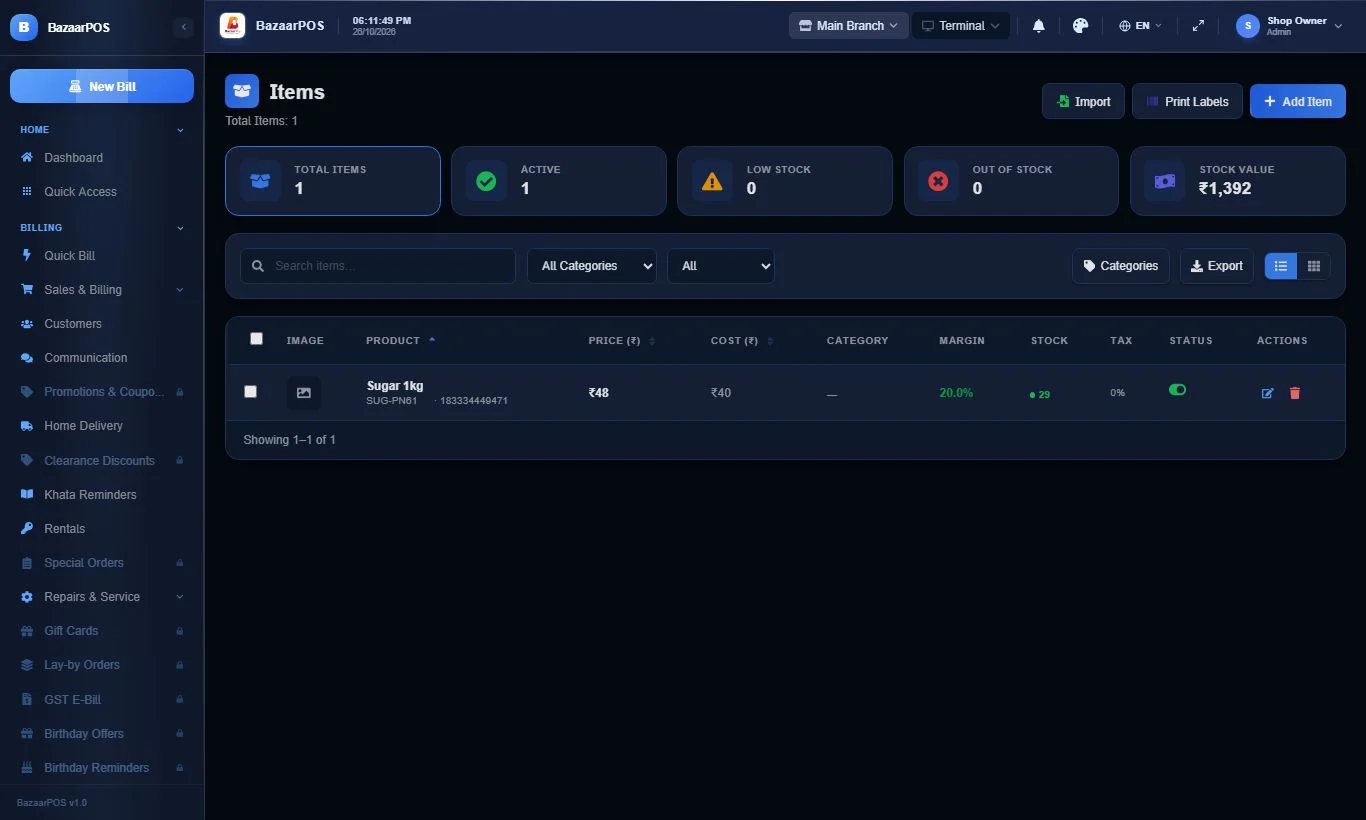
- Open Reports → Sales Reports: the bill made in the other shop is there. Open Items: the stock is already reduced.
6 Connect the owner's phone through the cloud
- In the BazaarPOS Mobile app open Settings → Network & Sync.
- Open the server screen (Backend Server) and, instead of scanning a QR code, type this in the Backend URL box and save:
https://www.bazaarpos.in/pos-app-backend/api/v1 - Back in Network & Sync, type your mobile number and password and press Sign In & Connect while you have internet.
- The phone downloads everything and then syncs by itself whenever it has internet — at home, in another city, anywhere.
Part 3 — Items and billing, step by step
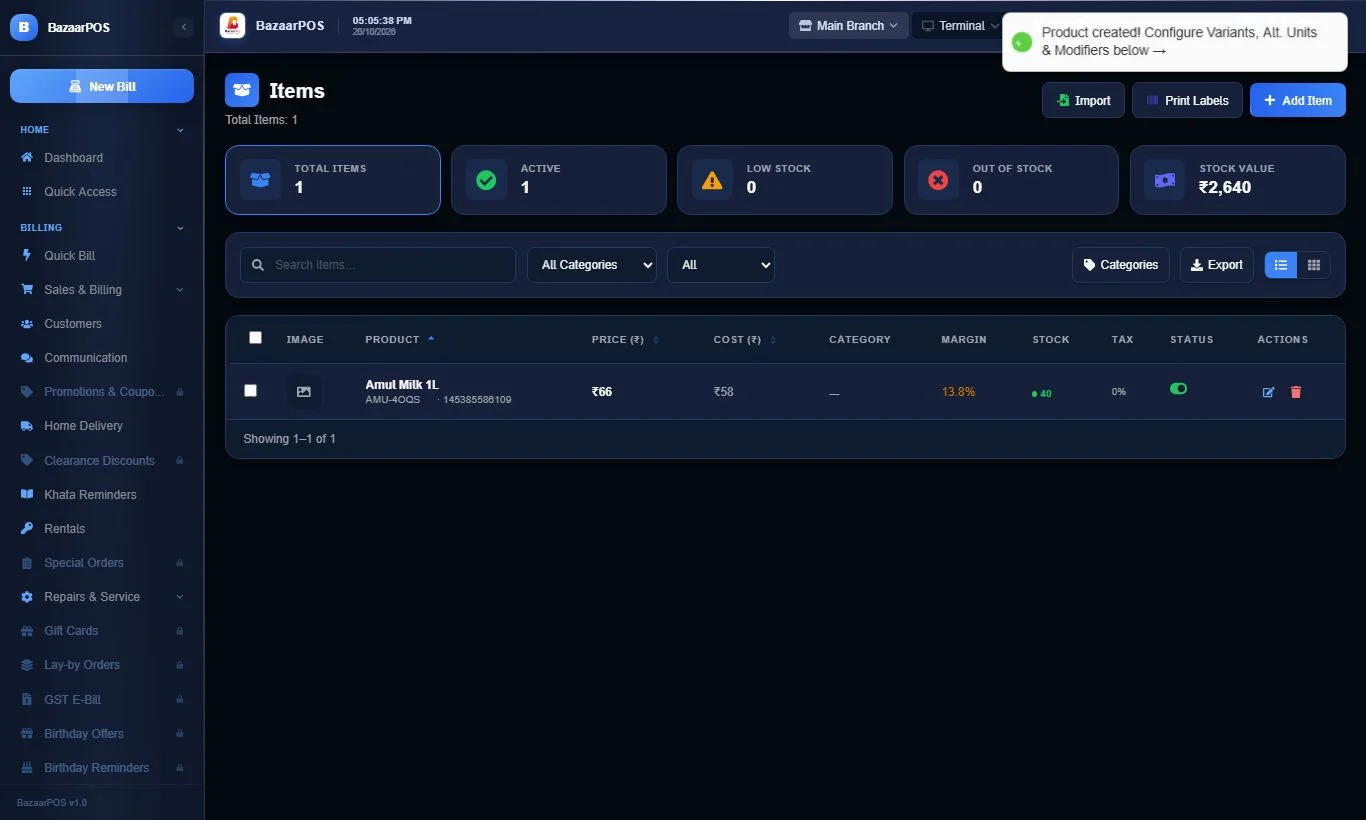
1 Add an item
- Go to Items → Add Item.
- Type the name, selling price, cost price and opening stock.
- Set Visibility to This branch only.
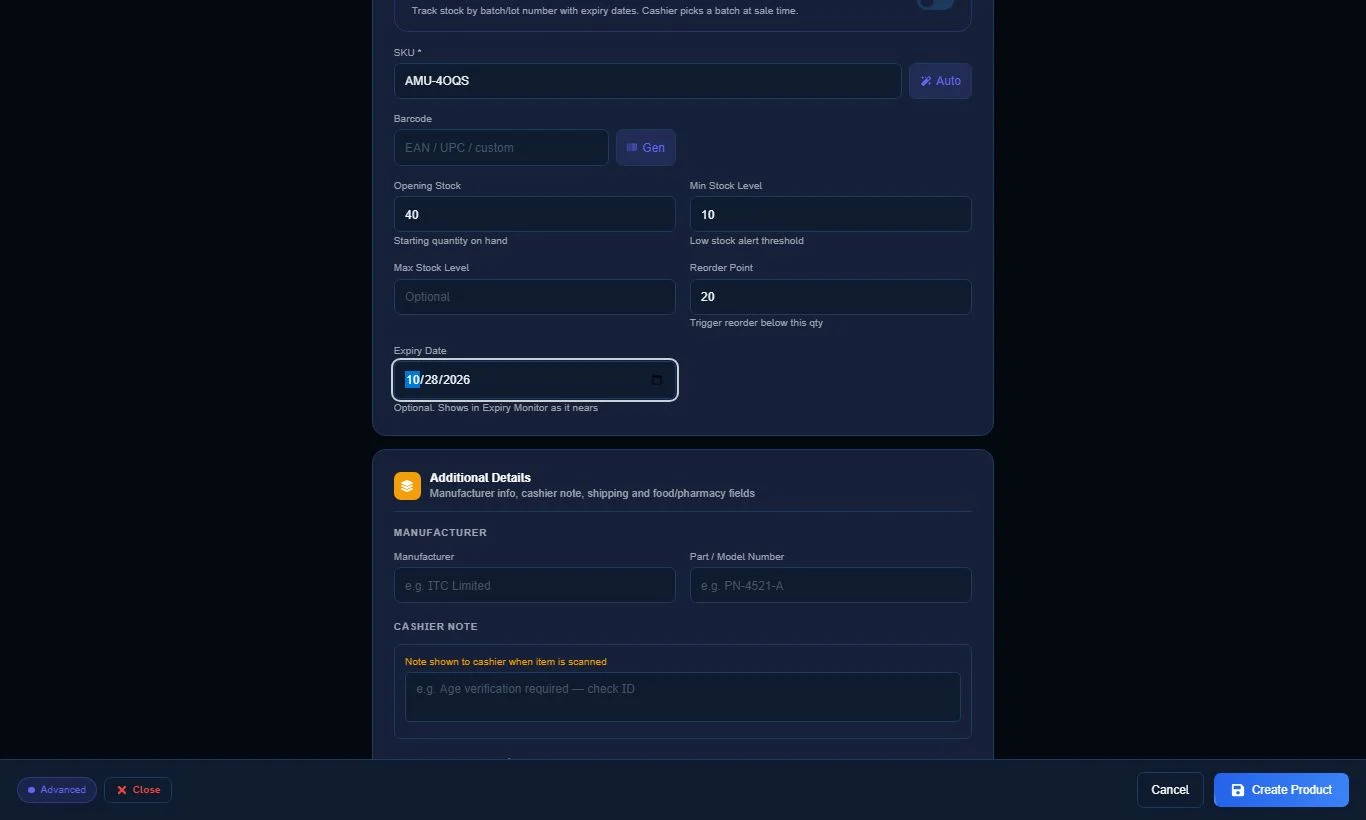
- If the item can expire (milk, bread, medicine), fill the Expiry Date.
- Press Create Product.
2 Make a bill
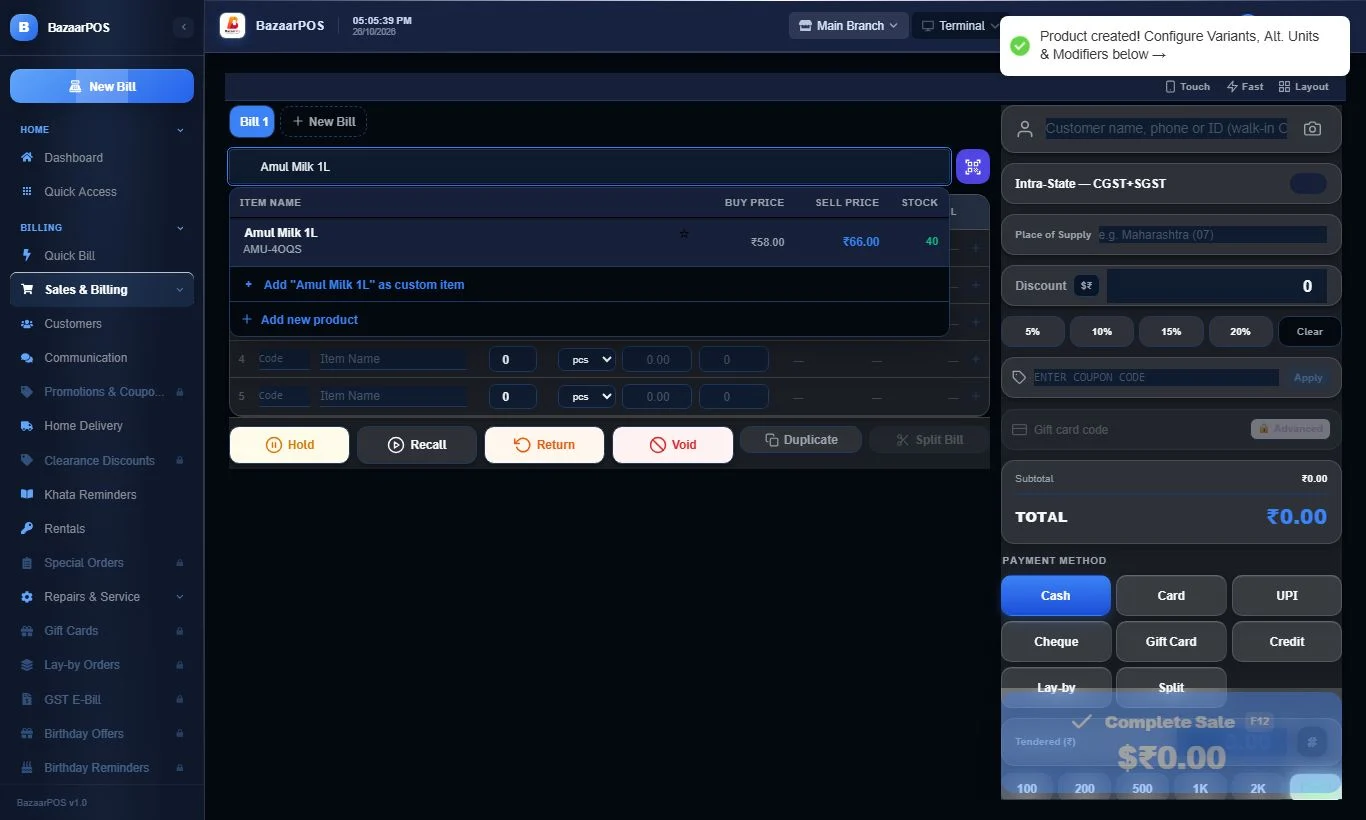
- Open Sales & Billing.
- Type the first letters of the item name in the search box. The matching items show with price and stock.
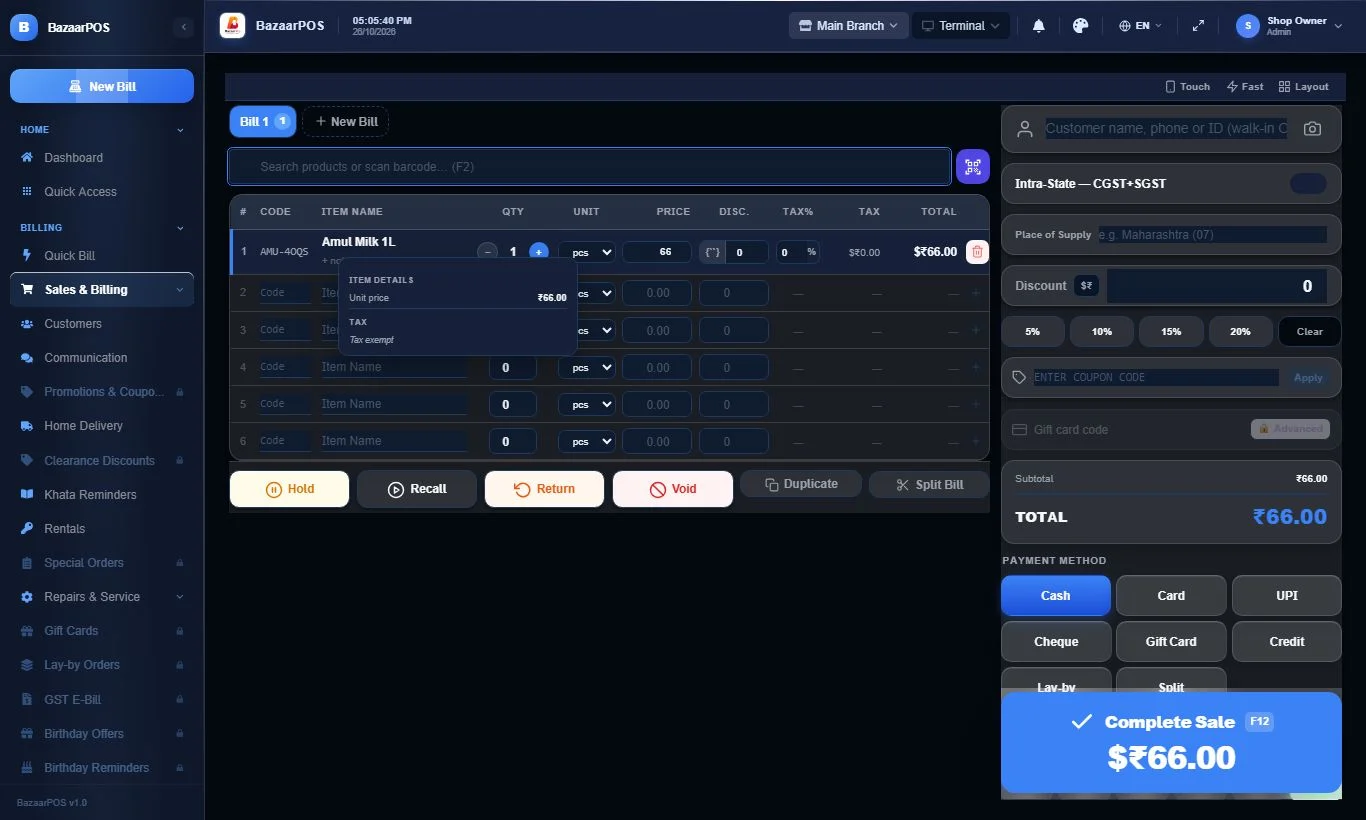
- Click the item. It is added to the bill. Click it again (or use +) for more quantity.
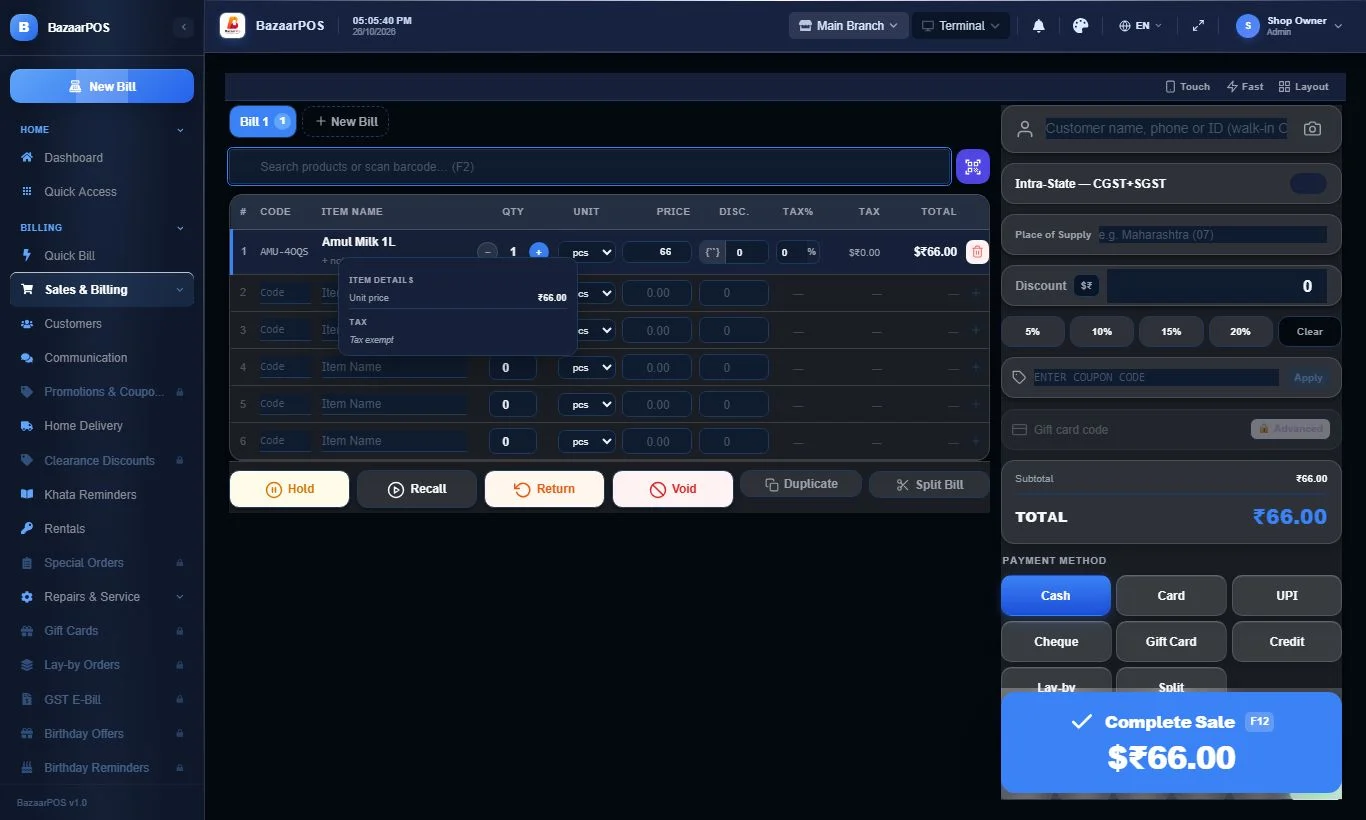
- Choose how the customer pays: Cash, Card, UPI and so on.
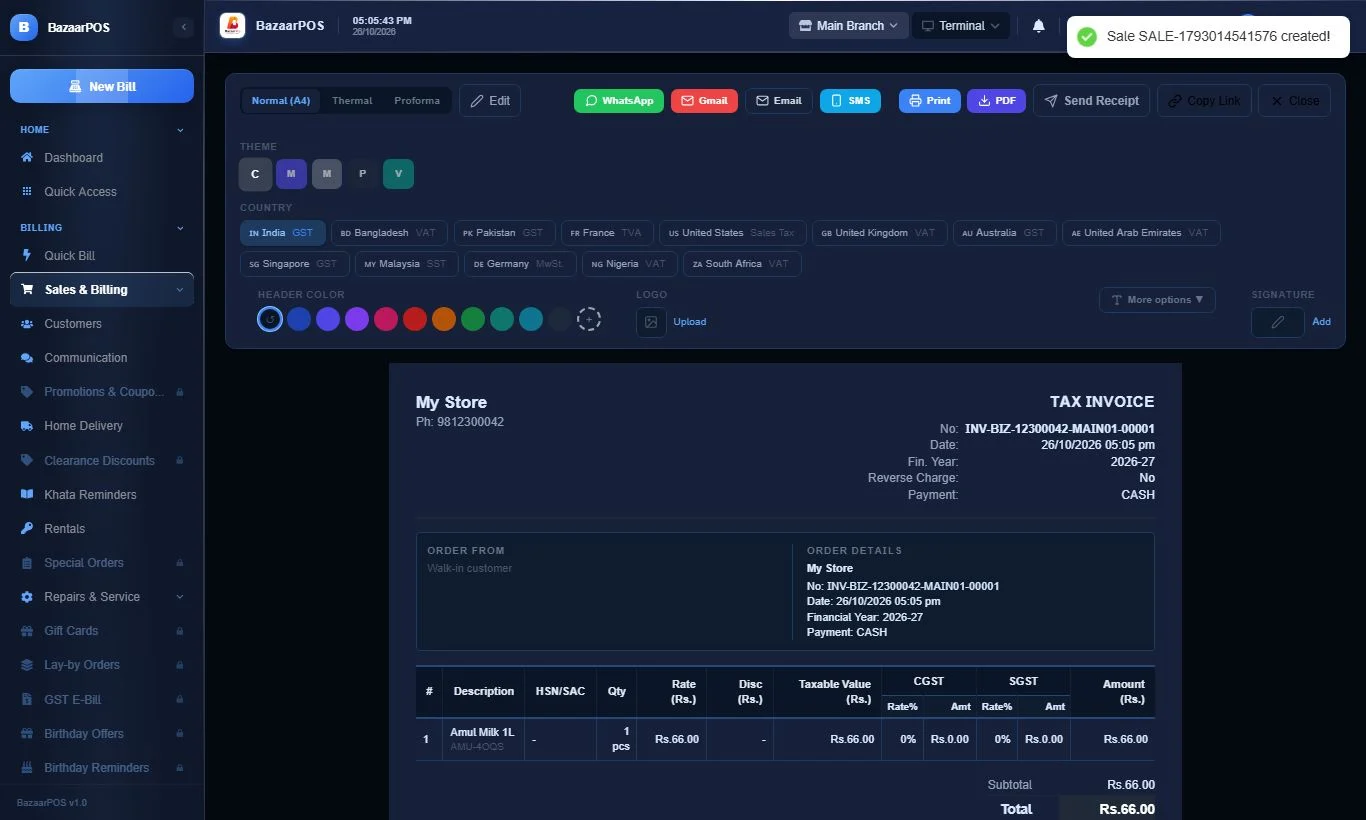
- Press Complete Sale. The tax invoice opens — print it, send it on WhatsApp, or press Close.
3 Check stock and sales
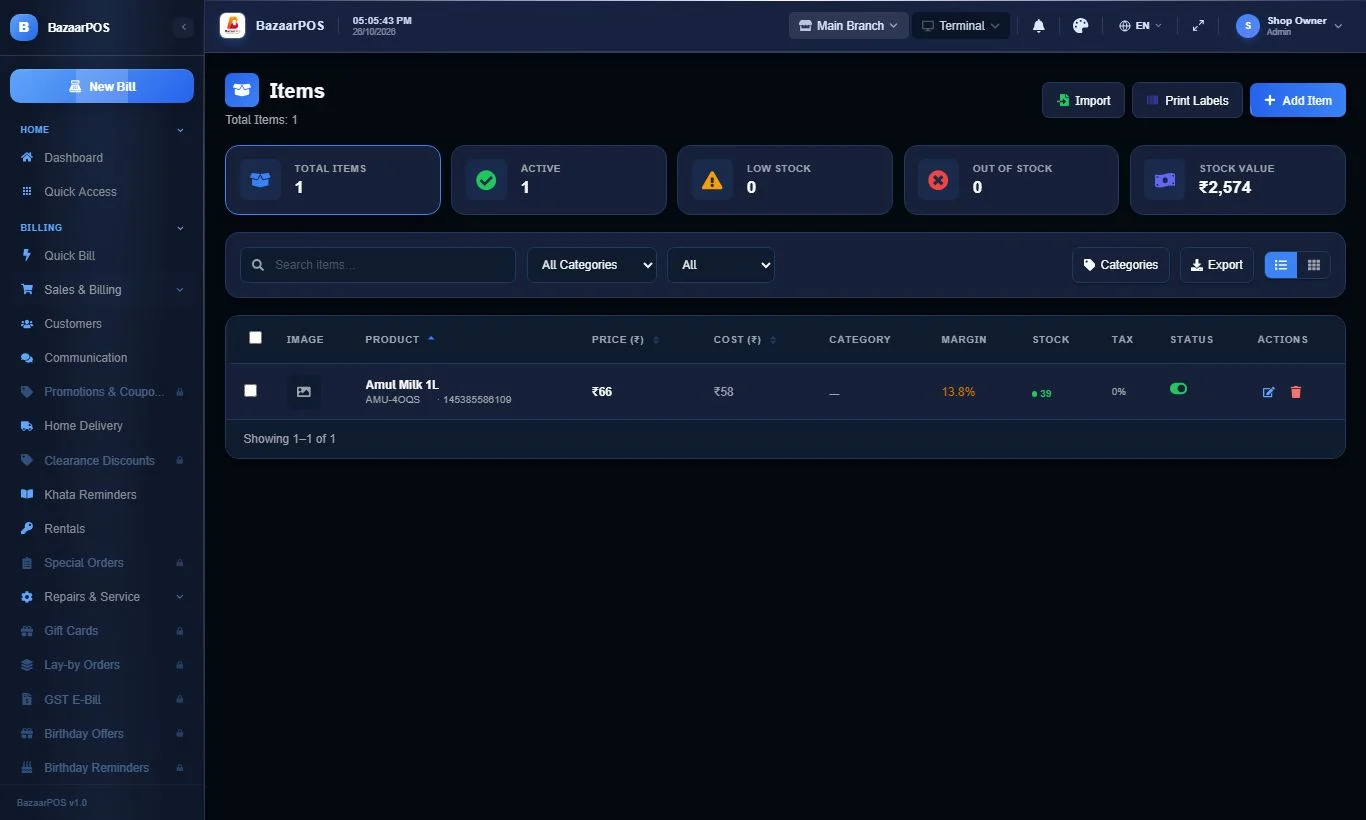
- Open Items: the stock is lower by what you sold.
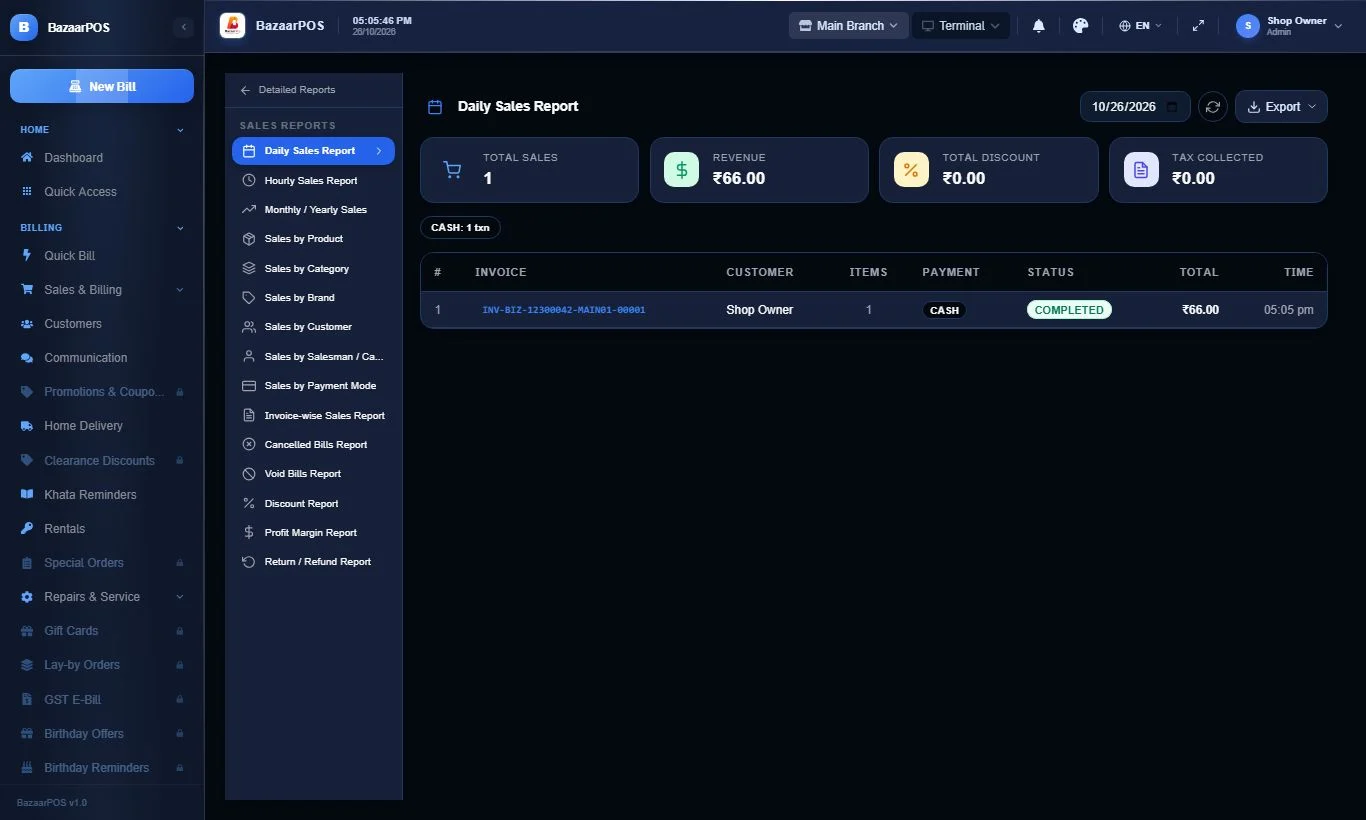
- Open Reports → Sales Reports for today's sales.
4 Watch expiry dates
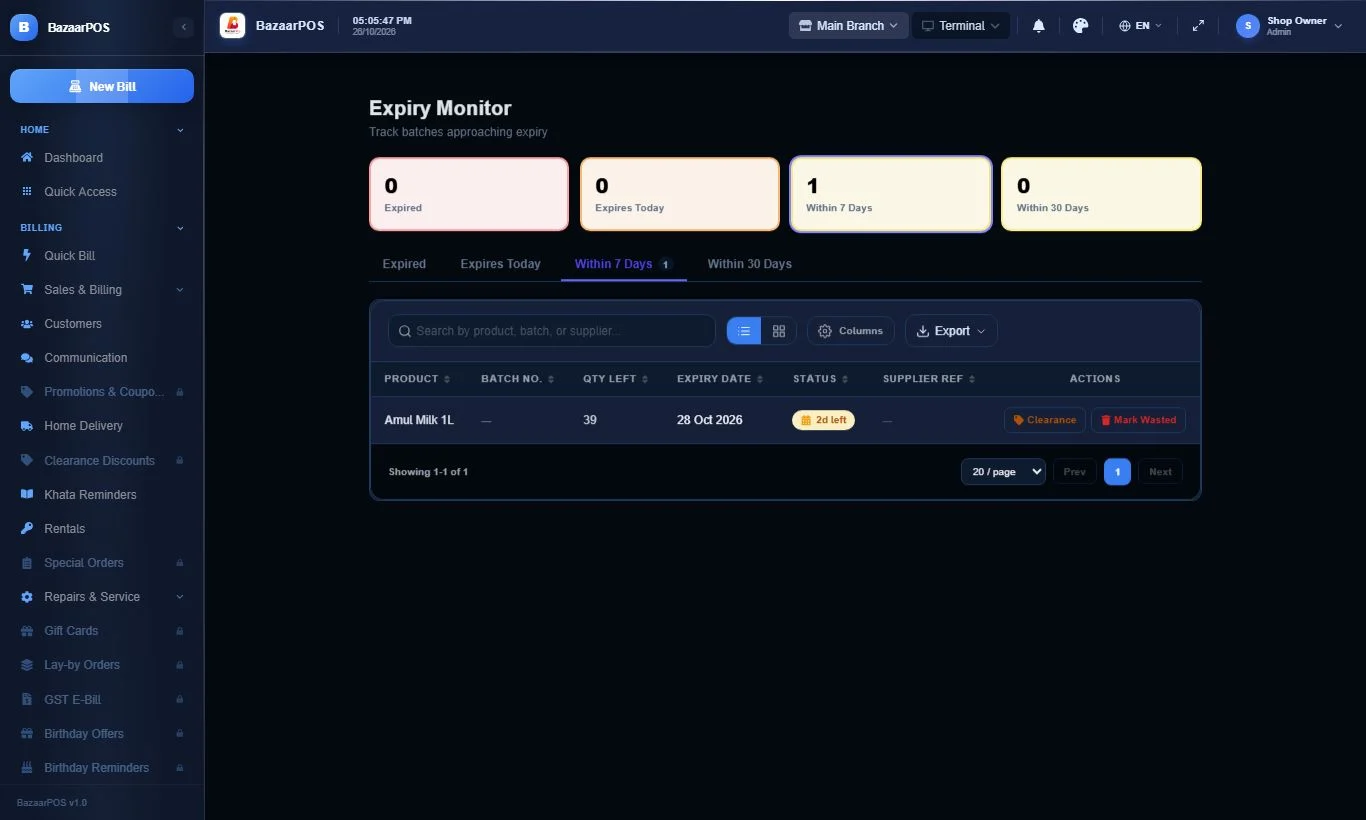
- Open Expiry Monitor in the Stock menu.
- Items that have an expiry date show up under Expired, Expires Today, Within 7 Days or Within 30 Days.
- Use Clearance to sell it cheaper, or Mark Wasted when it has to be thrown away.
Good to know
What is shared between computers and phones
- Items, prices, categories and stock (two computers selling the same item at the same time both reduce the stock correctly)
- Customers, suppliers and expenses
- Bills, returns and purchase orders
- Expiry dates
- Staff logins, their job type and their access to the shop
- Shop details (name, GSTIN, address) and bill settings — the latest change wins
- Shop setup: tax rates, tax groups and tax rules (and which taxes an item uses), invoice designs, payment gateway connections, discount rules (like happy-hour offers), staff commission rules and custom fields
- Roles you create yourself. Each commission rule and each bill stays attached to the same person on every computer, because people are matched by their login ID.
Parts for your kind of shop (restaurant, bakery and more)
Everything your kind of shop adds is shared too: restaurant tables, menus, kitchen stations, combos and orders; bakery recipes, standing orders and wastage; garment, electronics, pharmacy and salon records; GST, TDS and ledger entries; and online-order and marketing records.
The shop admin can switch each of these parts on or off for a computer: open Settings → Network & Sync → Cloud Sync and use the What is shared with your other computers box. Items, stock, customers, bills and staff are always shared and cannot be switched off. If you switch a part on again, everything made while it was off is sent and received automatically.
Not shared between computers
- The built-in roles (Admin, Manager, Cashier) — every computer already has them.
- Extra branches — each branch has its own stock numbers, so branches are not merged. Contact support to set up several branches under one account.
- Tax details saved against a particular customer or supplier (PAN, TDS/TCS settings).
- Things that belong to one computer: its printer and counter settings, sign-in codes, AI assistant keys and report email schedules.
Rules that keep things safe
- One login per person. Signing in with the same login on a second device signs the first one out.
- Invoice numbers stay different. Each device puts its own terminal code (MAIN01, MAIN02, MAIN03…) inside the invoice number. In the cloud setup every connected computer or phone gets its own code by itself. In the same-Wi-Fi setup, give each computer its own terminal (Settings → Terminals) and avoid 01 on computers that phones connect to, because the first phone is given 01. If two bills ever get the same number, both are kept and the later one gets a short extra code at the end.
- Your plan limits how many logins you can add. The counter on the Add Staff button shows it.
- Everything syncs by itself about every 30 seconds while there is internet. Sync Now does it immediately.