Use BazaarPOS on your phone
Set up your phone as a second billing counter. Whatever you do on the phone — bills, stock, orders — also shows on the shop computer, and the other way round. Every step has a picture.
Before you start
- Your mobile number — the same one used for your BazaarPOS account.
- Your password (or you will choose one the first time).
- Wi-Fi or mobile data switched on in the phone.
- To share with the shop computer inside the shop, the phone must be on the same Wi-Fi as that computer.
- The BazaarPOS app installed — see Install on Android.
Which connection do I need?
| Where is the phone? | Use |
|---|---|
| Inside the shop, on the shop Wi-Fi | Part 2 — Same Wi-Fi. The phone talks to the shop computer directly. |
| Outside the shop (home, another shop, travelling) | Part 3 — Cloud. The phone and the computer share through the internet. The computer must also be connected to the cloud. |
| Connection | Box on the phone | Type this |
|---|---|---|
| Same Wi-Fi | Backend URL on the Network & Sync screen | The address shown on the shop computer: Devices → This Device → Network addresses, like http://192.168.1.10:3200/api/v1 |
| Cloud | Backend URL on the Network & Sync screen | https://www.bazaarpos.in/pos-app-backend/api/v1 |
localhost or 127.0.0.1 on the phone. They always mean “this phone itself”.https://www.bazaarpos.in/pos-app-backend/api/v1 (online) or http://192.168.x.x:3200/api/v1 (shop Wi-Fi). The address ending in /gate1/api is the licence server, not your shop: do not type it in this box. If you do, the app saves the correct shop address for you and tells you so.Part 1 — First time on the phone
Do this only once on each phone.
9876543210. The app adds the country code (+91) for you. Do not type a 0 at the start or the +91 yourself. Use the same number you gave when you bought your licence. This guide needs app version 1.0.21 or newer.1 Open the app and type your number
- Find the BazaarPOS icon on your phone and tap it. The first time, the app takes up to a minute to get ready — do not close it.
- On the Welcome! screen, tap Phone Number and type your mobile number (10 digits).
- Tap the blue Continue button.
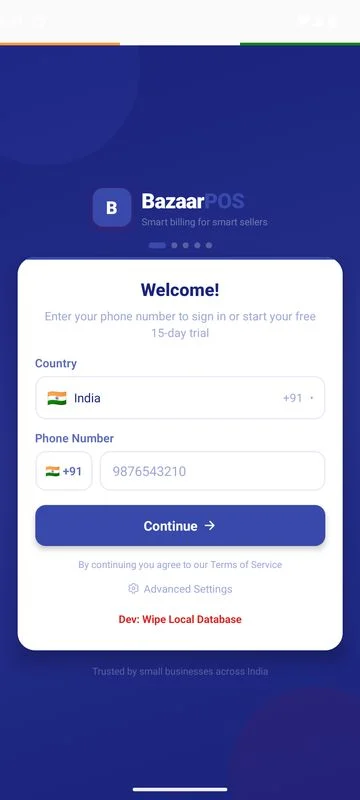
2 Make your password
- If this is a new number, the app asks you to make a password.
- Type a password of at least 6 letters or numbers in the first box, then the same password again in the second box.
- Tap the button below the boxes. Write your password down and keep it safe — you will need it every day.
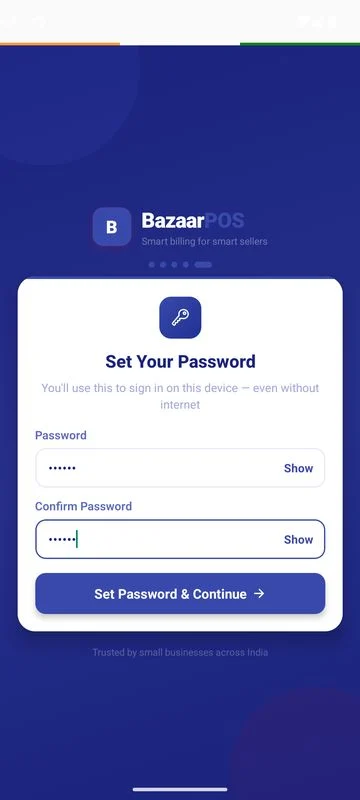
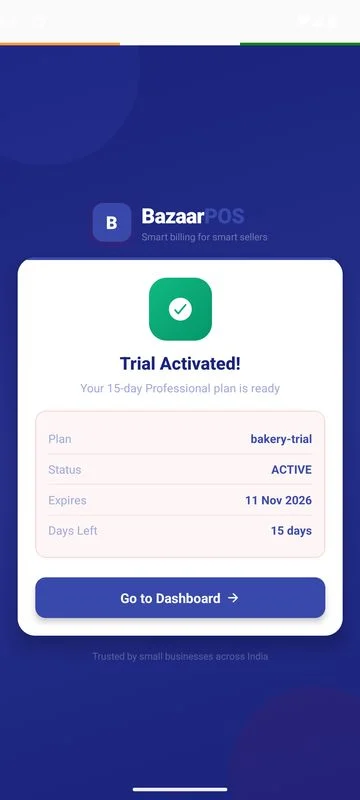
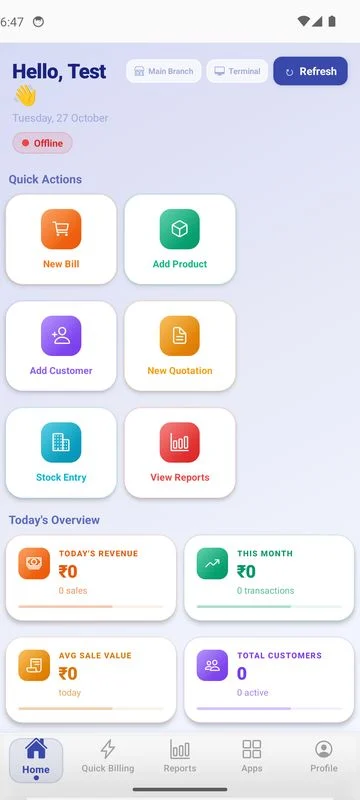
3 The Home screen
- You now see the Home screen. The small badge near the top says Offline because the phone is not yet connected to your shop's information. This is normal — go to Part 2.
- If the screen stays empty for more than a few minutes, close the app completely and open it again.
4 If you already bought a licence
- Sign in with the same mobile number you used when you bought. The app finds your purchased licence by itself.
- You see License Activated! and Your purchased plan is ready, with your plan name and the date it ends. Tap Go to Dashboard.
- If you see Trial Activated instead, your purchase was not found. Do not worry: go to Part 10 and type your licence key.

Part 2 — Connect to the shop computer (same Wi-Fi)
After this, your items, customers, recipes and old bills appear on the phone.
1 Open Network & Sync
- At the bottom of the screen, tap Apps.
- Tap the search box at the top and type Network.
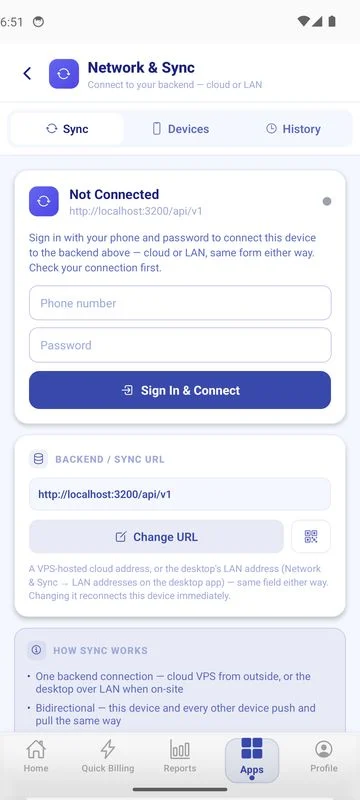
- Tap the green Network & Sync icon. It says Not Connected for now.
2 Check the address
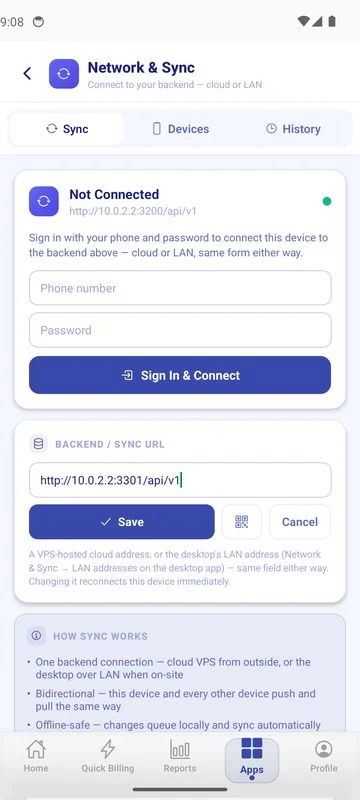
- Look at the box named BACKEND / SYNC URL. This is the place the phone will connect to.
- Inside your shop it must be the address of the shop computer. On the computer open Devices → This Device and copy the address under Network addresses.
- To change it on the phone: tap Change URL, type the address exactly as shown on the computer, then tap Save.
3 Sign in
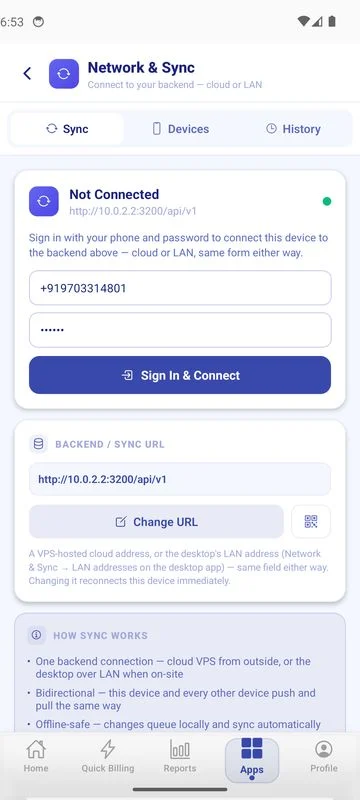
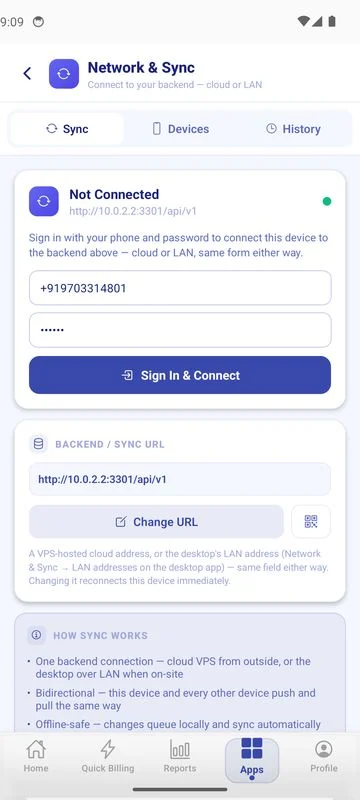
- Tap Phone number and type the same mobile number you use on the shop computer.
- Tap Password and type the same password.
- Tap the blue Sign In & Connect button and wait a little. The button shows Signing in….
4 Check that it worked
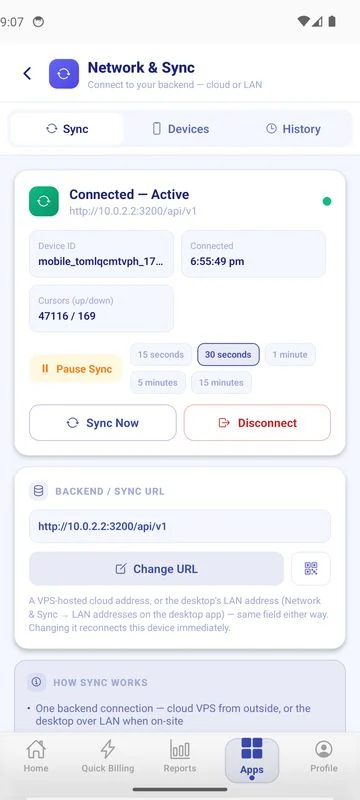
- You should see Connected — Active with a green dot. The phone and the computer are connected.
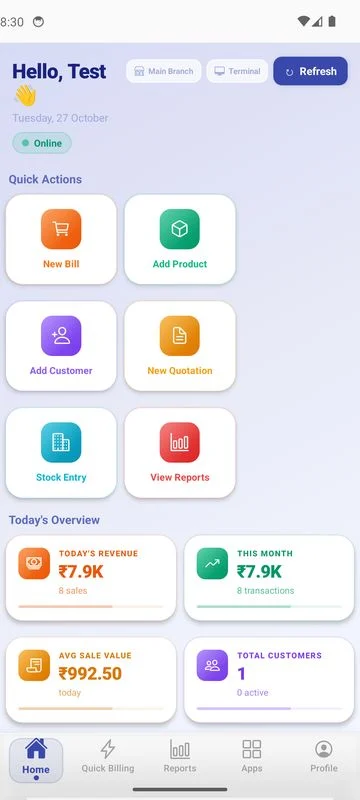
- Tap Home at the bottom. The badge now says Online and you see today's sales and your customers.
Part 3 — Use the phone away from the shop (cloud)
Outside the shop the phone cannot see the shop Wi-Fi, so it uses the cloud. The shop computer must also be connected to the cloud (see Many PCs & Phones).
1 Switch the phone to the cloud address
- Open Apps → Network & Sync.
- If the phone is already connected, tap Disconnect. The button changes to Tap again — tap it once more to confirm, then tap OK on the message.
- Tap Change URL, type
https://www.bazaarpos.in/pos-app-backend/api/v1and tap Save.
2 Sign in to the cloud
- Type your mobile number and password, then tap Sign In & Connect.
- Wait for Connected — Active with the green dot.
- To go back to the shop Wi-Fi later, repeat these steps and type the shop computer's address instead.
Part 4 — How sharing works
- How fast? The phone and computer share about every 30 seconds. When busy it can take one or two minutes.
- Want it now? Open Apps → Network & Sync and tap Sync Now.
- No internet? You can still make bills. The phone keeps them safely and sends them when it is connected again.
- Stock stays right. If you sell 1 piece on the phone and 1 on the computer at the same time, stock goes down by 2 on both. Nothing is counted twice and nothing is lost.
- Give every computer its own terminal. The bill number carries a terminal code, like
MAIN02inMAIN02-00011. Over the cloud, every phone and computer gets its own code by itself. On the same Wi-Fi, a phone is given the next free code, so on the shop computer pick a terminal other than 01 (for example 05) when phones connect to it. If two bills ever get the same number, both are kept and the later one gets a short extra code at the end.
Part 5 — Every day
1 Sign in
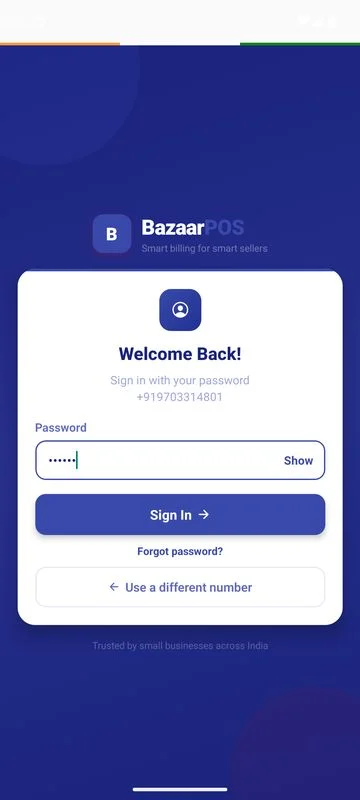
- Open the app, type your mobile number and tap Continue.
- Type your password and tap Sign In.
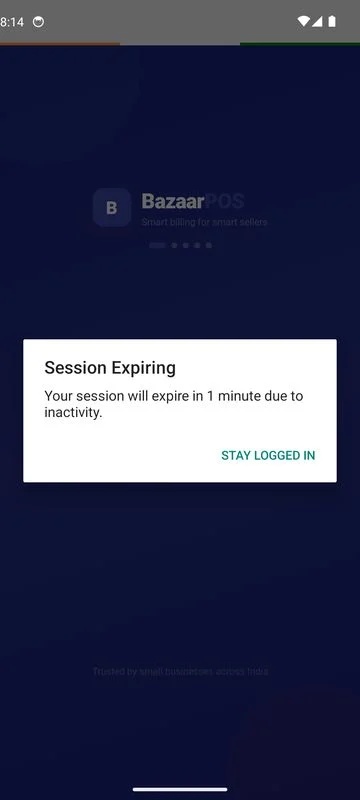
- If you do not touch the phone for a while the app warns you, then signs you out to keep your shop safe. Tap Stay logged in to carry on.
2 Choose your branch
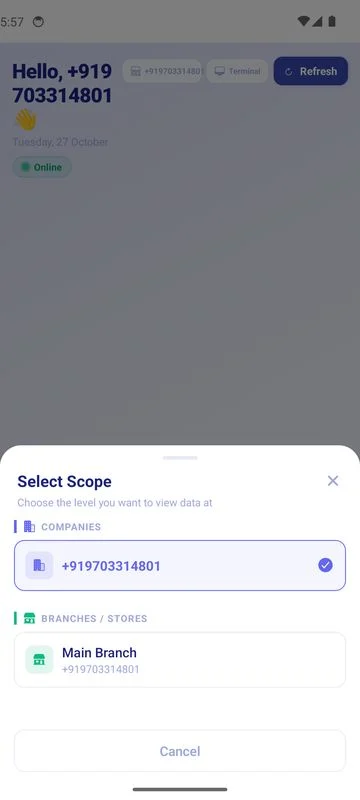
- If you have more than one shop, make sure the right branch is chosen at the top of the Home screen. Bills go to that branch.
- The Home screen shows today's sales, this month, the average bill and your customers. Tap Refresh at the top to update the numbers.
Part 6 — Make a bill
1 Add items
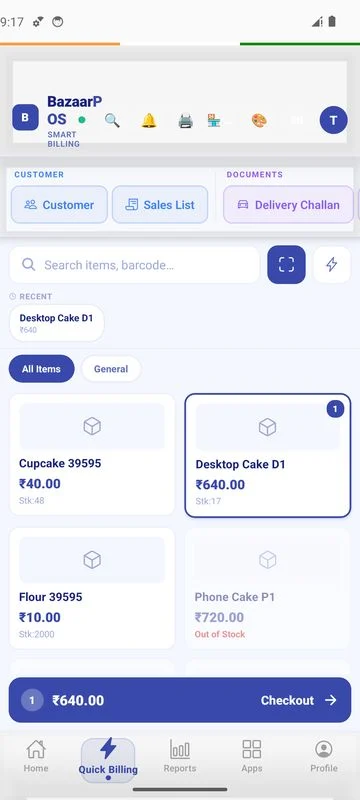
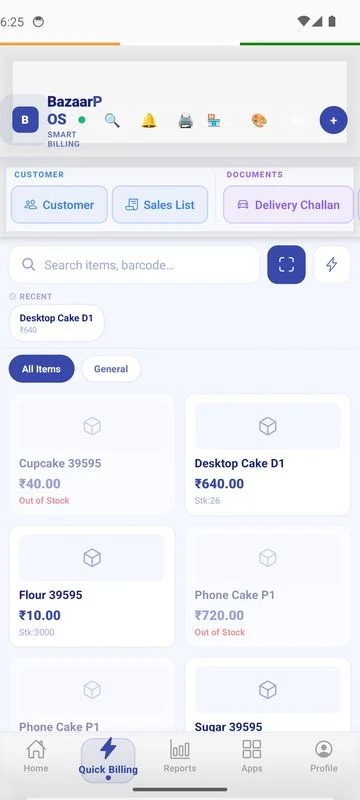
- At the bottom, tap Quick Billing.
- You see your items with the price and how many are in stock (Stk). Tap an item once for each piece the customer wants. A small number on the item shows how many you added.
- If an item shows Out of Stock, you have none left.
2 Checkout
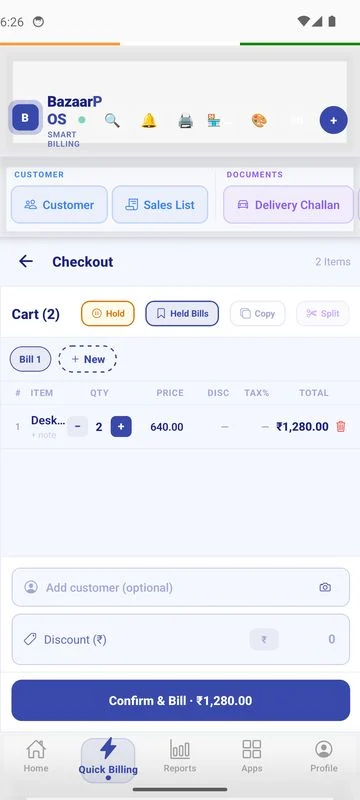
- Tap the blue bar at the bottom that says Checkout.
- Check the list: item name, quantity and total. To remove an item, tap the red bin on its line.
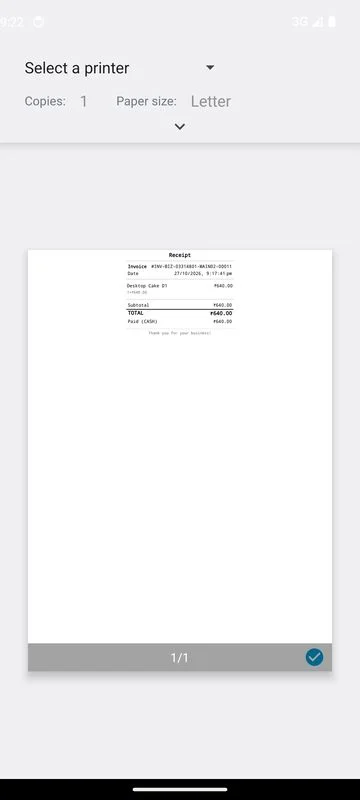
- Choose how the customer pays and finish the bill. The receipt appears — you can print or share it.
Part 7 — Pre-orders (orders for later)
Use this for cakes or other orders the customer collects on another day.
1 See your pre-orders
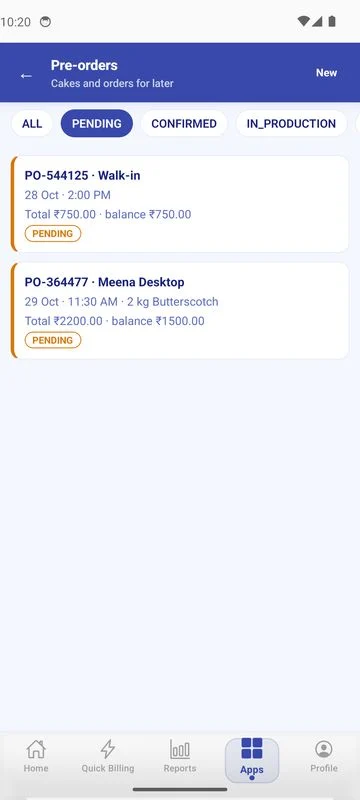
- Tap Apps, type Pre in the search box and tap Pre-orders.
- You see all pre-orders, including ones made on the shop computer. Tap PENDING, CONFIRMED… at the top to see only those.
2 Add a new pre-order
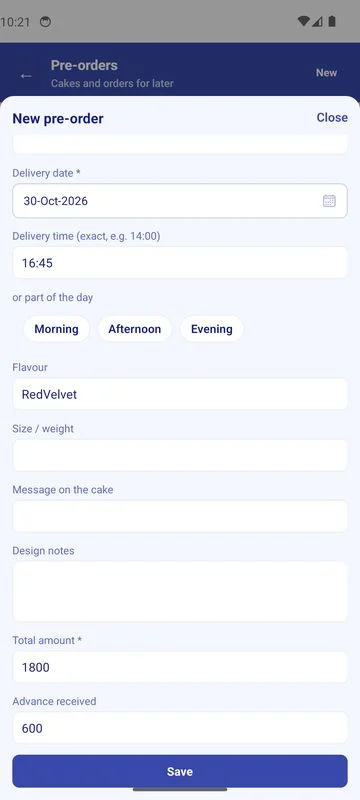
- Tap New at the top right.
- Fill in Customer name and Phone, then the Delivery date (tap the day, then Done) and Delivery time (type like 16:45, or tap Morning, Afternoon or Evening).
- Add the Flavour, Size / weight, Message on the cake and Design notes, then the Total amount and the Advance received.
- Tap Save. It shows on the shop computer a minute later, with the advance payment.
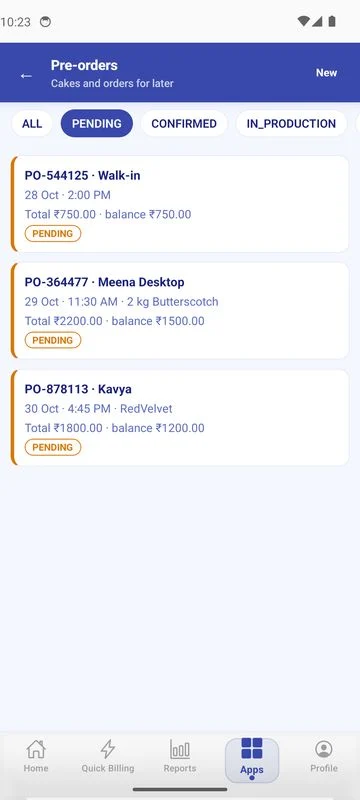
Tap a pre-order to open it. You can Collect payment, Mark confirmed, Bill at counter (the advance already paid is taken off) or Cancel order.
Part 8 — Cake orders
1 Take and bill a cake order
- Tap Apps, type Cake and tap Cake orders.
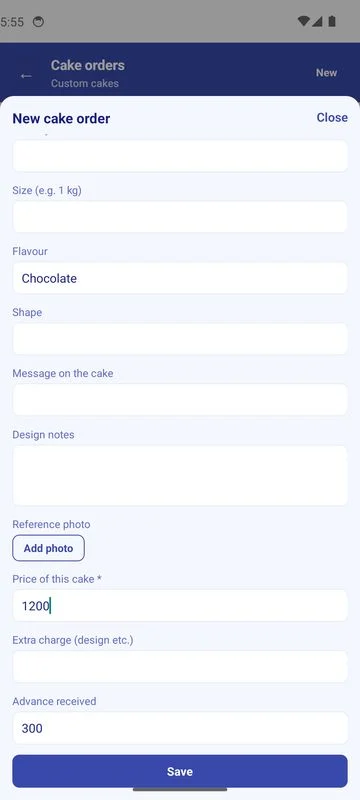
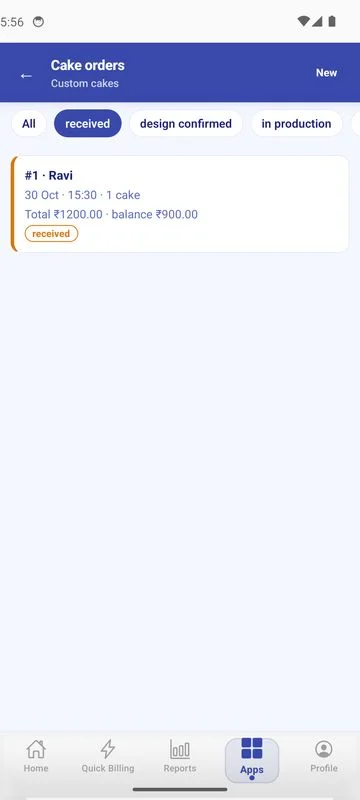
- Tap New, fill in the customer, pick-up date and time, cake details, price and advance, then tap Save. The order shows the total, the advance paid and the balance.
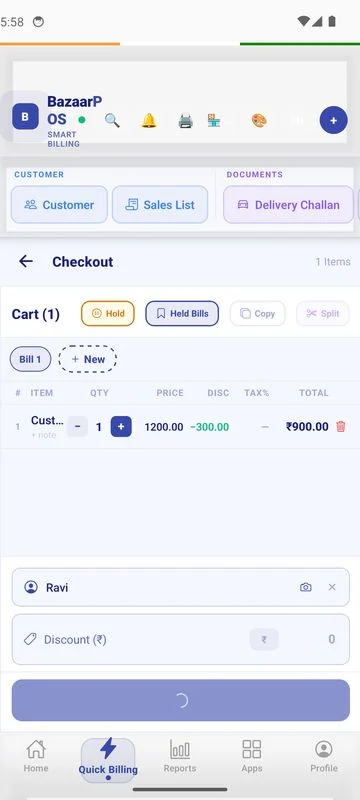
- When the customer comes, open the order and tap Bill at counter. The advance is taken off and you collect only the balance.
Part 9 — Baking (production)
Record what you bake. The app uses up raw materials and adds the finished items to your stock. Recipes are made on the shop computer and appear on the phone after sharing.
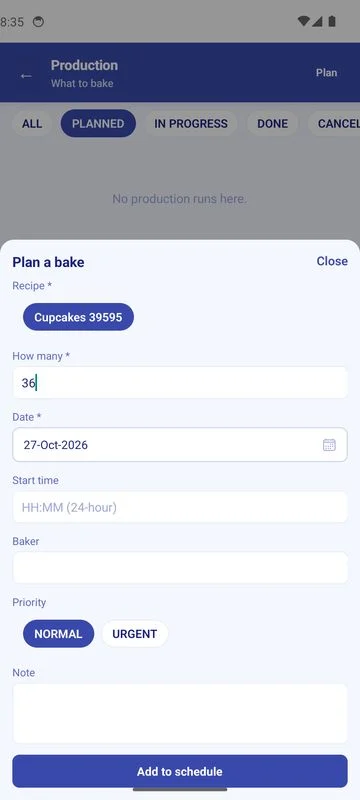
1 Plan a bake
- Tap Apps, type Production and tap Production.
- Tap Plan at the top right and tap the recipe you want to bake.
- In How many type the number of pieces, check the Date, then tap Add to schedule.
2 Start baking
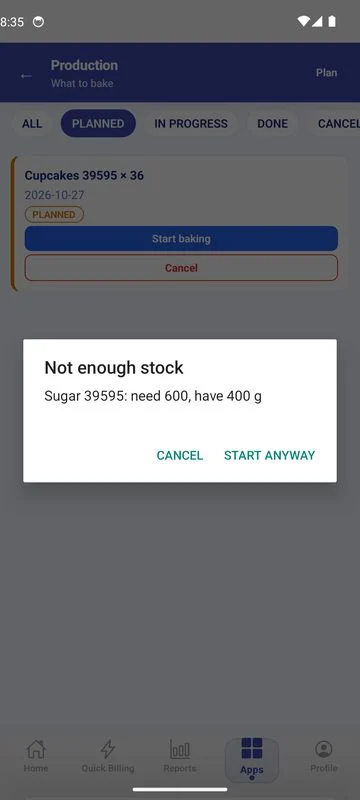
- Open the PLANNED list and tap Start baking under your bake.
- If a raw material is short, the app tells you which one — for example “Sugar: need 600, have 400 g”. Tap Cancel to add stock first, or Start anyway if you do have it but have not entered it.
3 Finish baking
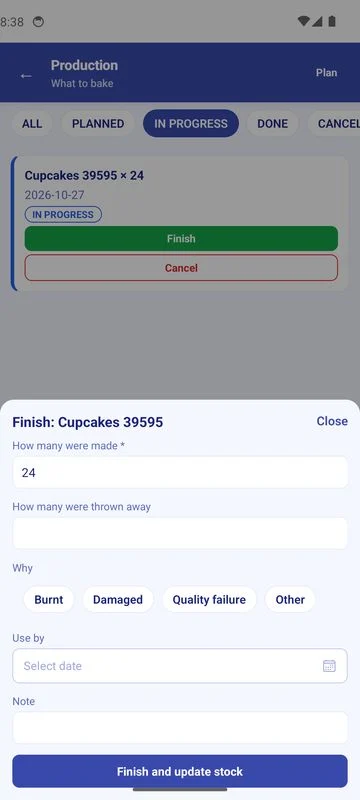
- Open the IN PROGRESS list and tap Finish under your bake.
- In How many were made check the number. If some were spoilt, type how many in How many were thrown away and tap the reason (Burnt, Damaged, Quality failure or Other).
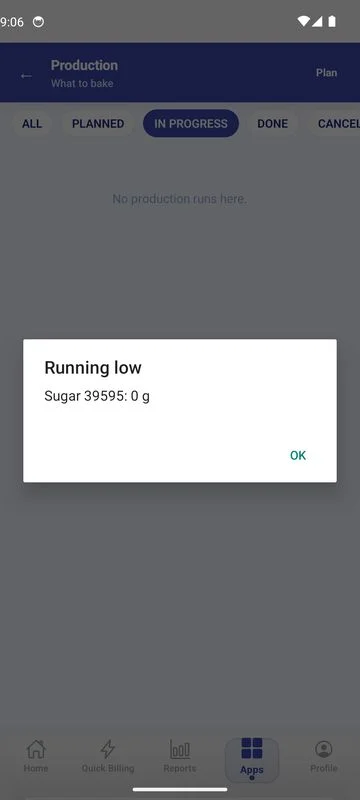
- Tap Finish and update stock. Raw materials are used up and the finished items are added to your stock on the phone and on the computer. If a raw material is now very low, a Running low reminder shows.
Part 10 — Your licence: trial, purchased key and Sync Now
A new phone starts on a free trial. When you buy a plan you get a licence key (a code like 1A2B-3C4D-5E6F-7A8B). Typing it in the app switches your phone from the trial to your purchased plan. Your bills and products stay as they are.
1 Open the License screen
- At the bottom of the screen tap Apps, then tap License.
- At the top you see your Subscription Key. Under it the card shows your plan name (here POS TRIAL Plan), how many Branches, Desktops, Mobiles and Users it allows, and the date it Expires.

2 Type your purchased key
- Scroll down to Activate License Key.
- Tap the box and type the key you received after buying (the 16 letters and numbers in 4 groups).
- Tap the blue Activate button.

3 See the message and check your plan
- The message Success — License activated! appears. Tap OK.
- The card now shows your purchased plan, the new limits and the new end date. The trial is gone.
- Close the app and open it again: your plan is still there.


4 Sync Now (refresh your licence)
- Use Sync Now after you renew or upgrade your plan on the website, so the phone picks up the change.
- Tap Sync Now on the plan card. Wait a moment. License synced with cloud. means it worked. Tap OK.
- You need internet for this. Without internet your licence keeps working, and you can try again later.

5 If the key is not accepted
- You see License key not accepted. Your current plan does not change.
- Check the key letter by letter: ask for it again from the email or SMS we sent after your purchase, or from bazaarpos.in → Dashboard → Licenses.
- Check your internet and tap Activate again.
6 Update the phone app
- Download the new BazaarPOS app file (.apk) from the link we sent you.
- Install it over the old app. Do not uninstall the old one first, so your information stays on the phone.
- If the phone says it cannot install, stop and contact support before you remove anything.
Saving the shop address
After you tap Save on Apps → Network & Sync, the message Backend URL updated — reconnecting in the background… means the address was saved. If you typed the licence-server address by mistake, the app tells you and saves the right shop address instead.


Troubleshooting & FAQ
The Home screen says Offline.
Network & Sync says Not Connected.
I see Cannot reach the licence server.
I bought a licence but the app gave me a trial.
I see License key not accepted.
Sync Now says it could not reach the licence server.
I typed the address and the app says That address is the licence server.
/gate1/api is for licences. The app saved your shop address (https://www.bazaarpos.in/pos-app-backend/api/v1) instead. Now sign in with your mobile number and password.After saving the address I see Could not connect.
I see Invalid or revoked device token.
Numbers on the phone are old.
A pre-order, recipe or customer made on the computer is missing on the phone.
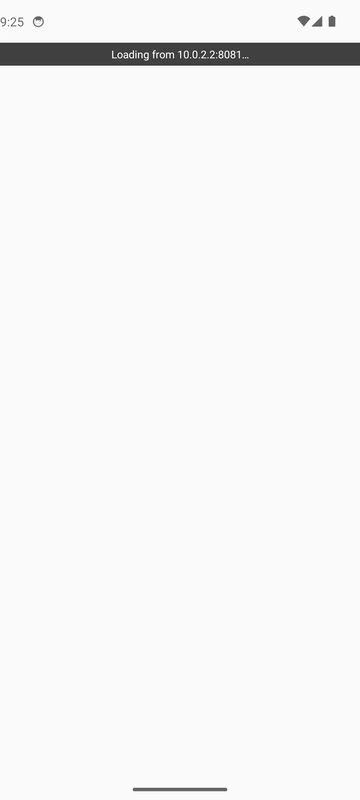
The screen is blank when I open the app.
Not enough stock when starting a bake.
The phone cannot connect inside the shop.
Still stuck? Contact support and tell them exactly what the screen says, or send a photo of it.