Building Materials Setup
Run a cement, steel, tiles or hardware dealership in BazaarPOS: sell the same item by the bag, the tonne or the box, keep each contractor's sites with what they owe, use the rates you agreed with them, add freight and loading to a bill, and deliver big orders in lots.
How it fits together
You keep your normal Items, Customers, billing, quotations, sales orders and delivery challans. Nothing is entered twice. The Building section adds what a dealer needs on top:
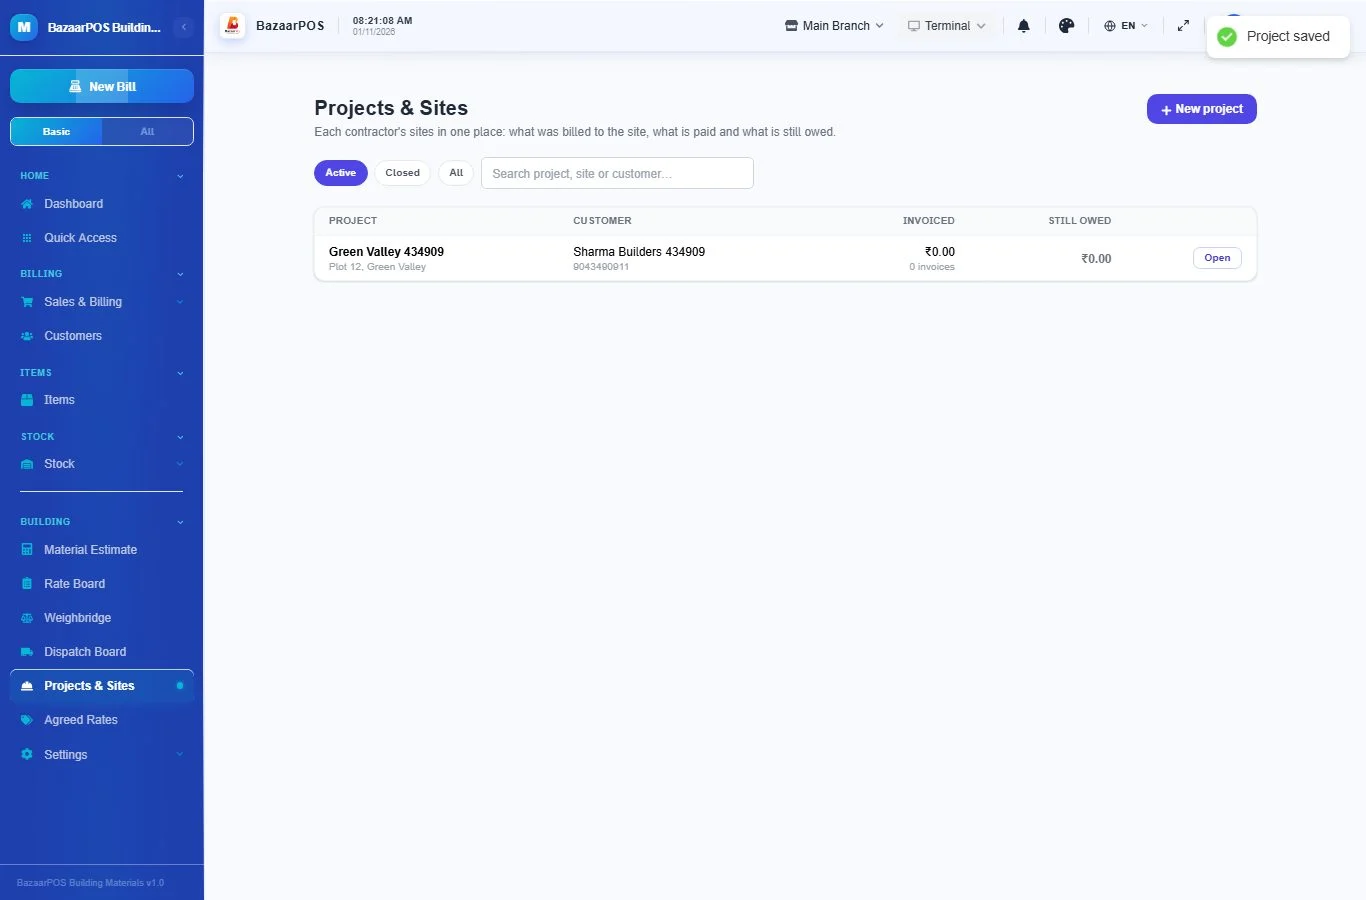
- Projects & Sites: a contractor's sites. Bills, orders, quotations and challans are linked to a site, and each site shows what was billed, what is paid and what is still owed.
- Agreed Rates: the price you agreed with a customer, or with one of their sites, for a period. Billing uses it by itself.
- Building tools in billing: pick the site, add freight, loading or unloading to the bill, and use the agreed rates.
The rest is what BazaarPOS already does for every shop: items sold in more than one unit, credit limits and statements, partial deliveries and delivery challans. Those are shown below, so you can set everything up in one place.
Step 1: Items and units
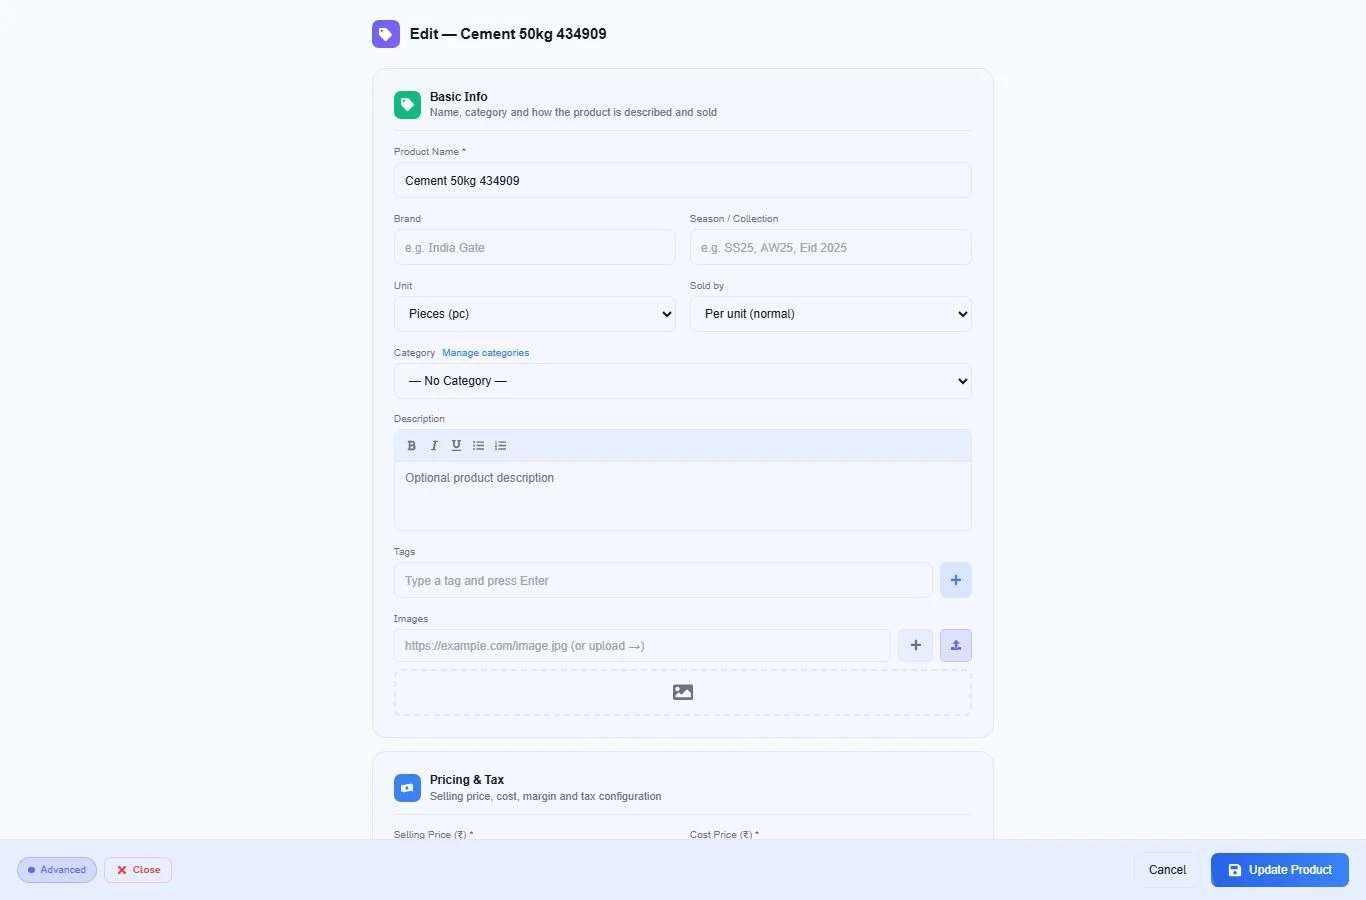
Open Items and add cement, steel, tiles and the rest as usual. Two boxes matter for a dealer:
- Unit is how you count the item (pieces, kg, bag, tonne).
- Sold by lets you sell by length or by area instead of by the piece, for pipes, wire, sheets and tiles. At billing you type the width and height and the price is worked out.
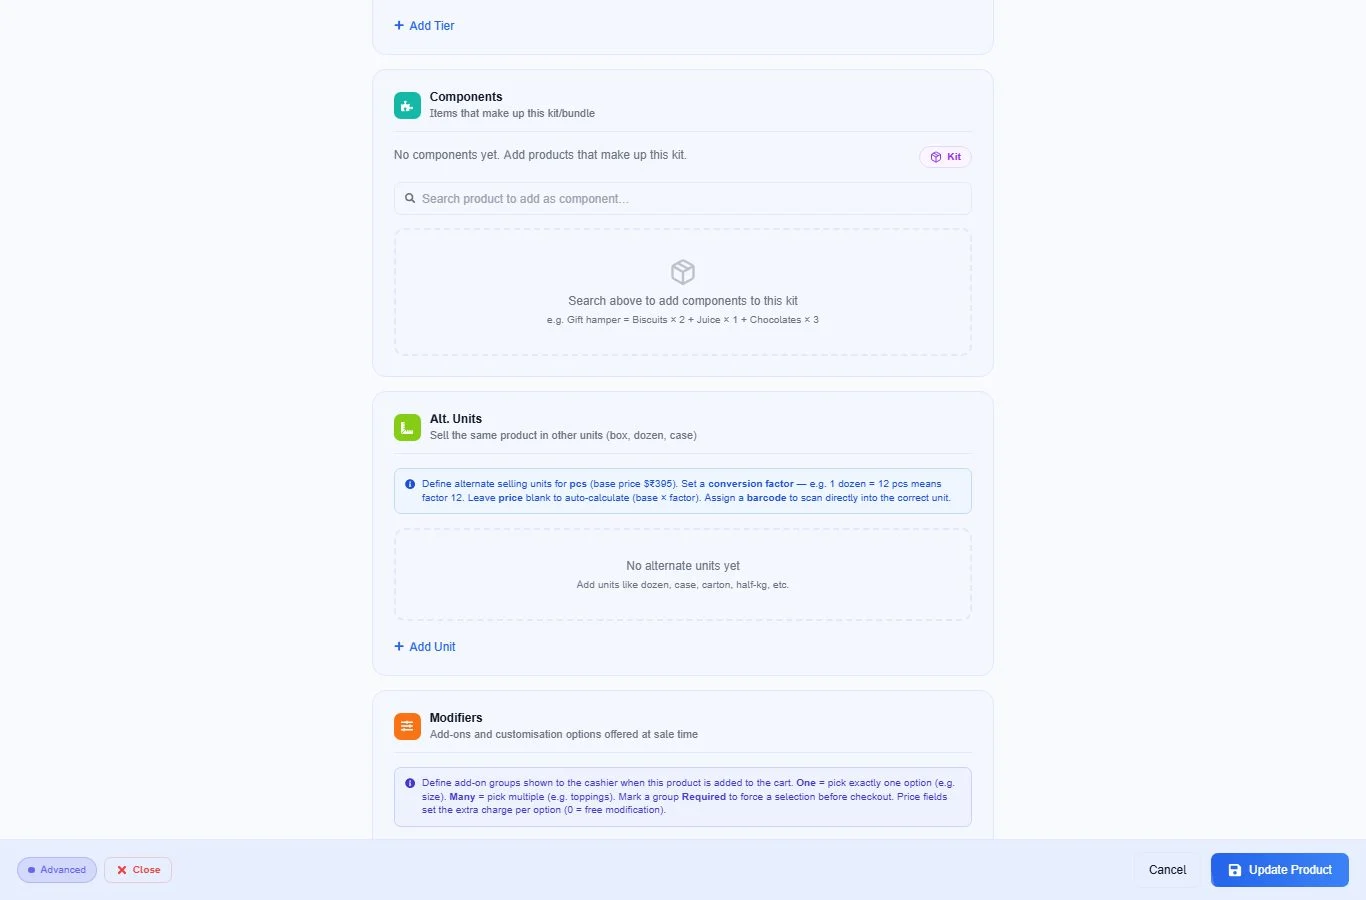
To sell the same item in another unit, scroll down to Alt. Units. Add the unit (for example box or tonne) and its conversion factor: if a box holds 12 pieces, the factor is 12. Leave the price empty and it is worked out from the base price. You can give each unit its own barcode.
The first time you open the Building app, BazaarPOS adds the units a dealer sells by to the units list: sq ft, sq m, running ft, tonne, quintal, cu ft, cu m, brass, bundle, sheet and truck load. You can pick them in Unit and in Alt. Units.
Step 2: Add a contractor's project or site
Open Building → Projects & Sites and press New project. Choose the customer (the contractor or builder), write the project or site name, and the site address: it becomes the delivery address on the bill. Add the site contact, and a credit limit for this site if you want one.
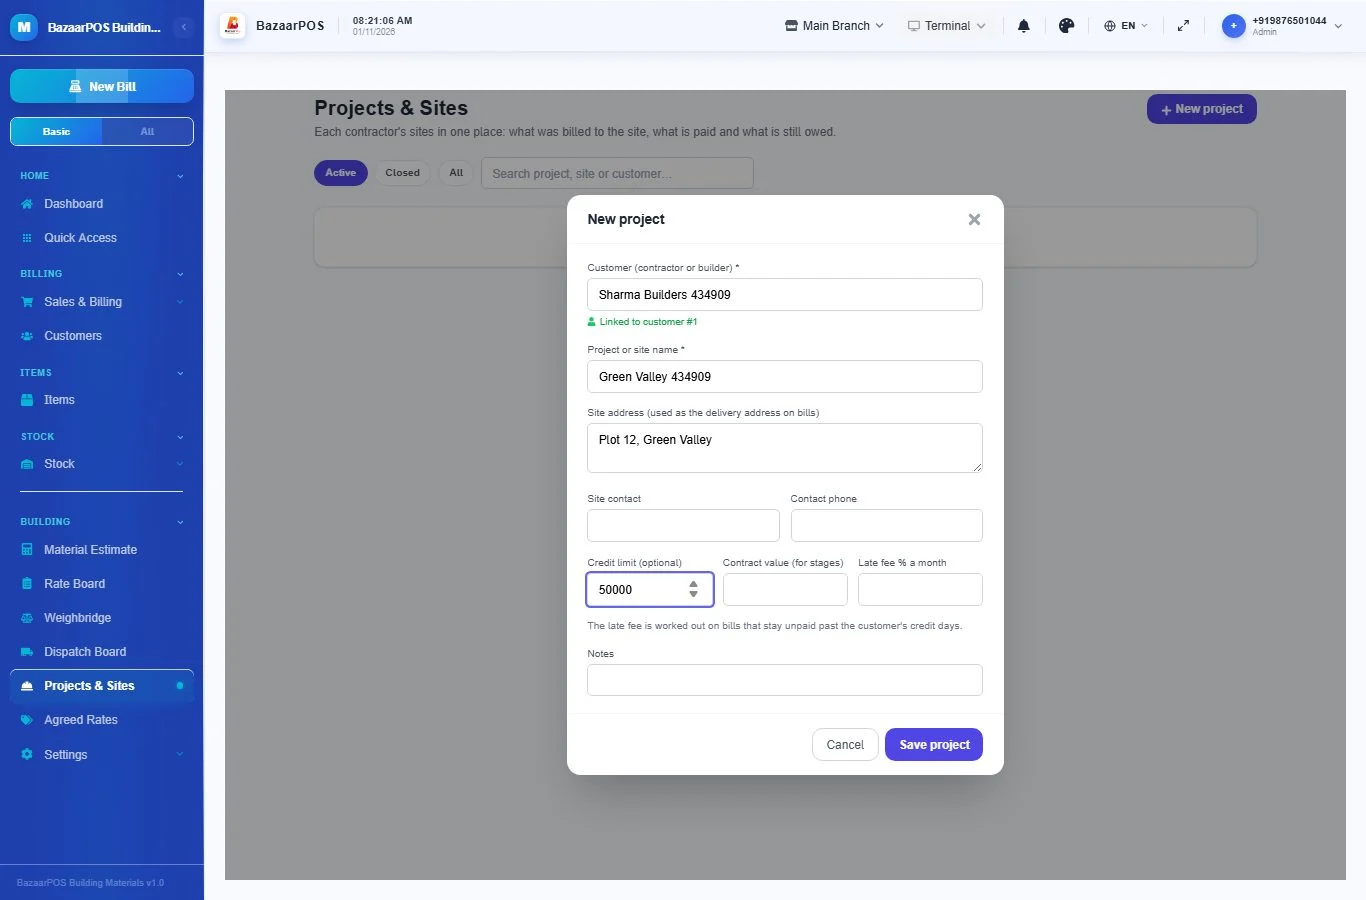
The same name can be used for two different customers, but not twice for one customer. A project can be closed when the work is over; a closed project takes no new documents.
Step 3: Bill a site, with freight and loading
Open New Bill and choose the customer. A Building tools button appears at the bottom left of the billing screen. Press it:
- Project / site: pick the contractor's site. You see what the site already owes against its credit limit. The site address is filled in as the delivery address. When the bill is saved it is added to the site by itself.
- Add a charge to the bill: press Freight / transport, Loading charges, Unloading charges or Other charges, write the amount and the tax percent, and press Add to bill. It becomes a line on the bill. The tax starts at the highest rate on the bill, because transport that goes with goods is usually taxed like the goods. Change it if your tax advisor says otherwise.
- Use the rates agreed with this customer: when ticked, items that have an agreed rate get that price automatically (see Step 5).
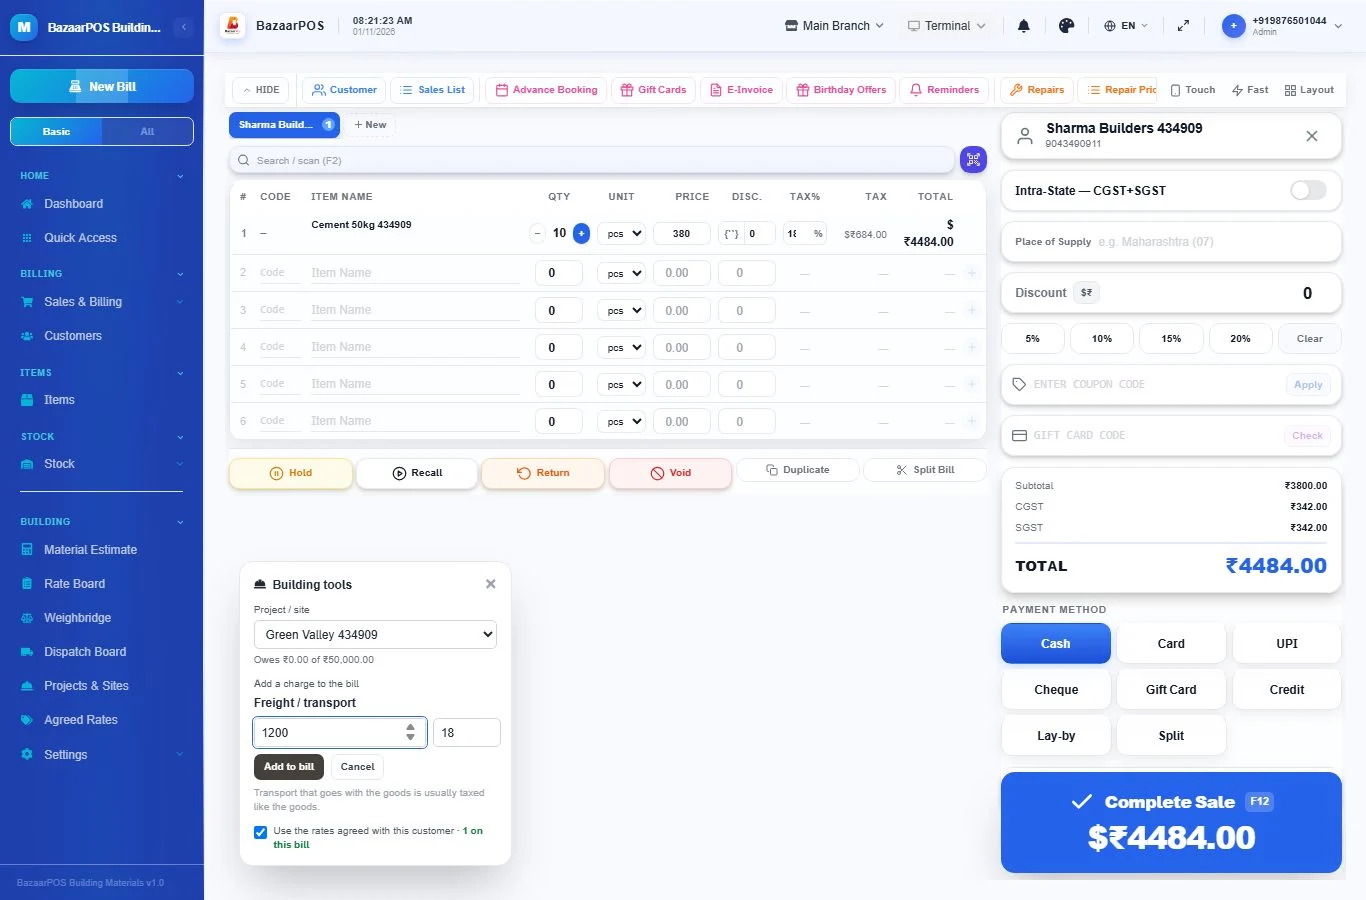
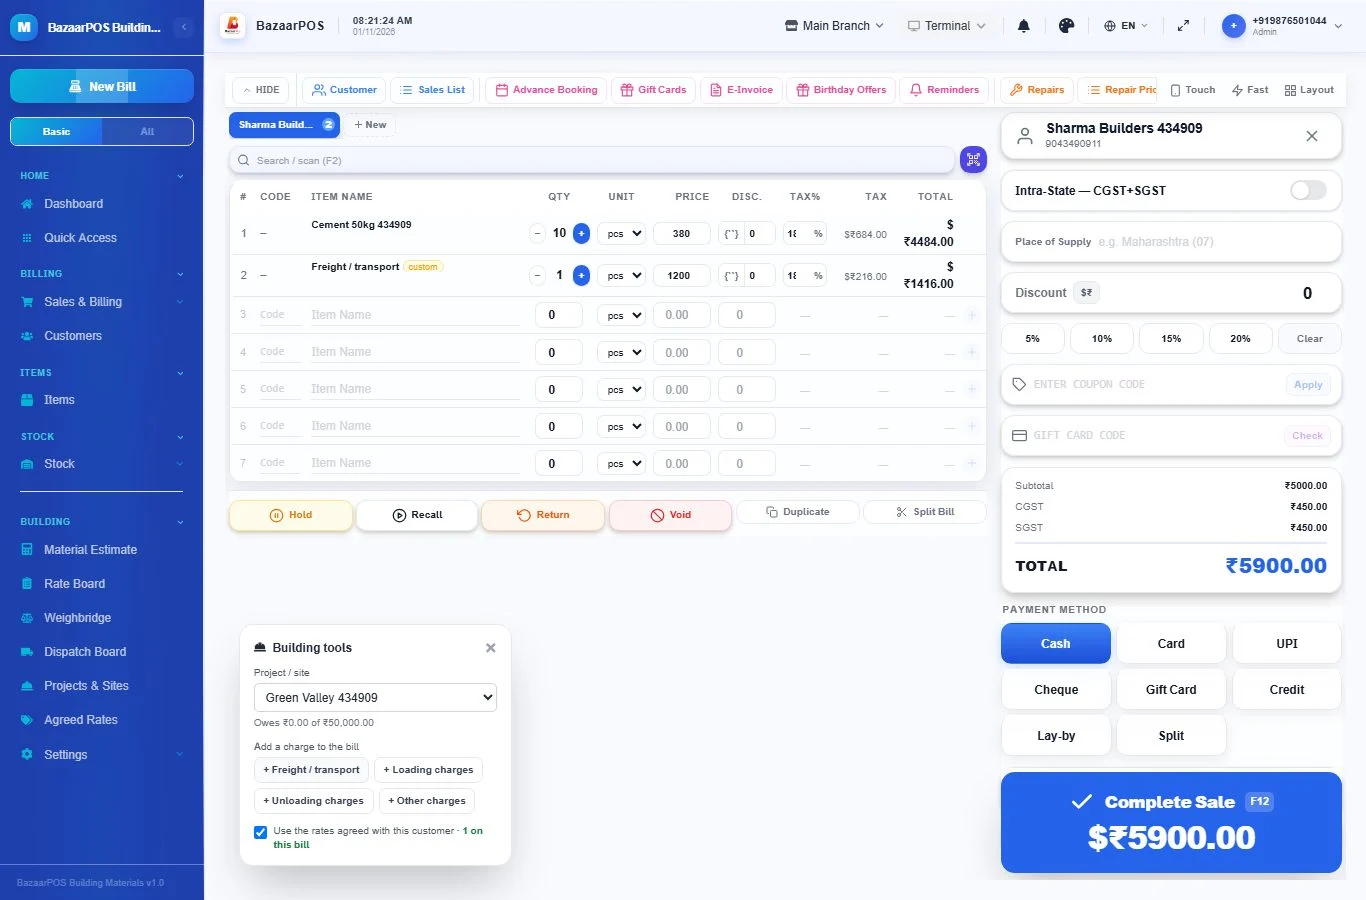
The same cart can be saved as a quotation or a sales order instead of a bill. With a site picked, it is added to the site as well, and the freight and loading lines and the agreed rates are on it too. A delivery challan made from a bill, and the invoice you make for a lot of a sales order, join the same site by themselves.
Step 4: See what a site owes
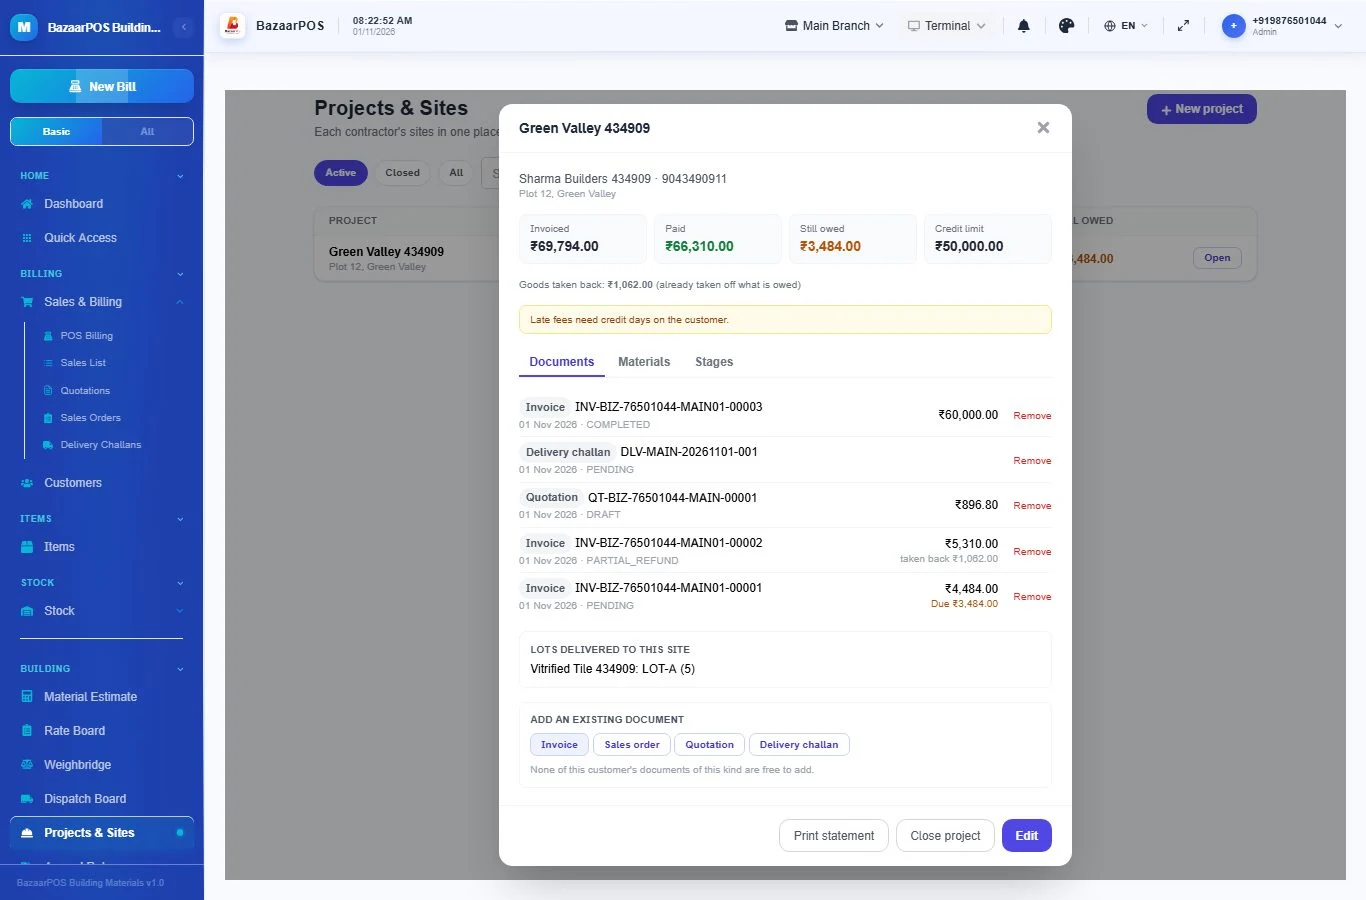
On Projects & Sites, press a project. You see Invoiced, Paid, Still owed and the credit limit, then every document of the site. Goods the customer took back are taken off what is owed and shown as Goods taken back. A challan that has been delivered shows who received it. Under Add an existing document you can add an older invoice, sales order, quotation or delivery challan of the same customer. Print statement gives a page you can hand to the contractor. Close project when the work is done.
Late fee. When you edit the project, write a Late fee % a month. Bills that stay unpaid past the customer's credit days (set on the customer) then earn a fee for each day late, shown on the statement with an Add to a bill button that puts it on a bill. A customer with no credit days earns no late fee.
Step 5: Tile shade and lots
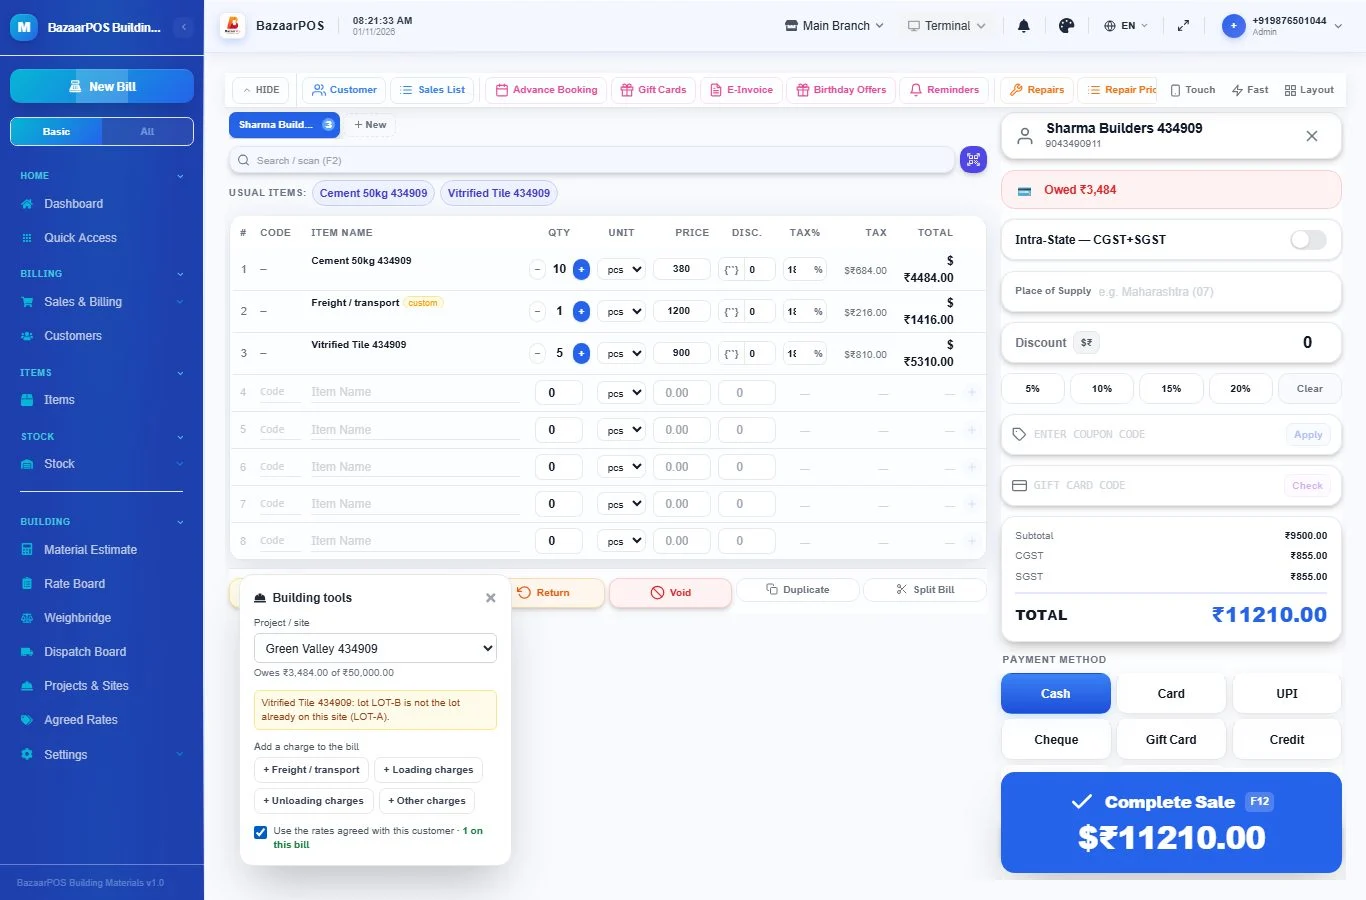
Tiles, paint and some other goods differ from lot to lot, and two lots on one site can look different. When you receive stock, give it a batch number: for tiles, the shade or lot number printed on the box. When you bill, choose the batch. On Projects & Sites, the site's statement lists Lots delivered to this site with the quantity of each lot, and marks an item that has gone out in more than one lot.
While you bill a site, the Building tools panel warns you if the lot on the bill is not the lot the site already has.
Step 6: What has gone to the site, against the plan
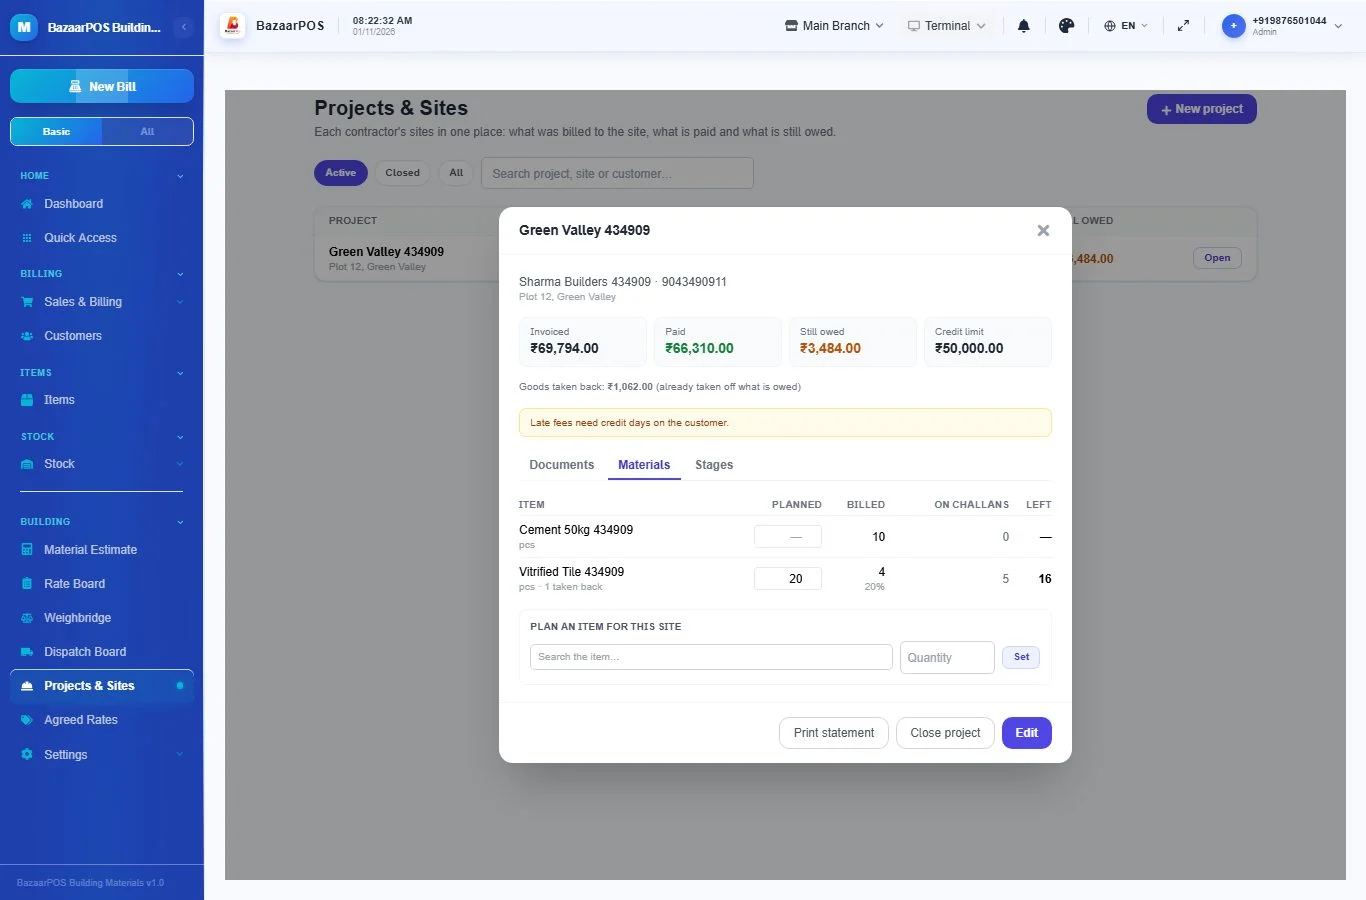
Open a project and press the Materials tab. For every item that has gone to the site it shows what was billed (less anything taken back), what is on challans, and what is left of the quantity you planned. Write the planned quantity next to an item, or choose an item under Plan an item for this site, and the percent delivered shows beside it. A quantity turns red when more than the plan has gone out.
Step 7: Bill a project in stages
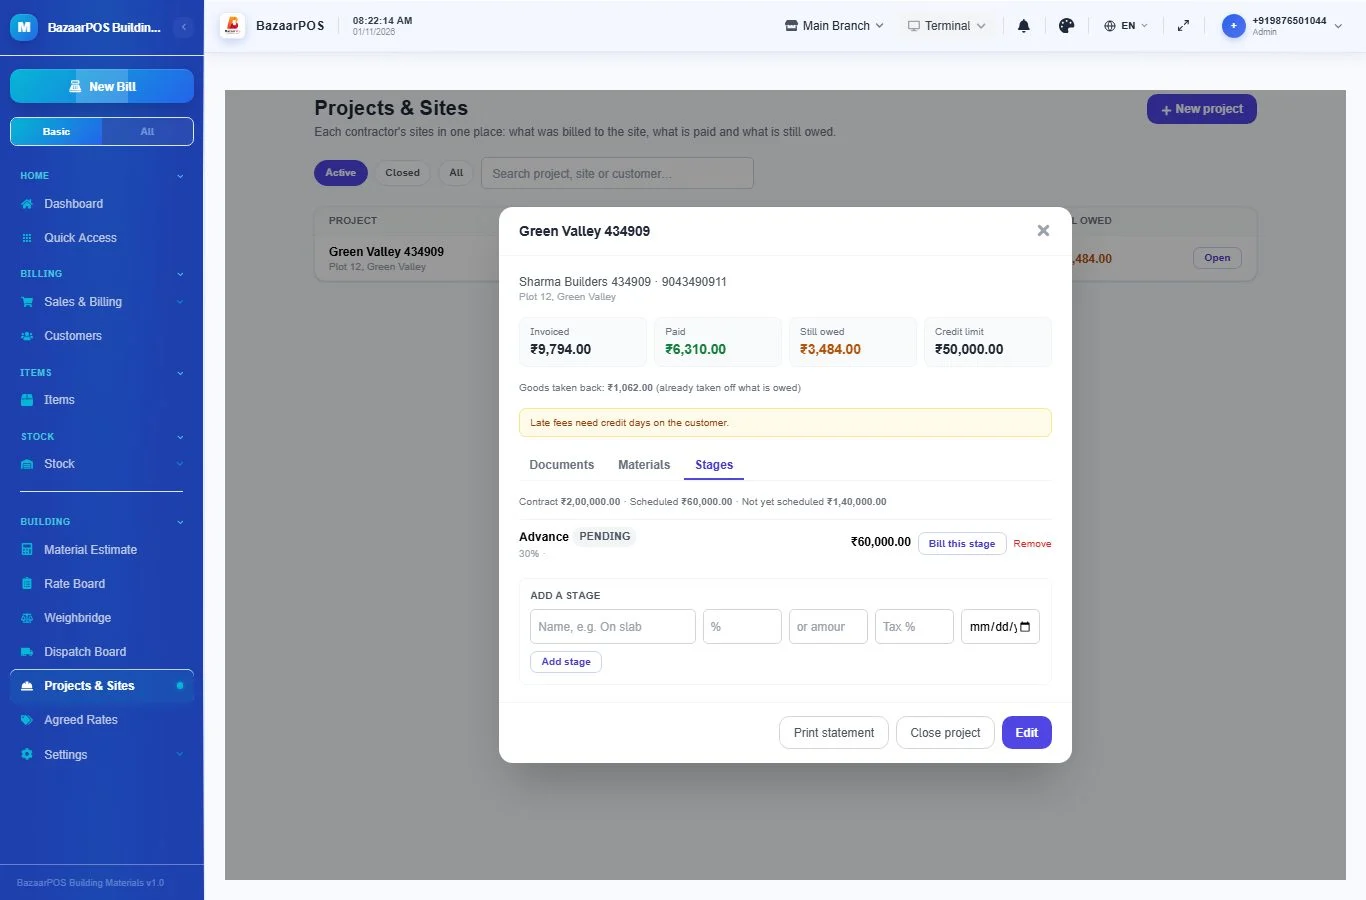
For a job paid in stages (an advance, a payment on the slab, a final payment), write the Contract value when you edit the project. Open the Stages tab and add each stage with a name and either a percent of the contract or an amount, a tax percent and a due date. When a stage is due, press Bill this stage: billing opens with the customer and one line for the stage. Save the bill and the stage becomes Billed, then Paid when the money comes in. A stage past its due date shows Overdue. A billed stage cannot be changed or removed.
Step 8: Estimate the material
Open Building → Material Estimate and choose what you are estimating:
- Tiles: the area, the tile size and how many tiles are in a box. You get the number of tiles and boxes, with extra for wastage (10% to start with).
- Paint and other cover: the area, the coats, and what one unit covers (for example 100 sq ft a litre). You get the litres or units.
- Concrete: the volume and the mix (for example 1:2:4). You get the bags of cement and the sand and stone in cubic metres, cubic feet and brass.
- Bricks: the wall area, the brick size and the mortar joint.
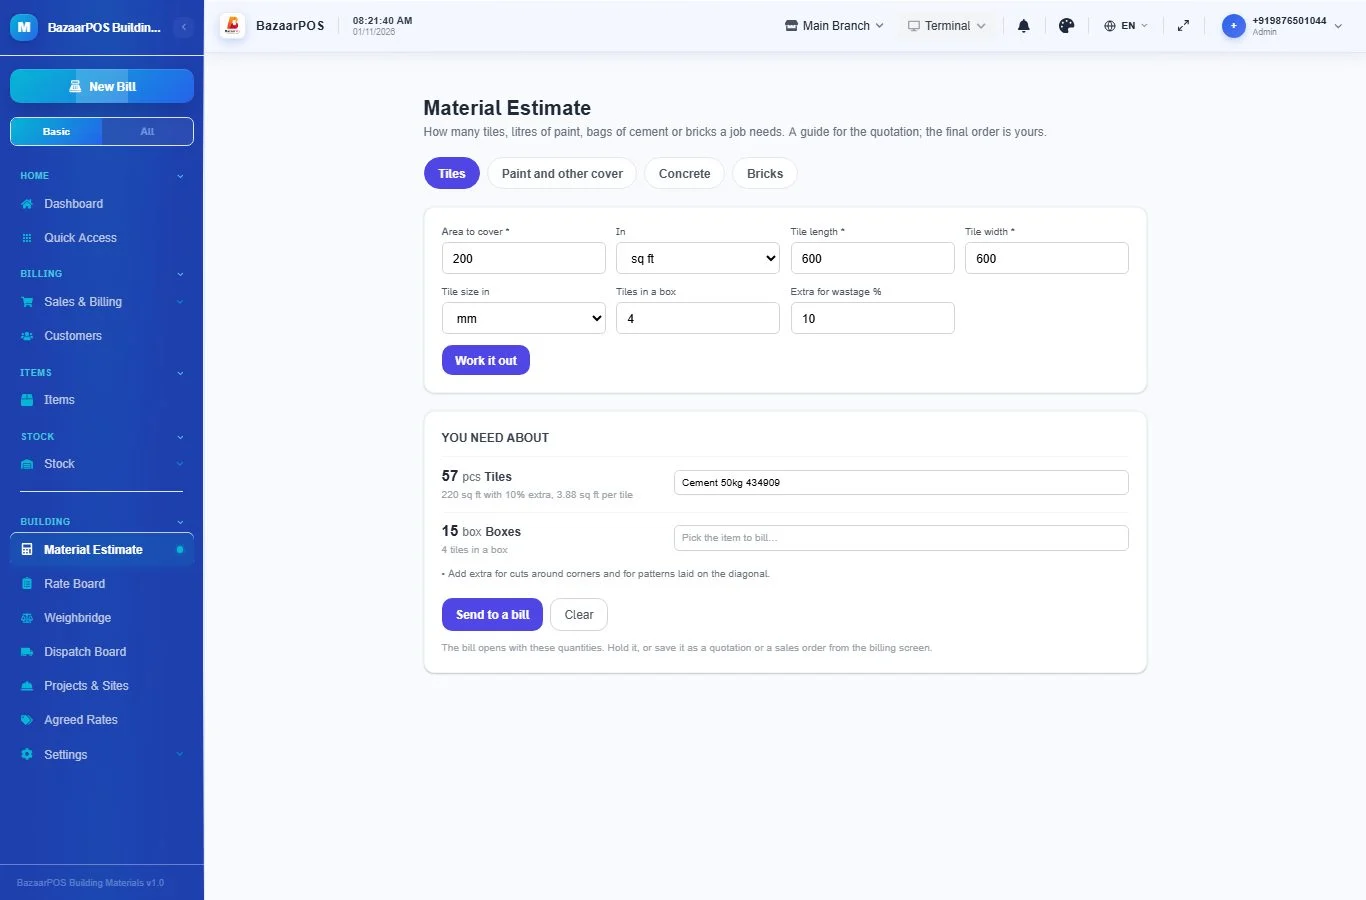
Pick the item for each line and press Send to a bill: the bill opens with those quantities. Hold it, or save it as a quotation or a sales order. The results are a guide, rounded up; the final order is yours.
Step 9: Agreed rates
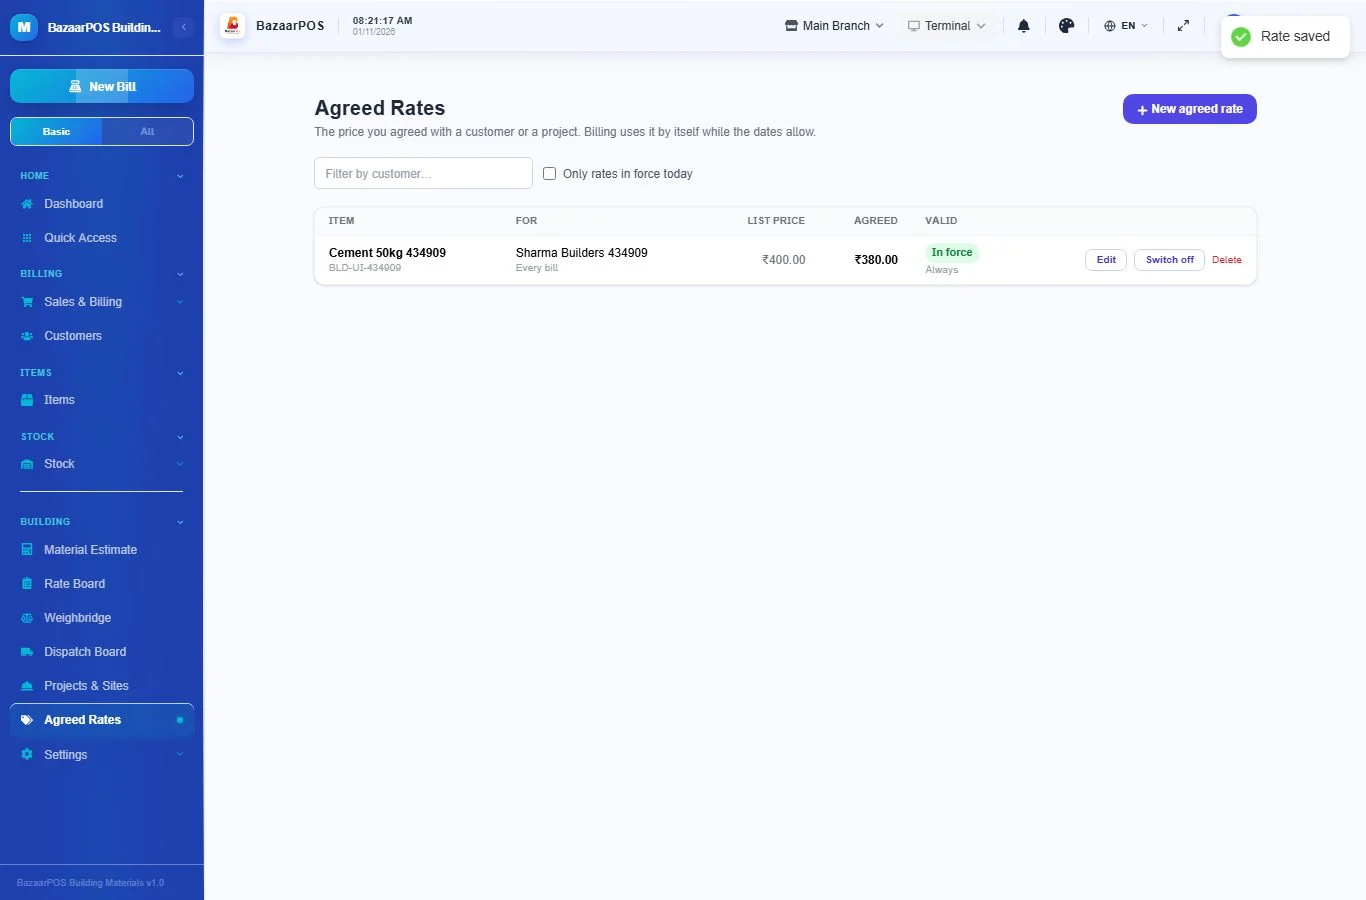
Open Building → Agreed Rates and press New agreed rate. Choose the customer and the item, write the agreed price, and the dates it is valid (leave them empty for no end). To agree a price for one site only, choose the project; a site rate is used before the customer's general rate.
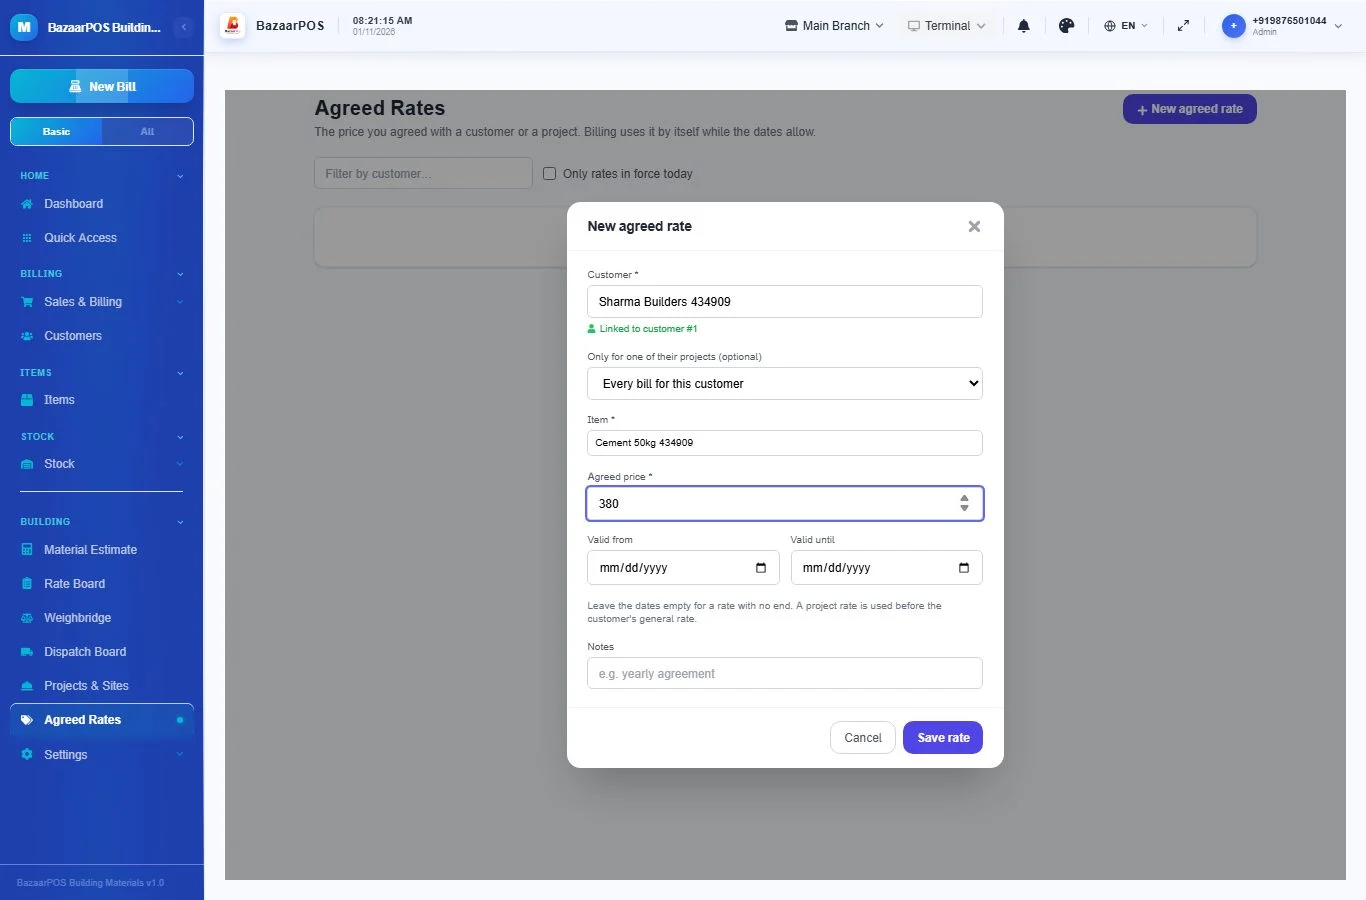
The list shows the list price next to the agreed price and whether the rate is In force, Starts later, Expired or Switched off. Switch off pauses a rate without losing it; Delete removes it. At billing, the agreed price is put on the line as soon as the customer (and the site) is chosen.
Step 10: The daily rate board
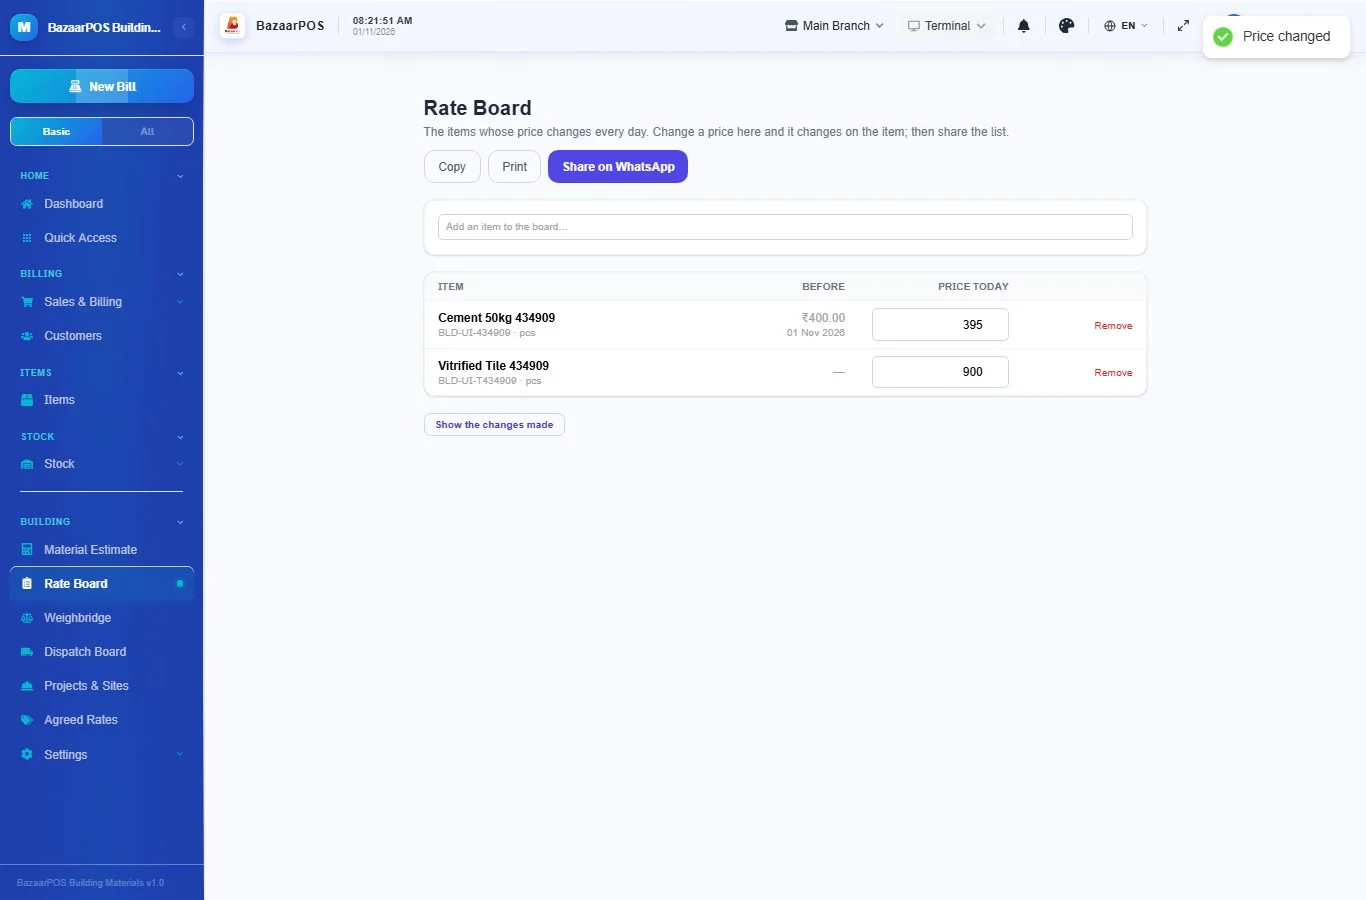
Cement and steel prices change often. Open Building → Rate Board and add the items you reprice every day. Write the new price next to an item: the item's selling price changes, and the board shows the price from before. Share on WhatsApp, Copy or Print sends the list of today's rates to your contractors. Show the changes made lists every change.
Step 11: Deliver a big order in lots
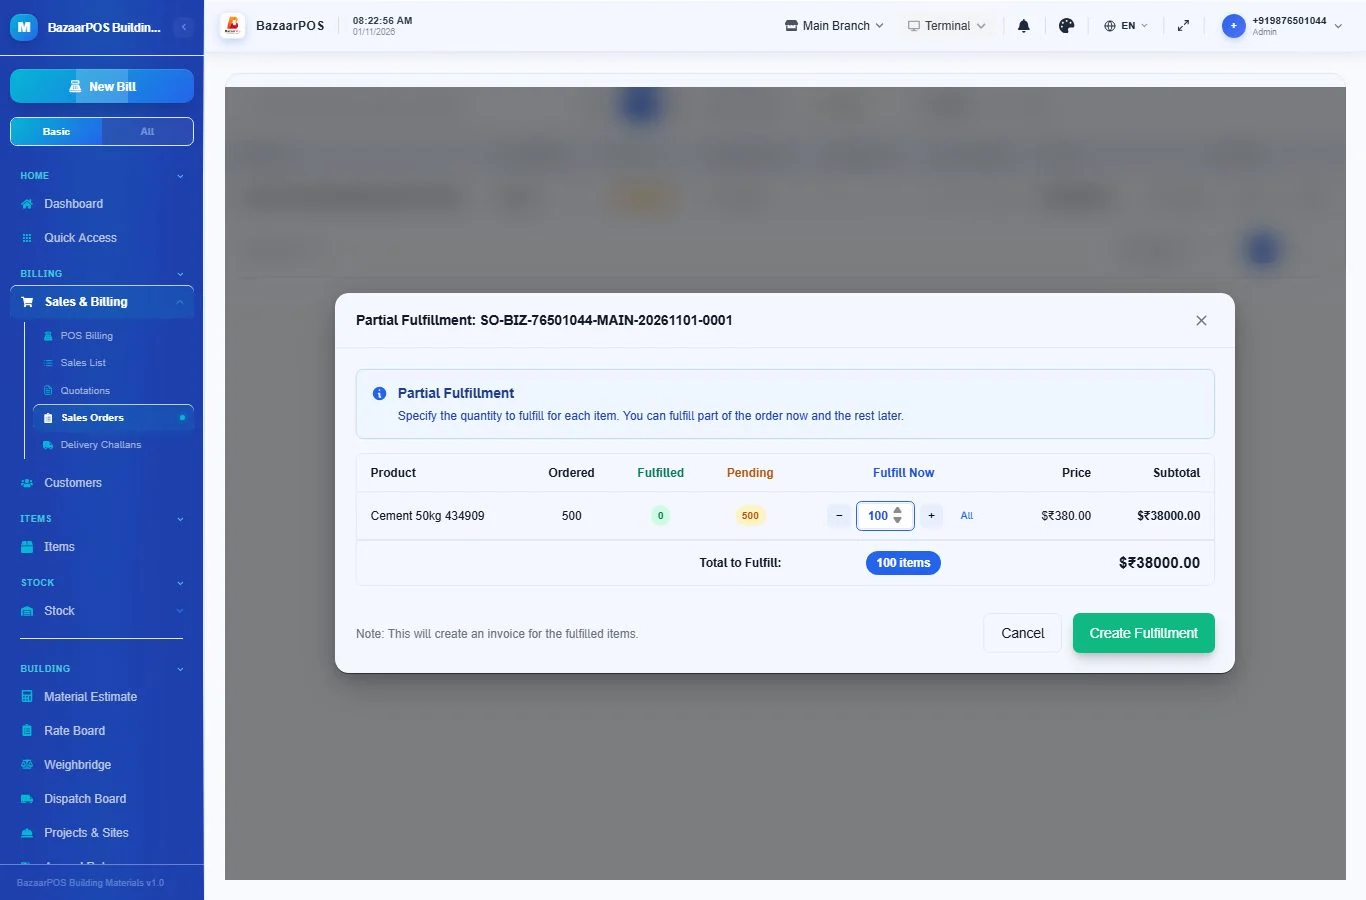
For an order such as 500 bags delivered over a month, make a Sales Order (under Sales & Billing → Sales Orders). When the first truck is ready, press Partial fulfillment on the order, write how many go on this truck in Fulfill Now, and press Create Fulfillment. An invoice is made for just those bags and the stock goes down. The order shows Ordered, Fulfilled and Pending for every item until it is complete.
For the truck itself, make a Delivery Challan (under Sales & Billing → Delivery Challans) with the vehicle number, the driver and the delivery address. You can add both the invoice and the challan to the site from Projects & Sites.
Step 12: Proof of delivery
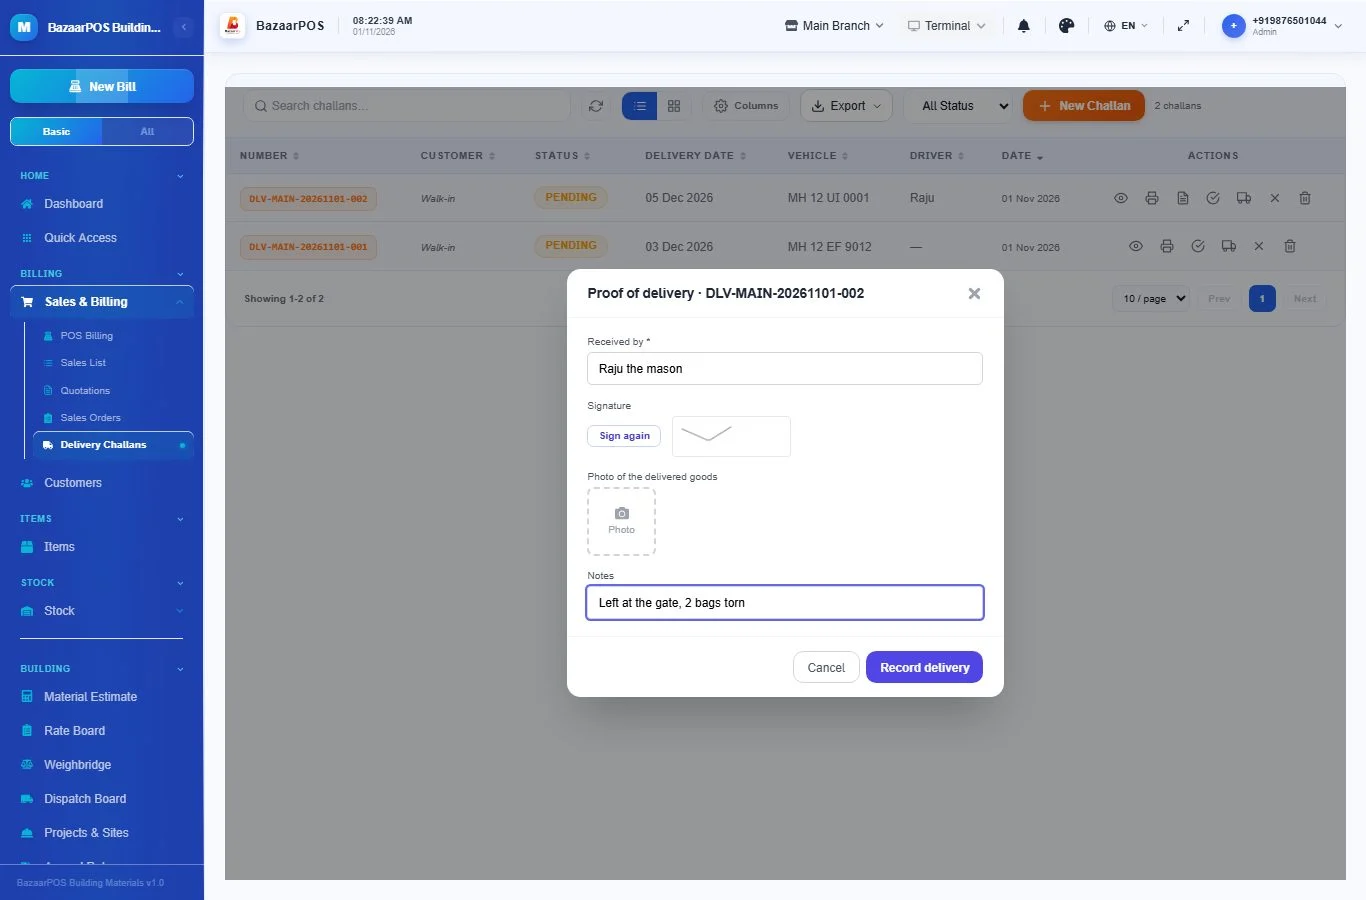
On Sales & Billing → Delivery Challans, press the tick button on a challan. Write who received the goods, take their signature, add a photo of the delivered goods and any notes, and press Record delivery. The challan becomes Delivered and keeps the proof; the site's statement shows who received it. On the phone, the challan's Proof button takes the name, a photo and notes.
Step 13: Trucks and the dispatch board
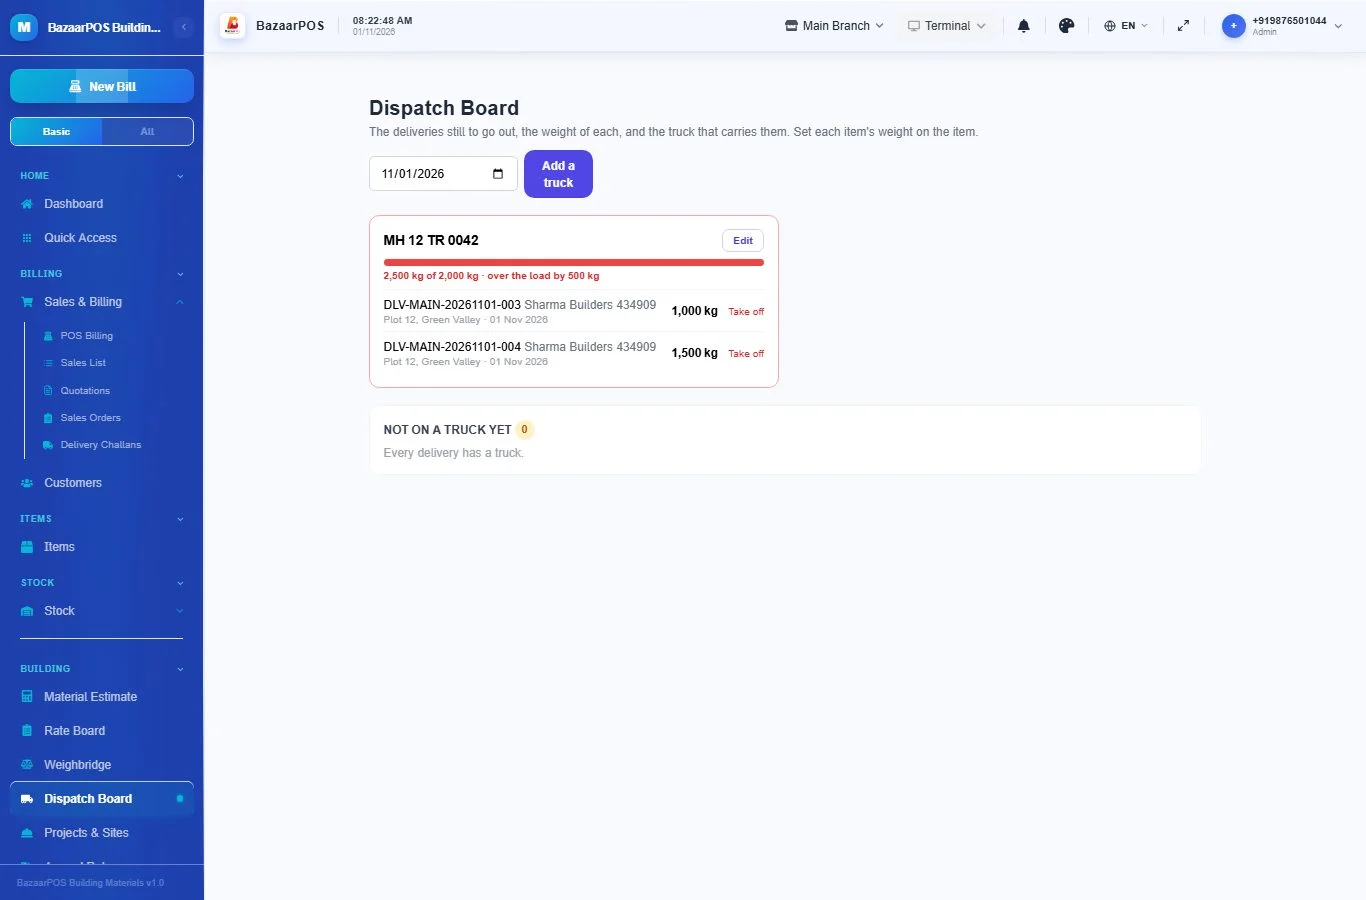
Open Building → Dispatch Board. Press Add a truck and write its number, the driver and what it can carry in kg. Set each item's weight on the item. The board lists the deliveries still to go out with the weight of each. Put a delivery on a truck from the list: a bar shows the load against what the truck can carry, and turns red with over the load when you have put on too much. Take off moves it back. The vehicle and driver are written on the challan.
Step 14: The weighbridge
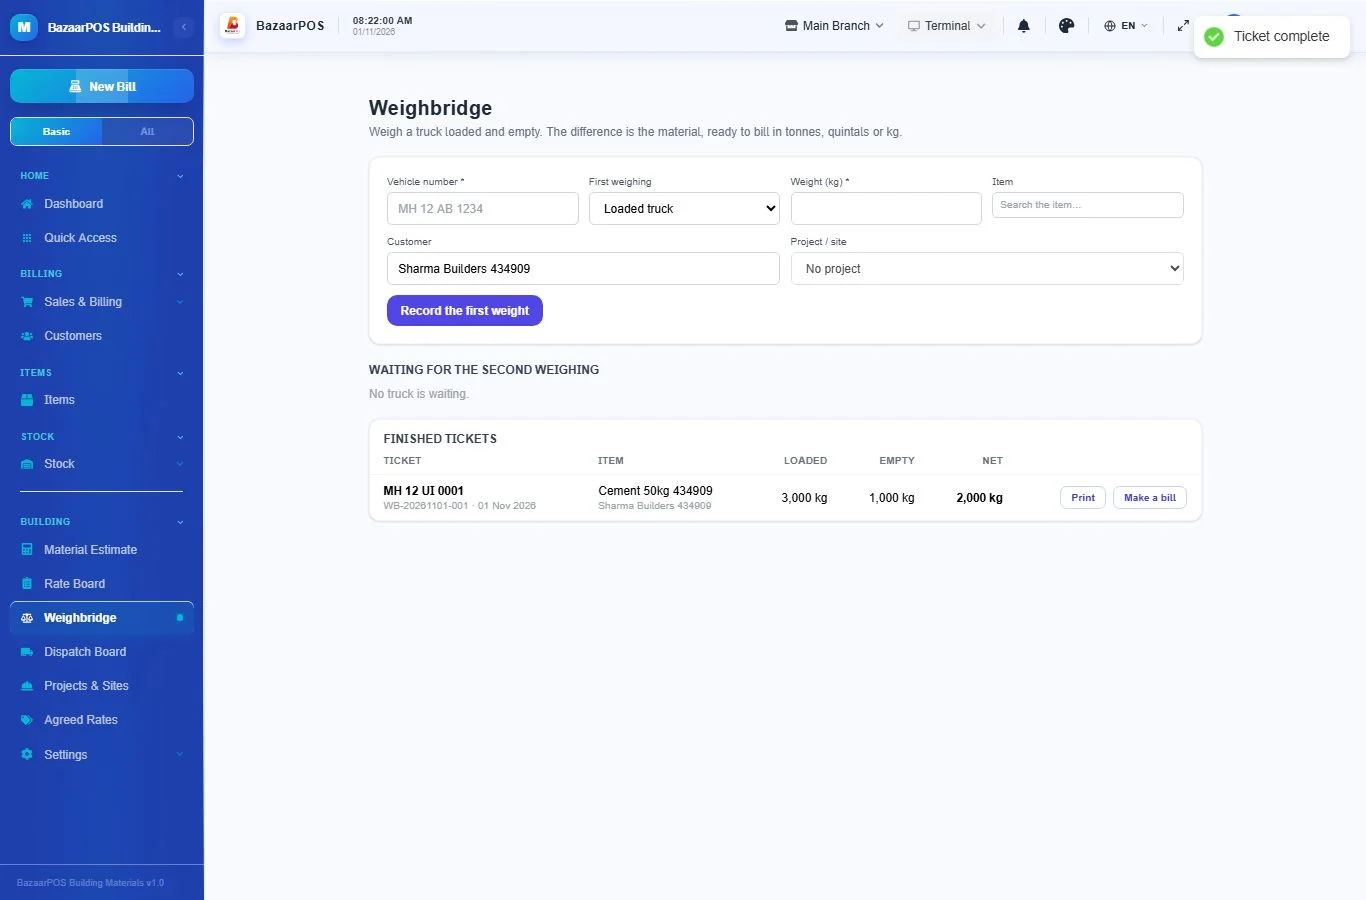
Open Building → Weighbridge. Write the vehicle number, choose whether the truck is loaded or empty for the first weighing, write the weight in kg, and optionally the item, the customer and the project. When the truck comes back, write the other weight next to its ticket and press Finish: the net weight is worked out. Print gives the ticket. Make a bill opens billing with the net weight as the quantity, in tonnes, quintals or kg as the item is sold. A truck can have only one open ticket at a time.
Also useful for a dealer
- Bulk prices and contractor price lists: see Bulk pricing.
- Credit limit, payment days and reminders: see Customers and Khata reminders.
- Items that must be ordered in: see Special orders.
- Scaffolding, shuttering and tools you rent out: see Rentals.
- Counting the godown: see Stock count.
- Supplier price changes: see Price update.
On the phone
The BazaarPOS phone app has a Building group in the Apps screen with Material Estimate, Rate Board, Weighbridge, Dispatch Board, Projects & Sites (with stages, materials and the late fee) and Agreed Rates. On the phone cart, the same building tools appear below the customer: pick the site, add freight, loading or unloading lines, and agreed rates are used automatically. To add a project or a rate on the phone, the customer and the item must already exist.
Which plan includes what
Building Materials comes in Basic, Advanced and Enterprise plans. A screen your plan does not include shows a message with how to upgrade.
- Basic: billing, items, customers, reports, freight, loading and unloading charges on bills, the building units, the Material Estimate and the Rate Board.
- Advanced: everything in Basic, plus Projects & Sites (with lots, the late fee and automatic linking of documents), Materials against the plan, Billing stages, Proof of delivery, the Weighbridge, loyalty, promotions, lay-by, stock count, special orders, rentals and customer advances.
- Enterprise: everything in Advanced, plus Agreed Rates, the Dispatch Board with your trucks, more than one branch and AI sales forecasting.